A couple of years ago, I returned home from a 15-day trip in the middle of a heat wave, and my apartment was way too hot—at least 45ºC (113ºF) inside. Needless to say, it wasn't the most comfortable way to come home, especially since it took several hours for my in-wall air conditioning (AC) units to cool the apartment.
I have two AC units in my apartment; one in the living room and the other in my bedroom. To minimize unnecessary power consumption, I'd turned off the AC units while I was away. After this experience, I decided it was time to find a way to control my AC units remotely so my apartment wasn't super hot when I got home (and I wouldn't risk damaging my computers because of the heat). However, my apartment's AC units don't have a thermostat, like most modern AC systems, that lets you set a temperature for the room. My units just have on/off switches, which meant I needed a thermostat.
My friends had been telling me about their home automation setups for a while, but I hadn't seen the point until now. Living in a small, one-bedroom apartment without sensors or networked appliances, I thought there was nothing I could automate. I realized automation could solve my apartment temperature issues. I started building my own thermostat, something that could read my apartment's temperature and adjust the AC unit based on it.
Hardware
First, I needed some hardware to read the temperature in the apartment and to control the AC units. I started with the control side since I figured dealing with a temperature sensor was the simpler issue. I started thinking about how I could remotely control my AC units. My first inclination was to tap into the existing controls with a microcontroller I could access over my home network.
The AC has only analog controls, a rotary selector switch for the mode and a potentiometer for fan speed, so it would be pretty easy to tap into that.
The AC units included with my apartment.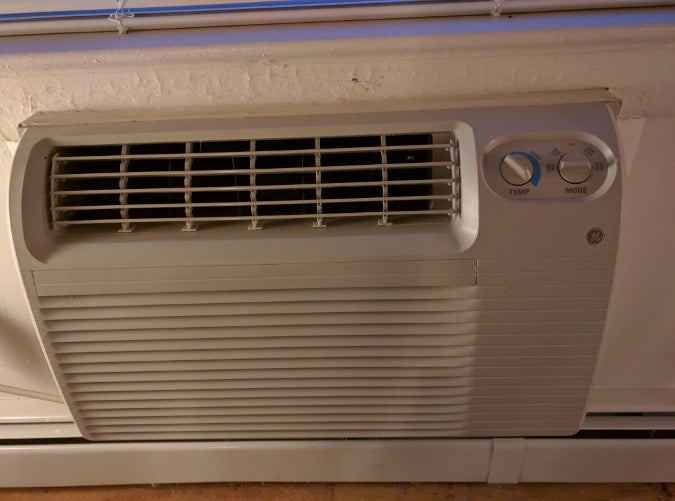
But I don't own the AC units—they are included with the apartment. I decided I probably shouldn't take them apart and solder wires into them, otherwise I'd probably have to buy the units when I moved out. This was definitely something I didn't want to worry about.
My next idea was to implement a form of robotic control to turn the dials on the AC unit. While this would have been really cool to see in action, it didn't feel like the most reliable option. The knobs have broken before, and I had to get replacements from the apartment complex. I felt that having something automatically turn the knobs was just asking for them to break again.
Then, I realized I don't need to control the AC dials—instead I can control the power to the AC units. I could leave the AC units in the on state and turn the power on when I need to cool the room and off when I don't. While I'd still have to adjust the mode manually when necessary, just controlling the power state met my needs. So, I began the search for a relay to control the power to the AC unit.
I had two constraints to consider that influenced my choice. First, based on my apartment layout and where the AC units are mounted in the walls, I wanted wireless control. While I could have run a wire to the AC units, wireless would be easier (especially in the living room, because there is nothing located near the AC unit). The second constraint was the relay needed to be rated for the load of the AC unit. I had to measure it with a clamp meter because there isn't a model number anywhere on the units, and I don't have any documentation for them.
Apartment floor plan showing location of AC units.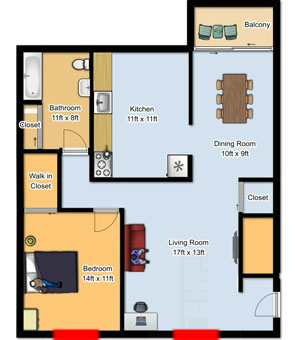
I started looking at the options for remotely controllable power switches. There are many different options on the market for Internet of Things (IoT) wireless communication protocols, but the most popular choices are Z-Wave and ZigBee. I used ZigBee devices in college and dealing with them was a real pain, so I wanted to avoid them.
My reading suggested the Z-Wave devices were easy to use and had a consistent ecosystem. My only hesitation with Z-Wave was that it's not an open platform. Some of its specifications are public, and there is an open source library for interacting with Z-Wave networks, OpenZWave, that also has Python bindings. While not ideal, it was likely I could any fix issues that arose. So I ordered a USB Z-Wave controller and two Z-Wave enabled power switches (one for each AC unit).
I still needed a temperature sensor; since I was already building out a Z-Wave network, I ordered a Z-Wave MultiSensor 6. It includes a variety of sensors—including temperature—in a small device. While I could have used another temperature sensor, this seemed like a good choice because it is portable and wireless and can be placed anywhere I want in my apartment.
Software
Next, I needed to look at software to use my hardware acquisitions as a thermostat. While all my devices were Z-Wave, and OpenZWave provides both C++ and Python interfaces I could use to access and control my devices, it was a bit too low-level for my taste.
Instead, I decided to use the Home Assistant project, for a few reasons. First, I know a bunch of people who use it, hack on it, or both. Second, while all my current devices are Z-Wave, Home Assistant will let me branch out to use other kinds of devices if I want. Home Assistant supports a ton of different devices and services—you can look at the component list to see them all. For Z-Wave support, it leverages OpenZWave and provides a higher level interface that is a bit easier to deal with. Home Assistant is written in Python 3, which is very convenient for me since I do most of my programming in Python. It also has an active community that has been responsive and helpful.
I installed Home Assistant on one of my servers and proceeded to configure its interface with my devices. There is a lot of detailed information available on setting up Home Assistant—you can refer to the official documentation for a starting point. For specific Z-Wave instructions, see the Z-Wave section in the Home Assistant docs.
After setting up Home Assistant, I had a single web interface and API for controlling my new power switches and displaying data from the MultiSensor. But, I still didn't have a thermostat—just a pretty interface (that I could use remotely) for manually turning the AC on or off.
First automation attempt
Home Assistant provides an automation interface that enables you to write rules that execute on a particular trigger from any device. After reading the docs on writing automation rules, I decided I could use this interface to build thermostat functionality. I proceeded to write up a bunch of rules like this one, which says if the living room AC unit is off and the temperature sensor reads above 25C, turn on the AC unit.
alias: 'Turn on Living Room AC when above 25 C'
trigger:
  platform: numeric_state
  entity_id: sensor.aeotec_zw100_multisensor_6_temperature_4
  above: 25
condition:
  - condition: state
    entity_id: switch.aeotec_zw096_smart_switch_6_switch_2
    state: 'off'
action:
  service: switch.turn_on
  entity_id: switch.aeotec_zw096_smart_switch_6_switch_2
This sort of worked, but there were several issues. The obvious one is I'd have to write a separate rule for every condition I thought the system might encounter. I would end up writing a lot of different rules (including separate ones for on and off). Also, if I wanted to change the thermostat's setpoint, I'd have to modify all the rules by hand and reload the automation configuration. Then there was the issue of reliability—if for some reason the rule wasn't triggered (either because of a state I didn't predict or a missed condition) there wasn't any transparency into why it didn't happen; I'd only know that the rule never ran its action. This left me in an odd place, as the approach I had envisioned wouldn't work.
Rather than getting too discouraged, I started looking through the Home Assistant source code and stumbled upon the perfect solution.
Thermostat component
It turns out Home Assistant already had a component implemented for basically my exact use case. Under the "thermostat" components (which have since been renamed "climate"), there is component named heat_control. This module was written to function as a thermostat with a temperature sensor and a power relay controlling a plug-in space heater. This enables users to set a temperature and have the heater turn on until it reaches the desired temperature, then turn off.
This was what I needed to do, except for air conditioners rather than space heaters. So I quickly threw together a patch to add support for using a cooling device instead of a heater. It added a config option to treat the switch device as an AC unit (or any other cooling device) instead of a heater.
After locally installing my patch and reconfiguring Home Assistant, I essentially had a thermostat. I also had a nice web interface to control the setpoint and view the AC unit's state.
The thermostat interface on a smartphone.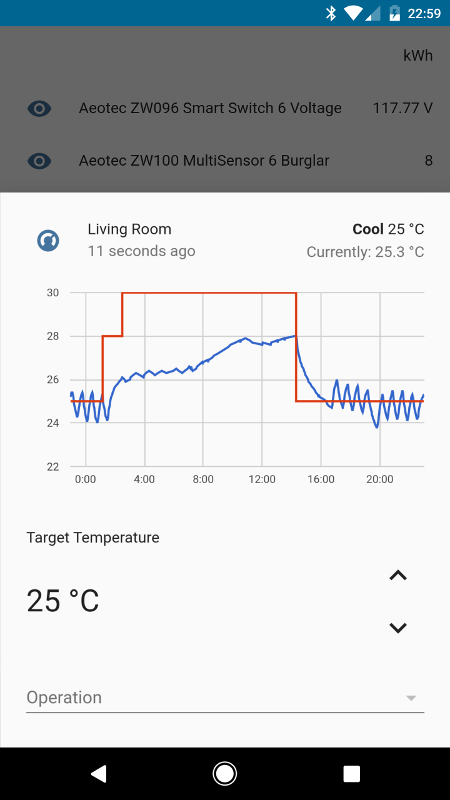
The thermostat interface in a web browser.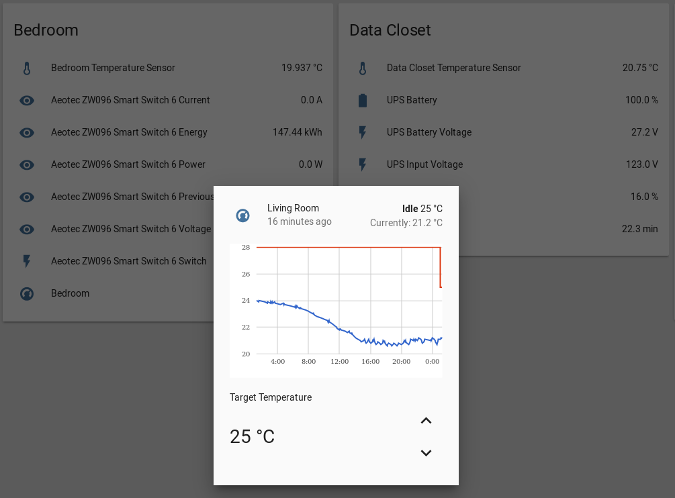
Since I pushed that patch, the heat-control thermostat module and the component type have been renamed generic thermostat climate component, which better describes its larger scope with the addition of AC support. With this component, I had succeeded at my initial goal, building a thermostat, and I even had a nice, mobile-friendly web interface to control the AC.
More problem-solving
At this point, I had a pretty cool setup. Home Assistant was acting like a real thermostat, and I could set a comfortable temperature for my apartment. But it still wasn't perfect.
Multiple zones
My first problem was that the single temperature sensor located in the living room was controlling both the bedroom and the living room AC units. As you can see in the following image, the rooms are different sizes. The AC units are identical, but the bedroom is significantly smaller than the living room, which means the bedroom was getting much colder than the rest of the apartment.
Apartment floor plan showing the bedroom area on the living room AC unit.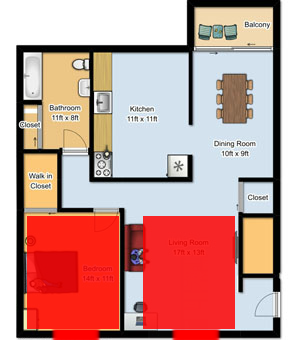
While I could have ordered another Z-Wave MultiSensor, they're kind of expensive and overkill for what I need. I also didn't have the same need for wireless control in the bedroom, because it already has networking cables for other machines. I also wanted two different readings—one in my bedroom and one in my bedroom closet, where I keep my servers and networking gear.
I remembered I had a spare Raspberry Pi 2 sitting in my closet, so I decided to leverage that by wiring a couple of temperature sensors into it and using it as my data source for the bedroom. After reading online about my options, I decided to use the DS18B20, a Dallas 1-Wire temperature sensor, which seems to be extremely popular with the Raspberry Pi crowd. (It helped that I had tinkered with the 1-Wire protocol in college, so I was somewhat familiar with it.)
Raspberry Pi 2 setup using temperature sensors.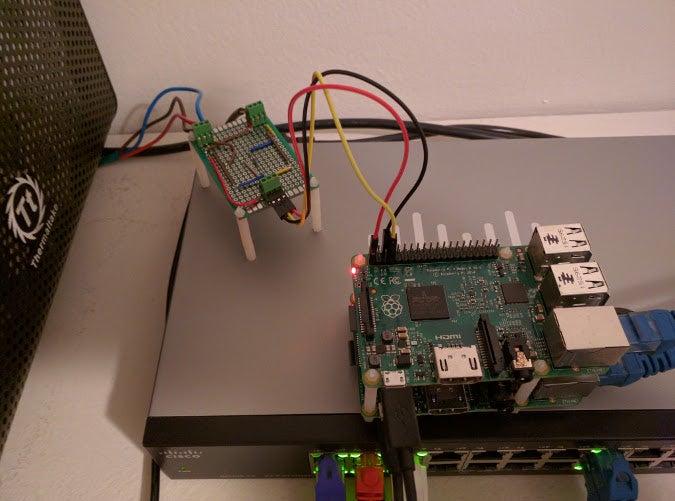
The nice thing with 1-Wire sensors is you connect everything in parallel. All the devices are individually addressed, so the daughterboard just wires the two sensors in parallel (with a pull-up resistor). With things connected to my Raspberry Pi 2, I had an interface to locally poll the temperature in my bedroom (and my "data closet"), but I needed a good interface for getting that data into Home Assistant, which runs on a different machine.
This led me to leverage the MQTT infrastructure I set up when I installed Home Assistant. I wrote a daemon to periodically publish results from an arbitrary number of Dallas 1-Wire sensors (and could work with other classes of sensors in the future). I added the new temperature sensors (using the MQTT sensor component) to the Home Assistant config and reconfigured the bedroom thermostat to use the new sensor, so now I have two individually controllable thermostat zones and temperature readings for my closet and bedroom.
Cycle times
After running the multi-zone setup for a few days, I discovered another issue, something I had never thought about: I was short-cycling the AC units. In other words, as soon as the room hit the desired temperature, it would immediately power the switch, which caused the AC unit to turn on and off in two to four-minute cycles. This didn't seem right to me.
Graph showing the short cycling of the air conditioners.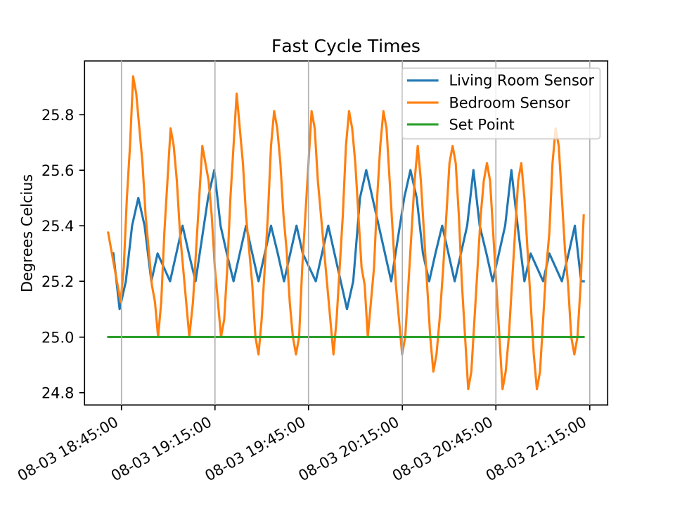
After doing some reading on AC units (and going a bit too far into the weeds—like finding ASHRAE papers from the late '80s exploring the effect of cycle times on various HVAC systems), I learned that AC units are most efficient at steady state and much less efficient the first few minutes after you turn them on. The behavior of my software thermostat was far from ideal.
I needed to add some hysteresis (in other words, a fudge factor) to the system so I wasn't constantly cycling the units. One way a thermostat does this is by adding a bit of hysteresis around the set temperature, so instead of switching at exactly the set temperature, it waits until it passes it by a couple of degrees. Another way is to set a defined maximum switching frequency, which sets an upper bound on how frequently the unit will cycle on/off in a room. This wasn't part of the original heat-control module, so I pushed out another patch in Home Assistant that added an option to set a maximum switching frequency.
The new option sets the minimum cycle duration, which I think makes it a bit clearer to understand than describing it as a frequency (which you'd want to express in µHz since normally you are dealing with frequencies of once per several minutes). Since I committed that patch, others have added options for hand-tuning the thermostat's switching behavior. This option allows me to set how frequently Home Assistant will cycle the power on my AC units. I set it to wait at least 20 minutes before switching, mostly because that seemed like a sane value. Since I don't have my AC units' model number, I don't have access to a datasheet or specifications for them. Therefore, I don't know what their efficiency curves look like, so I had to guess what a good value would be.
Graph of the corrected cycle times.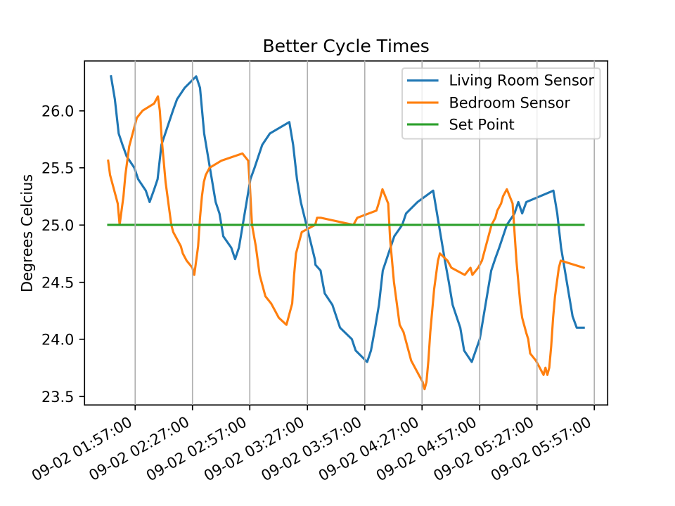
Taking it up a notch
Now that I'd achieved my initial goal, I decided to have a bit more fun and take the project even further. Since I built my thermostat with a home automation platform, it was very easy to tie it together with other devices and inputs.
Location-based settings
I decided to tie it to my location data since I carry multiple networked devices most of the time. Using the OwnTracks project, I had my phone periodically phone home and tell Home Assistant my location. OwnTracks uses MQTT, but it allows me to control my data (and encrypts data traffic with TLS), so my location data isn't sent to a third party's system. It also integrates nicely into Home Assistant using the latter's OwnTracks component. This enabled me to write automation rules to change the AC unit's setpoint based on whether I was home or not.
I was also able to write rules like this:
alias: Set Living Room AC to 26 C when leaving starbucks route 9
trigger:
  platform: state
  entity_id: device_tracker.myphone
  from: 'Starbucks Route 9'
action:
  - delay:
      minutes: 5
  - service: climate.set_temperature
    entity_id: climate.living_room
    data:
      temperature: 26
It says when I leave a local Starbucks (where I sometimes work when I need a break from my home office), wait five minutes and change the setpoint to a more comfortable temperature. The five-minute delay is based on the time it takes me to get home from Starbucks and how long it takes to cool down the apartment on a hot day.
Environmental conditions
As I used Home Assistant, I realized I owned other devices I could tie into the system. I wrote more automation rules to combine them with my thermostat in different ways, such as:
alias: Turn off AC when it's cold outside
trigger:
  platform: numeric_state
  entity_id: sensor.pws_temp_c
  below: 22.0
action:
  service: thermostat.set_operation_mode
  entity_id: thermostat.living_room
  data:
    operation_mode: off
This checks Weather Underground and turns the AC off if it's below 22ºC (72ºF) outside because at that temperature I should just open a window instead of running the AC. I plan to add push notifications to this rule so Home Assistant will send my phone a notification to remind me to open a window.
alias: Raise volume when AC turns on
trigger:
  platform: state
  entity_id: switch.aeotec_zw096_smart_switch_6_switch_2_0
  to: 'on'
conditions:
  - condition: state
    entity_id: media_player.living_room_av_reciever
    state: 'on'
  - condition: template
    value_template: |
        '{{ states.media_player.reciever.volume_level < 0.7 }}'
action:
  service: media_player.volume_up
  entity_id: media_player.living_room_av_reciever
My favorite rule governs when I'm watching TV or listening to music in my living room. My AC units are very loud—often louder than my speakers. When my speakers are below 70% of max volume when the AC unit turns on, the rule automatically raises the volume a couple of steps so I don't have to manually adjust it.
I'm very happy with this system. I accomplished everything I set out to do: provide temperature control when I'm away so my apartment isn't ridiculously hot when I come home. But it has also been a gateway into playing with home automation, which has become a fun hobby.




4 Comments