Dolphin has been the default file manager for the KDE desktop since Fedora 10. Other distributions that use KDE as a desktop option also use it as their default file manager. It's very powerful and provides some very advanced features.
The purpose of a file management application like Dolphin is to enable users to locate specific files and open, delete, copy, or move them. Dolphin and other file management programs also allow you to organize your files by moving or deleting files and entire folders.
As a very organized Virgo myself, I like this aspect of Dolphin.
Getting started
Installing Dolphin
If Dolphin is not already installed on your Linux host, you can use the following command for RPM-based distributions:
yum -y install dolphin
For Fedora 21 and later, you use the dnf command, which replaces yum for package management.
Launching Dolphin
Dolphin can be launched directly from the KDE 4 desktop; simply click on the folder icon with the house in it. Dolphin can also be launched from the KDE Kickoff menu; it's one of the default items in the Favorites tab of the menu.
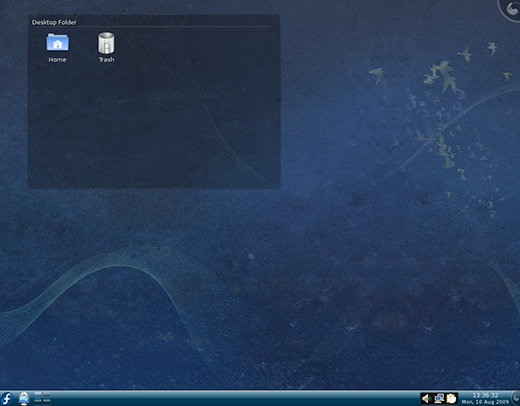
The default Dolphin window
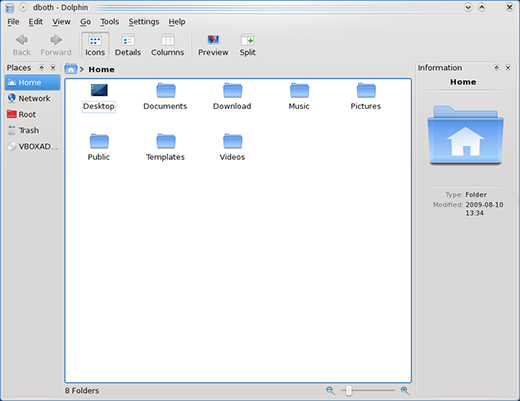
This configuration is easy for beginners to understand, but Dolphin is highly configurable and its rich feature set can be made easily available to the most advanced users.
Like Konqueror, Dolphin can be used to browse through the file system and locate files and directories (folders). Files can be opened in various applications, deleted, moved to other locations, and copied. Unlike Konqueror, which can also be used as a web browser, Dolphin can only be used as a file manager.
The Dolphin interface

Figure 3 shows two workspaces, but by default there's only one. Using two workspaces allows you to easily drag files from one to the other to move or copy them. Files and folders can also be moved or copied by dragging them from the workspace to a folder shown in the Places or Folders panels.
Menu bar
The Menu bar contains drop-down menus that allow access to all of Dolphin's features and functions. This includes things such as choosing which panels are displayed, configuring the toolbars to show additional icons, and configuring the overall functions of Dolphin.
The View > Panels menu allows you to specify which of the panels you wish to have displayed; this is where you can place a checkmark next to the Folders panel so that it will be displayed.
Toolbar
The Toolbar is the row of icons just under the Menu bar. It provides ready access to many functions of Dolphin. You can configure the Toolbar to contain the icons for the functions you use most.
Location bar
The Location bar shows the path to the folder(s) being viewed in the workspace(s). Note in Figure 3 that there are two styles that can be configured. The style of the Location bar on the left is a standard text entry field where you can type the complete path to a folder and it displays the path in command line interface style to the directory displayed in the workspace.
The Location bar for the workspace on the right side of Figure 3 is a new "breadcrumb" style in which each folder (directory) in the path is displayed as a button. You can click on any folder button in the path to navigate immediately to that folder. Once you do so, however, the buttons for the deeper levels of the directory tree are no longer displayed. The deepest level of the tree shown is the one currently displayed in the workspace.
The panels
The Places and Folders panels on the left side of the Dolphin window allow you to navigate to various locations.
These panels can be moved to other locations on the Dolphin window. Grab the title bar of the panel you want to move and drag it to another location in the stack of panels or move it to the opposite side of the Dolphin window. In some versions of Dolphin, the panels can also be dragged out to the desktop and undocked from the Dolphin window completely. Notice that the Folders and Places panels are stacked and that you can use the tabs to select which panel you want to interact with. Stacking the panels like this can allow you to use your valuable screen real estate more effectively.
Clicking on the diamond icon, if it exists, also undocks the panel and moves it out to the desktop. Clicking on the diamond icon while the panel is undocked redocks it back into its previous location in the Dolphin window.
Any panel can be removed completely by clicking on the X button in the upper right corner on its title bar.
Places panel
The Places panel is a configurable list of folders and other places such as permanent and removable drives to which you may need to navigate. To add a new place to this panel, simply drag the folder from a workspace to the location you want it in the Places panel. You can move items in this panel by dragging them up or down in the list.
The Places panel is not hierarchical. It is a single layer of places. I typically add places to which I frequently navigate. To navigate to any of the folders in the Places panel, just single click on one.
Folders panel
The Folders panel is somewhat similar to the Places panel in that it allows you to navigate to folders displayed in it. This panel, however, is a complete directory tree of the entire file system. This tree cannot be changed, as it reflects the exact current state of the file system. What you can do with the Folders panel is click on a folder to display its contents in the active workspace. You can drag and drop folders and files from the active workspace to any folder displayed in the Folders panel to move them to that target folder. You can also drag and drop folders from one place in the Folders panel to another in order to move them.
The Folders panel does not display files. It only displays folders. Files are only displayed in the workspace.
Information panel
The Information panel displays information about the currently selected file or folder, or the file or folder over which the mouse pointer is hovering. If the file is a document or graphic of some type, Dolphin will try to display a preview of it. In Figure 1 you can see the preview of the PDF document selected in the right hand workspace.
Other information displayed in the Information panel are the size and type of the file as well as the last time it was modified.
If Dolphin cannot display a preview of the file, it will display an icon representing the type of file it is.
Filter bar
The filter bar allows you to type in a name or file name extension and filter the display so that only files and folders whose names match the typed string of characters are displayed. The Filter bar also accepts some regular expression characters such as the period (.) to denote that any character can occupy a place in the text string. Note that this string is not case-sensitive.

Figure 4 above shows the results of using the Filter bar in the left workspace. Other than the fact that I have typed a string in the Filter bar, this is the same directory (folder) as in Figure 3. In Figure 4, I typed the string "d.v" so that only files which have the characters "d" and "v" but separated by a single place which can be any character at all. In this case the files now displayed include the strings "Dav", "dav", "dev", and "drv". The period (.) in the filter string I typed stands for any character. Two periods means any two characters. This is called a regular expression and it provides the ability to make very specific yet flexible matches with a single matching string.
Other regular expressions you can use might look like "d[ae]v", in which case the results would contain only files with the strings "dav" or "dev" but not "drv" or any other string in which "d" and "v" are separated by any other single character besides the specified "a" or "e". The square brackets represent a single character place in the string, but the (in this case) two characters within the brackets represent the characters allowed in that position. So "d[ae]v" is a three-character string, but only "a" or "e" are allowed in the second position.
You don't have to use regular expressions. You could simply type "dav" in the Filter bar to display only those files which have the specific string "dav" somewhere in their names.
Regular expressions can be very complex, and there are entire books written on using them. Needless to say a complete discussion of regular expressions far exceeds the scope of this document.
Note that it is possible to configure Dolphin so that the Filter bar is not displayed. If you need to add or remove the Filter bar, you can do so. See the section Configuring Dolphin for details on adding or removing the Filter bar.
Status bar
The Status bar is located at the bottom of each workspace. It displays information about the selected file or folder. If no objects are selected, it contains information about the folder that is being viewed in the workspace. This can be the total number of files and folders contained in the folder being viewed and the total disk space used by the objects in the folder.
Workspace
Last but not least, we have the workspace, the center of your interaction with Dolphin. The workspace displays the files in the folder you are viewing. You can have one or two workspaces. The default is one, but it is easy to add the second. On the Toolbar, locate and click on the icon of two workspaces with a green plus sign (+) on one side. This will add the second workspace. If you hover the cursor over this icon, the tooltip says "Split."
![]()
Note that the background color of the current, active workspace (the one you're working in), is lighter than the background of the inactive workspace, which is shaded a little gray. To close the active workspace, locate and click on the icon in the Toolbar that has two workspaces and a red minus sign. The previously inactive workspace now fills the window and becomes the active workspace. Hovering the mouse pointer over this icon shows a tooltip that says "Close."
The Dolphin toolbar
The Dolphin Toolbar, like the Toolbar for any application, provides a focal point for easy access to features and functions. All of the functions that can be accessed using the Dolphin Toolbar can also be accessed using the menus in the Menu bar. The Toolbar reduces the number of clicks required to do so.

Figure 6 shows a Dolphin Toolbar that has been somewhat customized with additional buttons. Your Dolphin Toolbar will almost certainly look different from this one in that it will have either the default set of buttons or the ones you prefer if you have already modified it. These icons represent the features which I find most useful to which to have ready access. Let's discuss each in order from left to right.
Create New
The Create New button allows you to create a new folder, text, or HTML file or link to a device, file, or folder. It creates this new object in the currently active directory, i.e., the active folder the active workspace. Click and hold this button to display the context menu that provides these choices.
Delete
The Delete button permanently deletes any and all selected objects in the active workspace. In Figure 6, the "X" in the button is greyed out because nothing is selected. When a deletable object is selected, the "X" is red. Simply select the files, links, and folders you want to delete and click on this button.
Warning: Objects deleted with the Delete button are permanently deleted. They can not be recovered.
Folders
The Folders button is a toggle, that is, it toggles the Folders panel on and off. When clicked once, it causes the Folders panel to be displayed and the button remains depressed. When clicked again, the button is raised and the Folders panel disappears. Notice in Figure 6 that the Button is depressed.
Navigation: Up, Back, and Forward
The Navigation buttons allow rapid navigation between certain folders.
Clicking the Up button, which is not on the Toolbar by default, takes you to the next level up on the directory (folder) tree. Clicking the Back button takes you to the directory that was previously the current active directory. If you click the Forward button after clicking the Back button, it takes you forward to the directory you just left.
Home
The Home button will always take you to the folder specified in the Dolphin configuration as the Home directory. See Configuring Dolphin for details of setting the desired location.
Reload
The Reload button forces Dolphin to reload the information for the current folder. Thus if a file has been added to the folder, deleted, or modified, the change can be forced to show up. Most of the time changes are updated by Dolphin automatically because some underlying daemons (background programs) look at each folder and send update notifications programs that are working in or monitoring those folders, such as Dolphin.
New Tab
The New Tab button opens a new tab in the workspace panel of Dolphin. See Figure 3 on the page, Configuring Dolphin. This affords more flexibility in navigating and managing files. It is like tabbed browsing in the Firefox web browser. They both allow you to have multiple locations open simultaneously in only a single instance of the program.
Delete Tab
This button allows you to delete the currently active tab. Other tabs are left open. If there is only one remaining workspace tab, the tabs will no longer be displayed. It is not possible to delete the last remaining tab.
New Window
The New Window button launches a new instance of Dolphin. It's possible to copy and move files and folders from one Dolphin window to another. This is another flexibility option that gives you the ability to work in whatever way is comfortable for you.
Views
The three Views buttons are designed to display the contents of folders in different ways, again giving you the option of viewing things in a way that is most meaningful and useful for you or in a particular situation.
![]()
The leftmost of these three buttons is the Icon view. This is just display of the icons in left-right rows. Where possible, the files are shown as previews rather than icons. The left workspace in Figure 3 shows the icon view.
The middle button in Figure 2 is the Details view. This is a vertical listing of each folder and file in the displayed folder and includes information such as the file size, type, date created or last modified, permissions, and the owner of the file. Many of the columns are not shown in Figure 8 below, but you can slide the horizontal scroll bar to see the other columns.

Preview
The Preview button turns the preview feature on and off. Previews show the first page of a document or a small thumbnail view of a graphic. Having this enabled takes memory and CPU cycles, so it can be a drag on the performance of systems with slow processors or small amounts of RAM. In such instances, you may want to disable previews.
Split/Close
![]()
The Split icon (the one with the green plus sign) is shown when there is a single workspace in a tab. Clicking on this button splits the workspace into two. Figures 3, 4, and 8 show a split workspace. When the workspace is split, the Close icon with the red minus sign is displayed. Clicking on the Close button closes the active workspace.
Zoom
The Zoom icons (one for zoom in and one for zoom out) increase and decrease the size of the icons or previews in the active workspace. This is the same function as the zoom slider at the bottom of the right-hand workspace in Figure 9, above.
Configure Toolbar/Configure Dolphin
These buttons open the windows to configure the Toolbar and to configure Dolphin, respectively. Refer to Configuring Dolphin for details on configuring Dolphin and the Toolbar.
Dolphin Handbook
This button opens the Dolphin handbook, which is a very nice set of instructions for using Dolphin.
About Dolphin/About KDE
These two buttons open small windows with a little bit of information about Dolphin and KDE respectively. This information is the version number and the author(s) as well as some other tidbits.
Exit
Just what its name implies, this button exits from Dolphin and closes it.
Configuring Dolphin
Dolphin is highly flexible and can be configured to meet almost any needs pertaining to filesystem navigation and file management. The major aspects of configuring Dolphin include the icons on the Toolbar, the tools available in the user interface (UI), and how Dolphin acts in certain specific circumstances.
Configuring the toolbar
The Dolphin Toolbar is the row of icons just under the Menu bar. It provides ready access to many functions of Dolphin. You can configure the Toolbar to contain the icons for the functions you use most.
![]()
The Dolphin Toolbar in Figure 10 will probably not look the same as yours. I have added several icons to this one that are not in the default configuration.
Adding icons to the Toolbar is quite easy. Using the Menu bar choose Settings > Configure Toolbar and the Configure Toolbars window is displayed as shown in Figure 11.

Simply drag the tools (icons) you want from the Available Actions side on the left to the Current Actions on the right. Drop them where you want them in the sequence. Once the icons are on the right side, you can change their position by dragging them up or down in the list. You can click on Apply to make the changes and keep this window open, or click on OK to apply the changes and close the window.
To remove a tool from the Toolbar, drag it from the Current Actions panel to the Available Actions panel and it will automatically be placed in the correct alphabetical order in the list.
The tools I find most useful that are not on the toolbar by default are the following:
- The Up button, along with the Back and Forward buttons, allows you to navigate the directory tree structure. The Up button always takes you to the next higher directory level, while the Back button takes you to the previously viewed directory. The Forward button takes you to the directory that you just left.
- The New Tab button allows you to add a new tab to the workspace so that you can have more flexibility in the number of folders (directories) you can work with simultaneously. Note that you can drag a file or folder from the visible tab to the background tab ("LinuxBook" in Figure 3) and drop it there and move or copy the object to the directory named on the background tab.

Dolphin preferences
The Dolphin Preferences menu (Menu bar > Settings > Configure Dolphin) allows you to configure the basic look and behavior of Dolphin.

Startup
The Startup tab provides configuration for the default folder Dolphin is to display when it is first launched. The Documents folder in your home directory is a good place to start and should be the default setting already.
You can also specify that Dolphin starts in Split View with two workspaces instead of the default one. The editable location bar allows you to edit the path displayed in the location bar to move directly to a new folder to display. Otherwise you can navigate using the various panels, the icons on the toolbar and the workplaces themselves.
View Mode
The View Mode tab allows you to define the visual characteristics of each of the three viewing modes, as well as some general properties that apply to all views. The General tab allows you to specify whether all folders are to use the same viewing properties, which I like because I prefer the Details view for viewing all folders. The other option remembers a specific set of properties for each folder when you change them. For example, you may want your basic home directory (folder) displayed in the default Icons view, but a directory filled with many files to be displayed in Details mode.
The primary attributes that can be changed in each of the three view modes are the fonts and their size, the icon sizes and the size of document previews when they are shown. The Icons view also has options to define whether the grid arrangement is arranged in rows or columns.

You must press the OK or Apply buttons to make the changes you have selected.
Basic tasks
Navigating the file system with Dolphin
The term "navigating the file system" is a fancy way of saying that you are moving from one folder (directory) to another to locate and manage files or other folders.

Using Dolphin to navigate the file system is quite easy. The Dolphin interface contains a number of elements directly related to the process of file system navigation and locating files you need to find so that you can work with them:
- Location bar
- Places panel
- Folders panel
- Filter bar
- Workspace
Displaying files
There are a number of options for how the files are displayed. The default view is Icons, where you simply see the icons of the objects and their names. The difference between the Icon view and the Columns view is that the columns view lines up the icons in one neat column.
The Details view shows more information about the files and folders such as their size, when they were last modified, who owns them, the file type, and the who the owner is. Using this view could tell you that the reason you cannot edit a file is that it does not belong to you and the permissions are set to disallow anyone but the owner of that file from changing it. Only the owner of the file or the root user can change the permissions of a file.
See the document Linux and Security for more information on file ownership and permissions.
You can choose from among these options using the Menu bar or the icons on the toolbar. To use the menu bar, select View > View Mode and then Icons, Details, or Columns. I personally prefer the Details view because of the additional information it provides me.
Opening a file with an application
Generally you can just use a single left click on a file such as an OpenOffice document or a Word document or a spreadsheet to open it in the appropriate application. If this works as you want it to, then you need do nothing else.
However this is not always the case. In some instances the wrong application is used—at least wrong for what you want to do with the file—or no default application has been specified. You can also right click on the icon of the file you want to open and get a context menu that offers some additional options.

In Figure 16 you can see the context menu shows multiple applications that you could use on this file. The one at the top is the default. Because Okular is only a viewer, you may want to open the file with OpenOffice Writer in order to edit it. Simply right click on the file, click on Open With, and select OpenOffice Writer.
You can easily change the default application to use with any given file type, or add a new one. See the section Configuring Dolphin in this document for details of how to do this.
You can also use the context menu to move, copy, and delete the files.
Selecting files
You can select multiple files to open, move, copy, or delete. There is no need to do those things one file at a time. To select all of the files in a sequence, click on the file at the top of the list in the workspace, then hold down the Shift key and click on the bottom file in the list. All of the files in between will also be selected; then you can perform the same operation on all of them.
You can also select a number of files that are not contiguous in the list. Select the first file, then hold down the Ctrl key and use the mouse to select the additional files you want to manipulate.
Selecting any one of the previously selected files deselects all the others, or you can use hold down the Ctrl key and click on selected files to deselect them. Clicking on any unselected file without holding down either the Shift or Ctrl keys deselects all the other files and selects the one on which you click.
Moving and copying files
After having selected one or more files, you can move or copy them to other locations (folders). Simply locate the target directory, i.e., the directory (folder) to which you want to move or copy the files. You can use either the Folder Panel, the Places panel, or the second workspace. Then drag the selected files to the new folder and drop them. A pop-up menu appears and you have to select whether you want to move or copy the files; select move or Copy and the operation proceeds. You can also choose to cancel the operation.
There is a fourth possible operation, which is to create a link in the target folder to the original file. This means you only have one copy of the file but the link in the target directory allows you to manipulate it just as if it were actually in that directory. This allows you to have the same file available in multiple folders, but not have to worry about keeping them all up to date when you change it.
Conclusion
As the default desktop GUI file manager for KDE, many people encounter Dolphin and never explore it beyond the bare minimum necessary to perform the most basic file management tasks. I hope this article has provided you with some insight into the many powerful features available in Dolphin. And, that it enables you to more fully utilize this very capable tool.






16 Comments