Users of vector-based applications have long implemented a technique by importing a photograph and tracing over it in order to create a vector graphic. Inkscape is no different. If you feel unable to do freehand drawing, here's a technique for you!
For the purpose of this demonstration, I’m using Inkscape for Linux Mint. This tutorial assumes that you have previously worked with Inkscape and know the basics for how to use it.
How-to guide
First, you’ll need a photo that you’d like to make into a vector graphic. For this tutorial, I’ve decided to use a photo I downloaded from the Internet of two dogs who are Internet celebrities: Boo (known as “The World’s Cutest Dog”) and his friend, Buddy.

Now, open your copy of Inkscape (see image of this).
Check the right hand side of your screen and make sure that you have at least the following pallets opened: Layers and Fill and Stroke.
Go to the menu at the top, select File then Import.
Select the photo of your choice. For best results, make sure your photo is either a .gif, .jpg (or .jpeg), or .png format.

Using the Pen tool, start tracing over the photo. My method is to build up the photo gradually in layers while putting each separate color in its own Layer. So, I started with the white color and made a separate Layer for that.
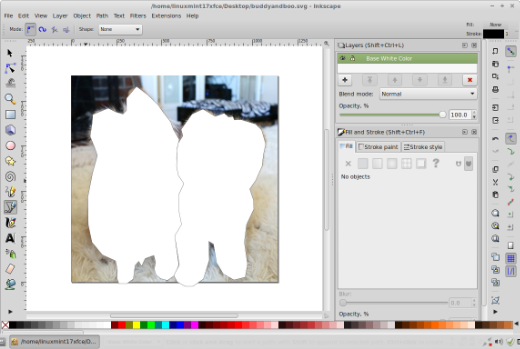
Once I finish the Base White Color Layer, I create a new Layer and call it Brown Patches. I trace over the brown parts of the dogs while hiding the Base White Color Layer in order to help me see what I’m doing better. (You can hide various Layers by clicking on the eye icon located on each Layer in the Layers pallets. The eye icon is located to the left of the name of the Layer.) Once I finish the Brown Patches Layer, I view both layers I’ve worked on so far.
Now it’s time for me to add another Layer called Light Brown Patches. In order to make my tracing with the Pen tool easier, I hide the Base White Color Layer while keeping the Brown Patches Layer visible. Here is the graphic with all three Layers visible.
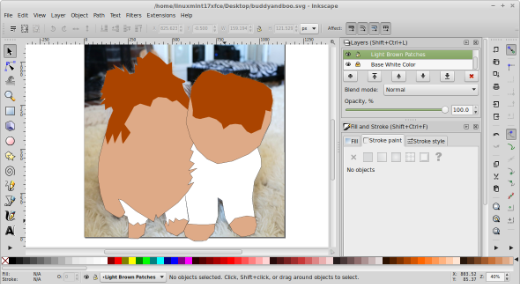
Now it’s time to create a new Layer called White Faces. I hide the other three Layers while I’m tracing over the dogs’ faces. Here is what the graphic is like with all the Layers visible. I then create another Layer called Eyes, Noses, and Mouths. I hide all the other Layers while I’m tracing over the dogs’ eyes, noses, and mouths. This is what the picture looks like with all the Layers visible.

Finally, it’s time for me to add some fur details in order to relay the impression that these dogs are very fluffy and furry. So, I add another Layer called Fur and using the Pencil tool, I draw lines that suggest lots and lots of fur.
Now that I have finished with drawing the two dogs I can choose to either trace over the background or delete the Layer that had the original photo and just leave the background empty. The latter is what I do, and now I'm done.
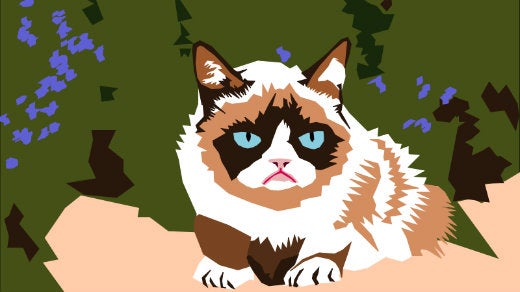
I can export it in the file format of my choice and upload it online in a variety of places, like on OpenClipArt. You can do this to an infinite amount of photographs—here are some examples of my work. I even did a graphic called Singing Geek, which was based on a still from a video that my friend and Opensource.com Community Moderator and writer, Phil Shapiro, created called "Oh, Metadata." The graphic arose from a joke wherein Phil admitted his fascination with Inkscape and Twitter, so I drew him in Inkscape wearing a Twitter sweatshirt.
Legal issues
Under the Fair Use laws in the United States, you can use anyone’s photos without permission for practice or personal use as long as you have no intention of making a profit from your work with them. It’s another matter, though, if you trace over someone else’s photo without permission from the original copyright owner (usually the original
photographer) and then you attempt to make a profit from the image by deriving prints (or other arts and crafts) from it.
Basically, if you’re going to trace a photo in Inkscape to make a profit from the creation/artwork, make sure that you’re using your own photograph, and if you want to use someone else’s photo, you will need to get permission from the original photographer before you do anything. Or, someone else's photo may be licensed via Creative Commons and allow you to modify and use it, without contacting them.




Comments are closed.