

In last month's article, we learned the finer points of exporting video for a sound mix. If you're at the point of a sound mix in your production, you should have these assets:
- Reference video, preferably with time code burn-in.
- One sound file per audio track used in your video editor.
As long as you have those ready to go, you're ready to mix.
For every season, a sound editor
There are several sound editing applications for Linux. Certainly the one everyone knows about is Audacity; its intuitive interface (if you know how to use a word processor, you know how to use Audacity) and effective simplicity makes it one of the go-to sound applications on any platform. There may be sound editors with prettier interfaces, but that doesn't change the fact that Audacity just works, and its results can be professional-quality.
There are good practices when using Audacity just as much as there are with any other application; remind me sometime to write an article about how to use it efficiently.
But as good as Audacity is, there are other sound editors better suited for serious sound work. So many of them are so good, in fact, that it's hard to recommend one over the other; the ones that come immediately to mind are Ardour, Qtractor, and MusE. For quick-starts on each of these applications (and more), visit Slackermedia.
I'm going to give a quick overview of Qtractor here because it's the one I've used the most.
JACK
The most important thing when doing sync sound with video is the "sync" part. You can be a brilliant audio engineer and mixer, but if you export your work and it is out of sync with the video, it's useless. To keep everything exactly in sync, Linux uses JACK.
The simplest way to start JACK is to launch it directly from a terminal. The basic command:
$ jackd --realtime --driver alsa --midi seq --playback hw:0
Most of that is fairly self-explanatory; the JACK daemon (jackd) is launched as a [near] real time process, using the standard Linux sound system ALSA. Less intuitive is the playback device, which in my example is set to hw:0.
Don't panic; these are just abbreviations for card numbers as seen in
$ aplay -l | grep card
or
$ cat /proc/asound/cards
For example:
 $ aplay -l | grep card
 card 0: SB [HDA ATI SB], device 0: ALC887-VD Analog [ALC887-VD Analog]
 card 0: SB [HDA ATI SB], device 1: ALC887-VD Digital [ALC887-VD Digital]
 card 1: NVidia [HDA NVidia], device 3: HDMI 0 [HDMI 0]
 card 1: NVidia [HDA NVidia], device 7: HDMI 1 [HDMI 1]
 card 3: Loopback [Loopback], device 0: Loopback PCM [Loopback PCM]
 card 3: Loopback [Loopback], device 1: Loopback PCM [Loopback PCM]
At first blush, that looks like a lot of confusing data but in fact it's mostly excess. You are not using a loopback device (just trust me; you're not), and you probably know whether you want to play over HDMI or Analogue (1/8th inch mini-jack) speakers or headphones. In this case, I'm using headphones, so the soundcard device I'm using is labelled card 0 or, for JACK, hw:0 (it would be hw:1 were I using HDMI).
Depending on your system setup, the results of that output might be different than my example, but if you stay calm and look at the physical computer, take an assessment of what hardware it has available, and then look at what you OS identifies, you should be able to figure it out.
JACK without the Effort
If all that just confuses you, then you should try QJackCtl, a simplified frontend for starting and stopping JACK. If you're new to Linux or you're experiencing problems getting JACK to work, QJackCtl might just do a lot of the heavy lifting for you.
To start JACK with QJackCtl, click the Start button.
Told you it was easy.
Hooking into JACK
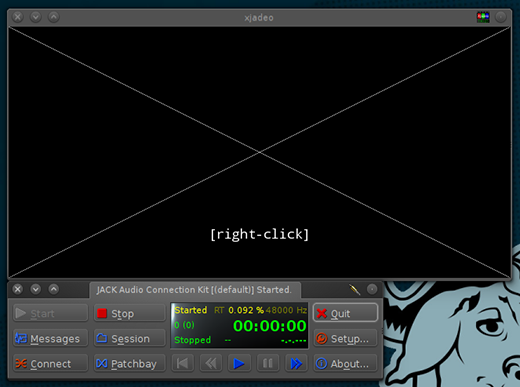
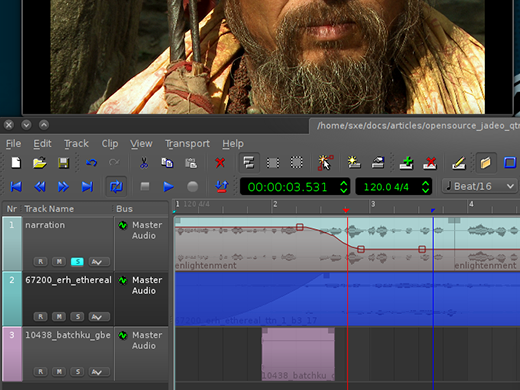
Once JACK is running, you can launch Qtractor. Once launched, Qtractor automatically uses JACK as its clock source. Xjadeo may or may not detect JACK, depending on when you launch it, so to confirm that it is syncing with JACK, right-click on the XJadeo screen and choose Sync > JACK.
Now when you play sound in Qtractor, the video plays along, or when you play video in Xjadeo, Qtractor plays along.
Qtractor Quickstart
Before you do anything, save your project. Yes, File > Save a completely empty project; this helps establish where all of the important data gets saved to, so save first and start work once you have a location reserved on disk.
Next, import the sound files that are supposed to accompany the video. The logical starting point are the rough audio tracks that you exported from your video, then add in any extra foley, effects, or music. To import sound files into Qtractor, select Clip > Import or just drag and drop sound files from your file manager into the Files panel in Qtractor (if the Files panel is not open, bring it up with View > Windows > Files).
The big empty space in the middle of the Qtractor window is, in film editing jargon, the timeline. That's where your sound tracks go; to add a track, just drag it from the Files panel and drop it in place at 00:00:00.
Keep adding your sounds tracks as required. Since you exported all tracks beginning from 00:00:00:00, as long as you position them all at 00:00:00 in Qtractor, they will all start in sync and stay in sync for the duration of your project.
The mix
The film and television industry has basically settled on guidelines for how loud sounds should be so that it can be reasonably expected that when users (they call them "audiences" in the biz) turns on a show, they can set the volume, set the remote control aside, and be able to hear everything as the sound mixer intended. That is, the dialogue should be easy to hear, soft noises like crickets or drones should not interfere or distract from the important sound, and loud noises are appropriately surprising but not so loud that it literally blows out the speaker.
As with colour mixing, the baseline for your sound mix should be the humans; that's what your audience, more than likely, need to hear. Your first step in the mix is to get your human voices into the -12dB to -15dB range. To do that, solo your first dialogue track and play through it). To view the sound levels, select View > Windows > Mixer and watch the Master Out channel.
Unlike many video editors, navigation in most sound editors is done less with clicking-and-dragging the playhead and more as a continuous tape deck. Use the Play and Stop buttons, and if you want to click and drag, use the navigation panel in the upper right of the Qtractor window.
The human voice fluctuates in volume but you're aiming for an average level of -12dB to -15dB. Unless you had a very good recordist, your sound probably won't naturally fall within that range.
- If the track is too loud, then the fix is simple: reduce the volume of the channel. Do this in the mixer window, with the vertical slider.
- If the track is too soft, you need to boost the volume. This is a little more complex than just doing the opposite of reducing the volume; if you just apply gain to the track, you'll raise the noise level as well as the signal (that is, the part of the sound you want). To raise the signal whilst supressing noise, use a Dynamic Range Compressor.
- If the sound varies drastically such that you cannot find a reasonable average setting, you might also want to use a Dynamic Range Compressor, with the aim of evening out the fluctuation.
Dyanamic Range Compressors
There are several good compressors available for Linux, usually bundled with audio plugin packs. There are very simple compressors and very complex ones. We'll look at one of the simple ones: the Dyson Compressor.
The (drastically) simplified theory with compression is that there are two points of interest in sound: the noise (usually the "room tone" of the sound track) and the signal (the part you want to hear). With a compressor, you target the low points as noise and the peaks as signal, and then adjust the area between those two in an attempt to find a suitable fuzzy area where you get more signal than noise. The signal peaks, along with the fuzzy selection below it (but above the noise level) gets boosted, and the noise gets left behind.
Most of this can be done by ear, on the fly.
To add a compressor to a channel, right-click on the track label on the left and select Track Properties. In the Track Properties window, click over to the Plugins tab. Click the Add button on the right and find a compressor.
Access to the plugin is also available in the Mixer window.
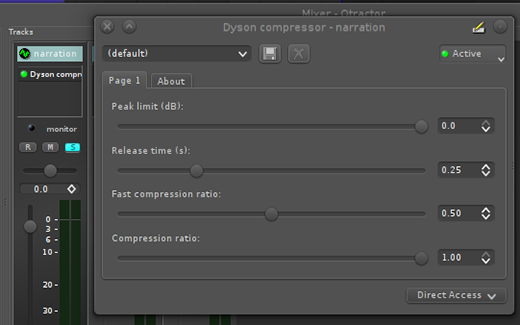
In the compressor window, adjust the peak to the maximum volume you wish to allow sounds to reach. To compress the range of the low and high points of the sound such that the sound is more even, increase the compression ratio.
Automation
Dynamic range compression is useful for corrective mixing, but at some point you will want to adjust volume at a finer grained level. You've probably seen audio engineers sitting in front of huge Harrison or Mackey consoles, adjusting levels with audio sliders. Qtractor can do that for you.
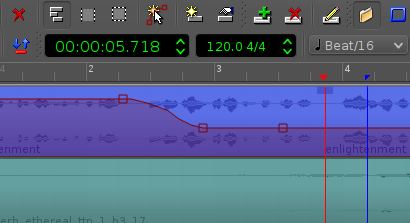
On the left of each track, there are four buttons: R, M, S, and a graphic (looks like a mountain range to some people) indicating Automation.
To activate automation, click the Automation button and choose Select > Gain. A red overlay appears over the track. You can't manipulate this overlay unless you are in automation mode; to enter automation mode, click the Automation cursor.
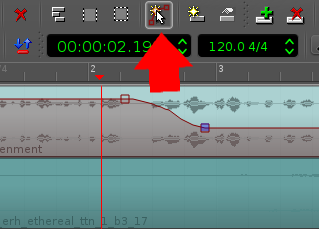
With the automation cursor, click anywhere along the overlay to create a keyframe. Drag the keyframe to adjust the volume.
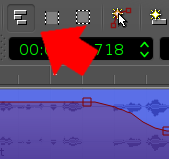
To leave automation mode, click the Select Clip icon to the left of the Automation cursor.
Effects
There are plenty of effects at your disposal in Qtractor, but unlike effects in video applications, sound plugins affect the entire track. This means that if you add, for instance, reverb to a track, then everything on that track gets sent through the reverb plugin.
That might seem backward to you if you're a trained video editor, but there's a good reason for it. If you have a video clip of a bell ringing, then any effect, like colour correction, you apply to that clip only needs to happen for as long as the video is visible. But if you apply reverb to the bell, then the sound of the bell's reverberation should last even after you cut away from the video, and indeed even after the sound effect of the bell; that's what reverb is for, after all.
In other words, audio effects are independent of sound clips in your audio editor.
To manage this, you should either move clips (or segments of clips) that require an effect to their own tracks, or else automate the effect. Since tracks are free, I usually just dedicate a track to foley effects that require unique effects.
Splicing
To make splices in an audio region, use the playhead as your blade. Position the playhead where you want to create the splice, and then select the audio region you want to cut. Make sure you're not in automation mode!
To make the splice, select Clip > Split.
Move segments of audio regions to other tracks by dragging them out of existing channels; a track will be created for you.
Export
When you're all finished your mix, it's time to export. There's probably no reason to export separate tracks, since all you're going to do is marry them back up to your video and export your finished product.
As a last precaution against unpleasant fly-away sound levels, it's not a bad idea to put a Limiter on the Master Out channel. Since all sound gets piped through the Master Out channel, and sound levels are cumulative, putting a light limiter to suppress any values that try to jump up past 0dB is good practise. You might have mixed the project to perfection, but you'd be surprised at how often an engineer forgets about that one place in the show that sounds collide, add up, and distort.
I like the Fast Lookahead Limiter plugin, but there are of course several others available. Which ever limiter you use, set the limit a little under 0dB (I usually go for -1 or so) with a release time of half a second. For most general-purpose soundtracks, that's sufficient to catch anything unexpected.
To do a full export, select Track > Export Tracks > Audio. In the Audio Export window, select Session to export until the very end of the very last audio clip. Choose the Master channel, and click the OK button. And then walk away from your computer. Really, walk away; your computer wants every last bit of processing power it possesses to play the sounds and effects smoothly, so let it render (or "bounce", in audio vernacular).
Once finished, import your exported track to your video editor and drop them into place at 00:00:00:00. That's all there is to it.
Audio engineering
This has been a quick walkthrough of audio mixing for video. It is hardly an in-depth lesson in the finer points of making audio sound great, but as always, a little research, a lot of practise, and a set of good tools is all you really need to become a pro. So go out there, get some sound, and start mixing. Try things, make mistakes, ask questions, and in no time you'll be giving up your day job as a video artist and switching over to glamorous life of audio engineering.
Makers
This article is part of Seth Kenlon's Multimedia Makers column, where he shares tutorials and tips on creating multimedia with Linux and its vast creative toolkit. In partnership with slackermedia.info and gnuworldorder.info.


2 Comments