

NetworkManager was introduced in 2004 to make network configuration more flexible and dynamic. The old SystemV startup shell scripts, of which the interface configuration files were a part, were incapable of handling WiFi, wired, VPNs, broadband modems, and more—or at least incapable of doing it quickly or efficiently.
In a series of articles, I've written about why I'm a fan of NetworkManager and how I've used it. In part 1, I looked at what NetworkManager does and some of the tools it provides for viewing network connections and devices. In that article, I mentioned that NetworkManager does not need interface configuration files for most hosts. However, it can create its own ini-style configuration files, and it recognizes the older network interface configuration files. The NetworkManager configuration files are officially called keyfiles. In part 2, I looked at the deprecated interface configuration files and how to configure them, should you still be using them.
Support for the deprecated ifcfg files is no longer provided by default for new installations beginning with Fedora 36. It will continue to use them on systems that have been upgraded from earlier versions of Fedora to release 36—at least for a while longer. Still, it is not a good idea at this late stage to depend on deprecated ifcfg configuration files. So for part 3 of this series, I will demonstrate migrating existing interface configuration files to the NetworkManager keyfiles using the command-line tool provided. I will also look at using both command-line and GUI tools to create new keyfiles from scratch and compare them for ease of use.
The migration is considerably more straightforward than it sounds. I used the nmcli connection migrate command on the two systems I needed to migrate, one with a single network interface card (NIC) and one, my router/firewall, with three NICs. After some extensive testing on a VM, it also worked perfectly the first time on both production hosts. That's it: No other commands, options, or arguments required. And it is fast, taking much less than one second on both hosts.
Why should I migrate my files?
Most of the restrictions of the old shell scripts lay in the structure—or lack thereof—of the ifcfg files. NetworkManager introduced the new network connection keyfiles to overcome those issues. But until Fedora 36, it still would recognize the old ifcfg configuration files. Now, NetworkManager no longer creates or supports ifcfg files for new installations.
I experimented with NetworkManager on a new Fedora 36 installation and could not convince it to use newly created ifcfg files. It continued to treat the interfaces as dynamic host configuration protocol (DHCP) and obtain its configuration values from the DHCP server. The ifcfg files are no longer supported on new installations because the NetworkManager-initscripts-ifcfg-rh package is no longer installed. That package contains the tools needed to use the ifcfg files. Hosts upgraded from older releases of Fedora will still have the NetworkManager-initscripts-ifcfg-rh package installed, so it will, for the time being, be upgraded along with the rest of the installation to Fedora 36. This may not be true in the future.
If you are using DHCP configuration for your network hosts, you do not need to migrate any ifcfg files. In fact, you can simply delete them, if they still exist, and NetworkManager will deal with managing the network connections. Personally, I prefer to move deprecated files like these to an archive subdirectory in /root so that I can find them later, just in case.
All hosts with static connections should be migrated. This usually includes servers, firewalls, and other hosts that may need to perform their network functions without the DHCP server being active. I have two hosts like this: my main server and my firewall/router.
My experiments
When NetworkManager officially deprecated the interface configuration files located in /etc/sysconfig/network-scripts, it did not immediately stop using them, but the update procedure did drop in a readme file, /etc/sysconfig/network-scripts/readme-ifcfg-rh.txt. This short file states explicitly that the ifcfg-style files are deprecated. It also provides a simple command that performs the migration for us.
I suggest you read that file on your host and then experiment in a non-production environment. I used a VM for my experiments and learned a lot. Before I started making changes, I displayed the connection data shown below to get the current state of the network connection.
[root@myserver ~]# nmcli
enp0s3: connected to Wired connection 1
        "Intel 82540EM"
        ethernet (e1000), 08:00:27:07:CD:FE, hw, mtu 1500
        ip4 default
        inet4 192.168.0.136/24
        route4 192.168.0.0/24 metric 100
        route4 default via 192.168.0.254 metric 100

lo: unmanaged
        "lo"
        loopback (unknown), 00:00:00:00:00:00, sw, mtu 65536

DNS configuration:
        servers: 192.168.0.52 8.8.8.8 8.8.4.4
        domains: example.org
        interface: enp0s3
I created a simple ifcfg file that defines a static configuration on one of my VMs then tested it to verify that this static config worked properly. Here is the ifcfg-enp0s3 file I created for this testing:
TYPE=Ethernet
PROXY_METHOD=none
BROWSER_ONLY=no
BOOTPROTO=static
# HWADDR=08:00:27:07:CD:FE
IPADDR=192.168.0.95
PREFIX=24
DEFROUTE=no
IPV4_FAILURE_FATAL=no
IPV6INIT=no
NAME=enp0s3
ONBOOT=yes
DNS1=192.168.0.52
DNS2=8.8.8.8
AUTOCONNECT_PRIORITY=-999
DEVICE=enp0s3
I commented out the hardware address in the ifcfg-enp0s3 file because it does not seem necessary. I tried it both ways, and it works just as well either way—once I finally got it working at all. NetworkManager completely ignored the contents of this file until I installed the NetworkManager-initscripts-ifcfg-rh package. After that, NetworkManager was able to set the network configuration from this ifcfg-enp0s3 file.
Then it was time to try the migration tool. I ran the command shown below to migrate the ifcfg file to a keyfile.
[root@myserver system-connections]# nmcli connection migrate
Connection 'Wired connection 1' (c7b11d30-522e-306f-8622-527119911afc) successfully migrated.
[root@myserver system-connections]#
This command took less than a second. It creates the new keyfile and then deletes the ifcfg file. I suggest making a copy of the original ifcfg file before running this migration tool. It created the /etc/NetworkManager/system-connections/enp0s3.nmconnection file for my host. Without specifying a specific interface, this command will migrate all ifcfg files located in /etc/sysconfig/network-scripts. If a host has multiple NICs and corresponding ifcfg files, only some of which you want to migrate, you can specify a list of connections to migrate.
The keyfiles can be modified using your favorite editor. I tried this by changing the IPADDR entry and restarting NetworkManager just to make sure it worked. The nmcli connection reload command did not work for me. Making changes directly to the keyfiles using an editor is not recommended, but it does work. To be honest, many experienced sysadmins (like me) really prefer editing ASCII text configuration files directly, so—recommended or not—that is how I do things most of the time. I just like to know what is actually in those files so I can recognize when something is wrong with them. It helps with solving configuration problems.
Doing it for real
After a day of experimenting so that I fully understood how this all works and how to recover in case it fails, I was ready to do it for real. I chose my main server for this initial attempt because it only has a single NIC, which will make it faster to get back online if there is a problem.
First, I copied the file /etc/sysconfig/network-scripts/ifcfg-eno1 shown in below to /root as a backup. The nmcli connection migrate command can make the conversion back from keyfile to ifcfg file. But why bother when I can have an exact backup ready to drop back in?
HWADDR=e0:d5:5e:a2:de:a4
TYPE=Ethernet
PROXY_METHOD=none
BROWSER_ONLY=no
BOOTPROTO=static
DEFROUTE=yes
IPADDR=192.168.0.52
PREFIX=24
GATEWAY=192.168.0.254
DOMAIN=example.org
IPV6INIT=no
DNS1=192.168.0.52
DNS2=8.8.8.8
DNS3=8.8.4.4
IPV4_FAILURE_FATAL=no
IPV6INIT=no
PEERROUTES=no
NAME="enp0s31f6"
ONBOOT=yes
AUTOCONNECT_PRIORITY=-999
DEVICE="enp0s31f6"
After running the nmcli connection migrate command, I verified that it emits the status line to indicate that the conversion took place, which it did. I next verified that the ifcfg file was gone and the /etc/NetworkManager/system-connections/enp0s31f6.nmconnection keyfile was in place:
[connection]
id=enp0s31f6
uuid=abf4c85b-57cc-4484-4fa9-b4a71689c359
type=ethernet
autoconnect-priority=-999
interface-name=enp0s31f6

[ethernet]
mac-address=E0:D5:5E:A2:DE:A4

[ipv4]
address1=192.168.0.52/24,192.168.0.254
dns=192.168.0.52;8.8.8.8;8.8.4.4;
dns-search=example.org;
ignore-auto-routes=true
method=manual

[ipv6]
addr-gen-mode=stable-privacy
method=ignore
never-default=true

[proxy]
This file will not be used until the NetworkManager is restarted or the host is rebooted. I first restarted NetworkManager and then checked the result, as shown below. The network configuration looks correct:
[root@myserver ~]# nmcli
enp0s31f6: connected to enp0s31f6
        "Intel I219-V"
        ethernet (e1000e), E0:D5:5E:A2:DE:A4, hw, mtu 1500
        ip4 default
        inet4 192.168.0.52/24
        route4 default via 192.168.0.254 metric 100
        route4 192.168.0.0/24 metric 100

lo: unmanaged
        "lo"
        loopback (unknown), 00:00:00:00:00:00, sw, mtu 65536

DNS configuration:
        servers: 192.168.0.52 8.8.8.8 8.8.4.4
        domains: example.org
        interface: enp0s31f6
After a complete reboot, I verified the network configuration again, and it looked identical to the output above. With that working, I removed the NetworkManager-initscripts-ifcfg-rh package and rebooted again, just because it can't hurt to verify everything.
Once I knew that the migration tool works on one of my production systems, and an important one at that, I was ready to do this on my firewall/router, the one with three NICs. I ran the same nmcli connection migrate command on that host and verified the results. After ensuring all was working correctly, I used DNF to remove the NetworkManager-initscripts-ifcfg-rh package from both production hosts. And I tested with a couple more reboots of each host just to ensure nothing got borked during the removal of the initscripts package.
What if I don't have ifcfg files?
New installations of Fedora don't create any type of network interface configuration files. The default is for NetworkManager to handle network interfaces as DHCP connections. So you don't need to do anything for hosts that use DHCP to obtain their network configuration information.
However, you may need to create a static configuration for some new hosts even when you don't have a deprecated ifcfg file to migrate.
Reverting to DHCP
Reversion to the use of DHCP is easy. Just remove the keyfile for the desired connection from /etc/NetworkManager/system-connections/ and restart the NetworkManager. Remove can mean moving the file somewhere else or just deleting it.
In preparation for my next series of experiments in creating new keyfiles, I moved the enp0s31f6.nmconnection keyfile to /root and restarted NetworkManager.
Creating new keyfiles
Although the old ip command can still be used to modify network interface settings in a live environment, those changes are not persistent after a reboot. Changes made using NetworkManager tools such as nmcli or nmtui, the GUI NetworkManager connection editor (nm-connection-editor), and your favorite text editor are persistent. The connection editor is available for Fedora on the system tray for each of the desktops I tried—Xfce, Cinnamon, LXDE, KDE Plasma—and probably the rest of the desktops I haven't yet tried.
Text editor
Assuming you are familiar with the keyfile structure, syntax, and variables, creating or modifying keyfiles from scratch is possible with just an ASCII text editor. As much as I appreciate and use that capability, using one of the three tools provided is usually much simpler.
Using nmtui
The nmtui tool (NetworkManager Text User Interface) is my second choice for a tool in this trio. I find the interface cumbersome, unattractive, and not intuitive. This tool is not installed by default, and I probably would not have installed it if I were not writing this article.
However, it does work, and it created a keyfile for me that was essentially identical to the one created by the GUI Connection Manager I discuss below. The only differences I found (using the diff command, of course) were the timestamp field in the file and one different selection I intentionally made when configuring the connection. The interface does provide some clues about the data you need to provide to create a working keyfile.
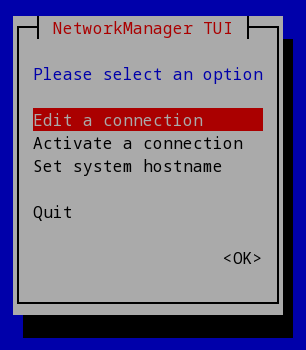
Start this tool by entering the command nmtui on the command line. In general, the arrow keys allow movement between the fields on the displayed pages, and the Enter key selects an item to modify or add. The Page Up/Page Down keys scroll the page. Select Edit a connection and press Enter to create a new keyfile.
(David Both, CC BY-SA 4.0)
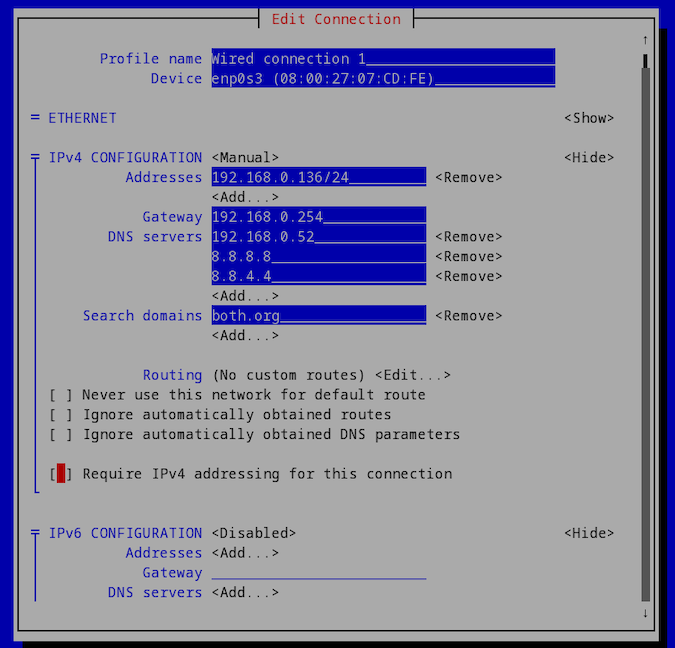
After wending my way through the interface, I arrived at the Edit Connection page. It was not clear to me from this interface that the CIDR prefix should be appended to the IP address, but I did that anyway, and it worked. Fill in the appropriate data on this page to configure the interface. Notice that I have disabled IPV6.
(David Both, CC BY-SA 4.0)
Next, scroll down to the bottom of the page using the keyboard and press OK to save the keyfile. The keyfile is saved immediately, but NetworkManager must be restarted to activate this file, whether new or changed. Although this is not my favorite interface for creating and managing NetworkManager keyfiles, I plan to use it when the GUI Connection Editor is unavailable, such as when working on a remote host.
Using nmcli
I have used the nmcli tool (Network Manager Command Line Interface) to configure an interface in the past, and this tool also works very well. I just like it the least because it requires the most typing and reading of the man page and online references. Executing the command immediately creates the interface configuration file in the /etc/NetworkManager/system-connections/ directory.
The command shown below adds the needed keyfile, just like the other tools.
[root@myserver system-connections]# nmcli connection add connection-name enp0s3-Wired ifname enp0s3 type ethernet ipv4.addresses 192.168.0.136/24 ipv4.gateway 192.168.0.254 ipv4.dns 192.168.0.254,8.8.8.8,8.8.4.4 ipv4.dns-search example.org ipv6.method disabled
Connection 'ethernet-enp0s3' (67d3a3c1-3d08-474b-ae91-a1005f323459) successfully added.
[root@myserver system-connections]# cat enp0s3-Wired.nmconnection
[connection]
id=ethernet-enp0s3
uuid=67d3a3c1-3d08-474b-ae91-a1005f323459
type=ethernet
interface-name=enp0s3

[ethernet]

[ipv4]
address1=192.168.0.136/32,192.168.0.254
dns=192.168.0.52;8.8.8.8;8.8.4.4;
dns-search=example.org;
method=manual

[ipv6]
addr-gen-mode=stable-privacy
method=disabled

[proxy]
[root@myserver system-connections]#
One of the assistance tools available while using nmcli connection add is the Bash tab-completion sequence that shows the available subcommands:
[root@myserver system-connections]# nmcli connection add <tab><tab>
autoconnect                        ifname                             ipv6.dhcp-send-hostname
con-name                           ipv4.addresses                     ipv6.dhcp-timeout
connection.auth-retries            ipv4.dad-timeout                   ipv6.dns
connection.autoconnect             ipv4.dhcp-client-id                ipv6.dns-options
connection.autoconnect-priority    ipv4.dhcp-fqdn                     ipv6.dns-priority
connection.autoconnect-retries     ipv4.dhcp-hostname                 ipv6.dns-search
connection.autoconnect-slaves      ipv4.dhcp-hostname-flags           ipv6.gateway
connection.dns-over-tls            ipv4.dhcp-iaid                     ipv6.ignore-auto-dns
connection.gateway-ping-timeout    ipv4.dhcp-reject-servers           ipv6.ignore-auto-routes
connection.id                      ipv4.dhcp-send-hostname            ipv6.ip6-privacy
connection.interface-name          ipv4.dhcp-timeout                  ipv6.may-fail
connection.lldp                    ipv4.dhcp-vendor-class-identifier  ipv6.method
connection.llmnr                   ipv4.dns                           ipv6.never-default
connection.master                  ipv4.dns-options                   ipv6.ra-timeout
connection.mdns                    ipv4.dns-priority                  ipv6.required-timeout
connection.metered                 ipv4.dns-search                    ipv6.route-metric
connection.mud-url                 ipv4.gateway                       ipv6.routes
connection.multi-connect           ipv4.ignore-auto-dns               ipv6.route-table
connection.permissions             ipv4.ignore-auto-routes            ipv6.routing-rules
connection.read-only               ipv4.may-fail                      ipv6.token
connection.secondaries             ipv4.method                        master
connection.slave-type              ipv4.never-default                 match.driver
connection.stable-id               ipv4.required-timeout              match.interface-name
connection.timestamp               ipv4.route-metric                  match.kernel-command-line
connection.type                    ipv4.routes                        match.path
connection.uuid                    ipv4.route-table                   proxy.browser-only
connection.wait-device-timeout     ipv4.routing-rules                 proxy.method
connection.zone                    ipv6.addresses                     proxy.pac-script
help                               ipv6.addr-gen-mode                 proxy.pac-url
hostname.from-dhcp                 ipv6.dhcp-duid                     slave-type
hostname.from-dns-lookup           ipv6.dhcp-hostname                 tc.qdiscs
hostname.only-from-default         ipv6.dhcp-hostname-flags           tc.tfilters
hostname.priority                  ipv6.dhcp-iaid                     type
[root@myserver system-connections]# nmcli connection add
I typically prefer the command line for most tasks. However, the complexity of getting the syntax and options of this command correct means that I must always use the man page and research the command before I issue it. That takes time. And it still complained about things I missed or got incorrect. Even when it did not throw an error, it created keyfiles that worked poorly, if at all. For example, the connection worked when I would SSH out from the test VM, but I could not SSH into the test VM. I am still not sure what the problem was, but that keyfile had the wrong CIDR prefix for the IP address. I eventually got the command correct by referring to the example on the manual page nmcli-examples(7).
When this is the only available method, I can do it, but it is my least preferred tool.
Using the GUI NetworkManager connection editor
I have used one of my laptops for parts of this section to show both wired and wireless connections. Although I typically prefer command-line tools, I like this GUI NetworkManager connection editor tool best of all the three available tool options. It is easy to use, intuitive, provides fast access to any configuration item that would ever be needed, and is directly available itself in the desktop system tray of all the desktops I have tried.
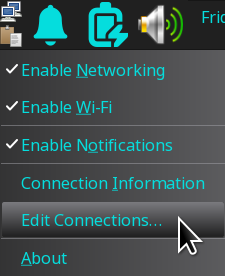
Just right-click on the network icon, the one that looks like a pair of computers, in the system tray. Then choose Edit Connections.
(David Both, CC BY-SA 4.0)
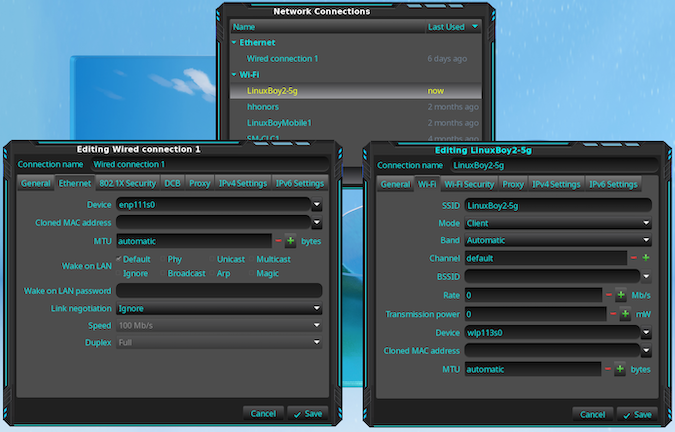
This opens the connection editing window, as pictured below. Double-click the desired connection from the connection list, usually Wired Connection 1 or a WiFi SSID. The illustration below shows both wired and wireless connections open for editing on one of my laptops. I have never needed to edit a wireless connection because the ones I connect to always use DHCP for configuration. It is possible to require static addressing for wireless connections, but I have never encountered that.
(David Both, CC BY-SA 4.0)
The Ethernet tab of the Editing Wired Connection 1 dialog window shows the device name enp111s0 for this laptop. In most cases, nothing on this page needs to be changed.
Back on my VM, I changed the Method field from Automatic (DHCP) to Manual. I added the IP Address, the CIDR prefix, and the default route (gateway) I want for this host. I also added three DNS servers and the search domain. These are the minimum configuration variables needed for a network connection. They are also the same ones defined in the interface configuration files and the previous keyfiles. The device name for this NIC is enp0s3. Here is the configuration for the wired connection using the GUI NetworkManager connection editor tool.
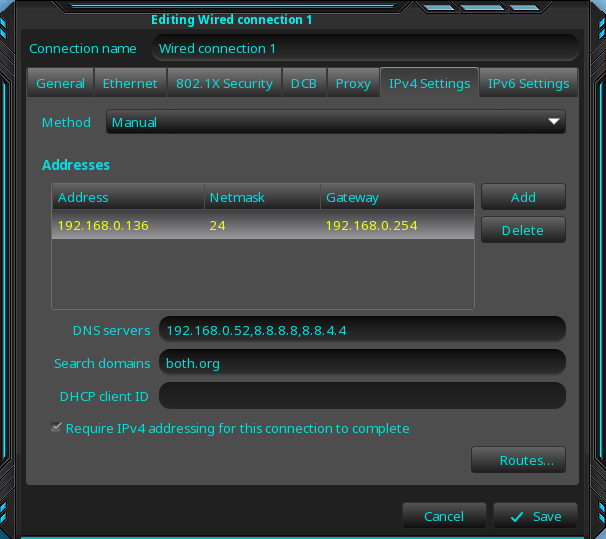
(David Both, CC BY-SA 4.0)
Another option available for the Method field is Disabled. I set the IPV6 to Disabled since I don't use IPV6.
After setting these values, clicking the Save button creates the new keyfile immediately. Making changes to existing keyfiles is just as easy. However, NetworkManager must be restarted for these configuration changes to take effect.
In terms of the amount of time and work involved in creating new NetworkManager keyfiles, the GUI Connection Editor is far better than the other options. It provides an easy-to-use interface with enough information about the data required to be helpful.
Conclusions
Fedora 36 changes the equation for using the old-style, deprecated interface configuration files. For new installations of Fedora 36, those files will not work unless the NetworkManager-initscripts-ifcfg-rh package is explicitly installed. This is a warning sign that all support for those deprecated ifcfg scripts will be completely ignored in the future.
Fortunately, the migration from any existing ifcfg scripts is trivially easy, and creating new ones is not much more difficult using one of the three tools available. I prefer the GUI NetworkManager connection editor tool because it is clear and easy. I can use the nmtui tool, which does the same thing as the GUI version but has a somewhat clunkier user interface. I try not to use the nmcli tool if I can help it. It does work but is cumbersome and takes a lot of reading and experimentation to get the correct command syntax and all of the right arguments to create a fully usable keyfile.
So go ahead and migrate now. I did, and it was easy.


1 Comment