Just a month ago, our geek wish of getting a 3D printer was granted: a Makerbot Replicator 2X arrived at our office. Since then we've been busy learning by trial and error about the possibilities and limitations of 3D printing. You can read my review of the Printrbot Simple Kit.
So far, in short, I can describe 3D printing as: Building an object, by depositing layers, and creating every layer by drawing it with melted plastic. The key to understanding 3D printing, and thus learning how to do it better, is to think about the objects as a stack of layers. Then, consider how the layers will look like as they are being stacked.
Curiously, this is very similar to how to understand and think about medical image processing (for instance, when analyzing CT scans or MRI scans).
Our early tests were mostly on printing models from Thingiverse: an exciting open repository of 3D shapes, ready for 3D printing. In Thingiverse we downloaded models, 3D printed them, rated them, shared pictures, improved the models, and share the models back. Thingiverse is to shapes what GitHub is to source code. That said, even GitHub started recently improving the way STL file models are managed and displayed; in particular, showing diff between versions.
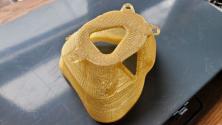
We learned quickly that the force of Gravity still applies inside a 3D printer. Therefore, supports are needed to print any models whose layers have pieces that would be temporarily floating in space because their attachments to the rest of the object are higher up, in layers that have not been printed yet. We also learned that temperature stability matters and that some of the rules of "baking a cake" equally apply to 3D printing. In particular: Stop opening the door of the oven while the thing is going on!
After some weeks of practicing with simple models, we were ready for something more interesting: 3D printing bone models extracted from medical images!
We started with a model of the mandibule and temporal bones; they were extracted from a CT scan by our collaborator Nabgha Farhat as part of a 3D printing tutorial. Nabgha was very kind to share the STL files of the resulting models with us.

Bone models were made using Slicer 3D, an open source application developed by the NAMIC community that provides functionalities for segmenting anatomical models from CT and MRI images. The anatomical models were saved as STL files, which can typically be used as inputs for 3D printing.
How to position the object in the printer
Things work better when the largest and most flat surface of the object is placed flat against the bed of the printer. To achieve that, we rotated the models using ParaView (another open source application that is commonly used for 3D visualization of simulation data).
The two bone models were printed separately, using different colors to highlight their contrast. We used ABS plastic in both cases. Each model took close to one hour to print, using layers that were 0.2mm thick; and about two hours, when using layers that were 0.1mm thick.
These tests illustrated the high value that 3D printing offers for educational applications, particularly in medical sciences, to make more accessible to students (and patients) the understanding of shapes in anatomical structures.
Today, we are moving on to more interesting applications combining medical images, computer vision, and 3D printing.


Comments are closed.