

Video editing is not a complex process from the user's point-of-view. After all, editors used to cut film with razor blades and tape, and then video on VCRs.
The actual process hasn't changed in 100 years: cut out the bad footage, splice the good parts together. What has changed, and what can get complex, is the visual language editors use in order to convey more information than contained in the footage itself. In this article, I will explore how to achieve a common visual style in Kdenlive: the split screen.
The split screen became popular in the 1970s, probably most famously pushed into the forefront of audiences' attention by filmmakers such as Brian De Palma, who used the technique in Carrie to allow the audience to see the actions of several characters at the same time. (Formerly, only cross-cutting was used to suggest that actions were happening simultaneously.) You didn't just get to see pigs blood dumped on Carrie, you got to see the reaction of the pranksters watching, and the other students in the crowd. Call it overkill, call it distracting, or call it genius, but the split screen technique has been adopted as a stylistic-but-acceptable means of showing the audience that two things are happening at the exact same moment in the movie's universe.
Create split screens with Kdenlive
To create this effect in Kdenlive, you need two video clips, and you should make sure that you have the frei0r video effect plugins installed. (If they were not automatically installed with Kdenlive, they are likely available from your distribution's package manager.)
1. If you are starting with an empty Kdenlive project, right-click anywhere in your Project Tree, or use the film icon in top right and select Add Clip.

2. Place the two clips in the timeline such that they overlap one another. For example, one video clip should be on Video 1 and the other on Video 2.
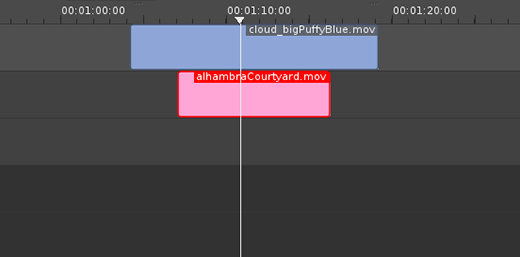
3. The clips now occupy the same space at the same time, but we need to override Kdenlive's (quite sensible) default of only showing the topmost layer by adding compositing.
First, so that we do not composite the clips literally on top of one another, move one clip to the right side of the frame and the other to the left.
There are multiple ways to move clips around within the borders of the frame: you can use Pan & Zoom, or you can use Rotate (keyframable). In this case, Rotate (keyframable) is the easier one, because it constrains movement along the X and Y axes, but feel free to experiment with alternates later.
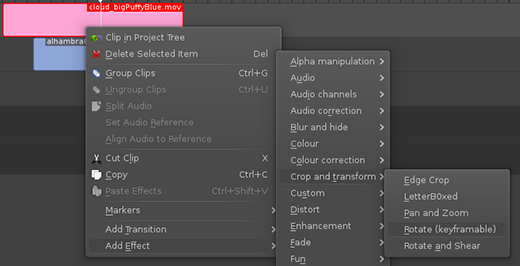
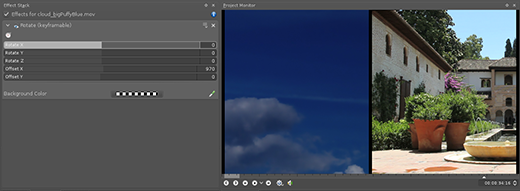
Right-click on the top video clip and select Add Effect > Crop and Transform > Rotate (keyframable).
The effect is added to the clip, and you should now see an open tab for the Effect Stack within your Kdenlive session. If you do not, go to the View menu and select Effect Stack.
In the Rotate effects panel, there are sliders to rotate the image along the X, Y, and Z axes, but ignore those. Instead, use the Offset values to shift the video to either the right or left side of the frame. Don't panic: you won't be able to see the bottom clip yet. That's normal.
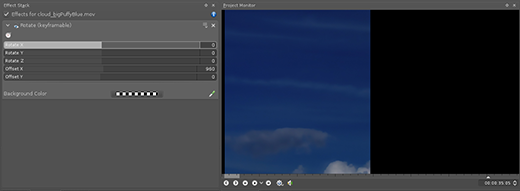
The sliders start at 0 offset, meaning that shifting the image toward a positive value moves the video to the left, whereas a negative value moves the video frame to the right. The values correspond to pixels, so if you have a 1920x1080 video, then setting the X offset to 960 sets the image half on the screen and half off.
Repeat this process for both video clips. Don't worry about being exact; you can always adjust the placement of the clips later. And no, you still won't be able to see the bottom clip, and you still shouldn't panic.
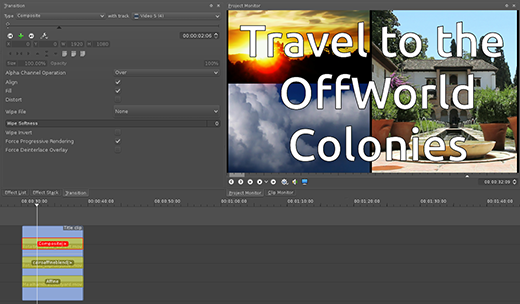
4. Now to composite the two clips together.
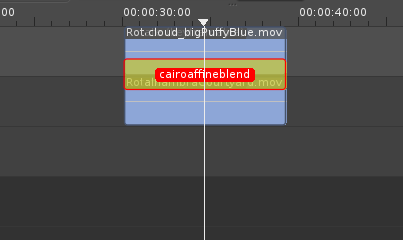
Right-click on the clip on Video 1 and choose Add Transition > Cairo Affine Blend (listed in the menu as cairoaffineblend). This transforms the alpha channel (empty space) into transparent pixels, revealing the clip on the lower track.
5. Use the Rotate panel of each clip to make fine adjustments to their alignment. For example, extend the offset so that there is a black bar between the two frames.
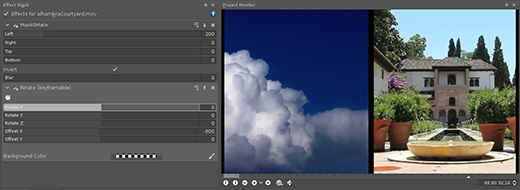
6. The problem with the current result is that unless you shot specifically for a split screen, what actually shows onscreen may or may not contain anything interesting to look at. Now that you have adjusted the placement of the video clips in the frame, you probably want to adjust the contents of the videos within each of their frames.
You can't really shift the contents of a video clip within its frame, but you can change the frame borders such that the parts of the image you are interested in show within your composited frame.
Right-click on the top (Video 1) video clip and select Add Effect > Alpha manipulation > Maskomate.
Notice in the Effect Stack that Maskomate is at the bottom of the stack. This is important, because Kdenlive uses a chain (or "stack") of effects that interact with one another even across video tracks.
7. Right-click on the bottom (Video 3) video clip and select Add Effect > Alpha manipulation > Maskomate.
In the Effect Stack, click the Up-Arrow icon in the upper right corner of the Maskomate filter. This moves your mask up in the compositing chain. The chain of effects we have built is:
- Rotate [Video 1]
- Maskomate [Video 1]
- Maskomate [Video 2]
- Rotate [Video 2]
This part is a little tricky because as you mask out the left or right edge of the video, you will want to lessen the offset. If you're the mathematical type, you can do everything by the numbers. If you work by eye, I find that it helps to mask a little, and nudge the offset a little, bit-by-bit until you get the image you want.
If sliders and numbers are absolutely too abstract for you, then you position the video by pointing-and-clicking with Add Effect > Crop and transform > Pan and Zoom. I'll cover this effect in a future article.
Repeat this as needed for your other clip.
Now you have a split screen shot in your movie project, simple as that! There are more tactile ways of doing these operations, such as the Pan and Zoom effect, which allows you to manipulate the clip live in the project viewer window, but if you are just beginning with onscreen effects like this one, it's better to start with these simple, keyframe-less effect panels.
There's no need to limit yourself to just two splits. As long as you set your transition to composite against the right track, you can split and add more images (or parts of them, anyway). Masking can get messy, and for more advanced composites a more complex mask scheme should be used, but for the basics, this stacking technique is simple, fast, and effective.
Makers
This article is part of Seth Kenlon's Multimedia Makers column, where he shares tutorials and tips on creating multimedia with Linux and its vast creative toolkit. In partnership with slackermedia.info and gnuworldorder.info.


3 Comments