If there's one thing that indie games like Mr. Rescue and Don't Be Patchman (the world's first and only SteamOS exclusive) demonstrate, it's that retro is hot. Specifically, pixel art is hot.
Developers like it because it's got a low barrier for entry, so if you don't have an art department eagerly awaiting to supply assets for your open source game, you can realistically do it yourself without spending a year learning complex artistic tools that you may never master (knowing Krita or Blender doesn't necessarily mean you'll be good at them; I'm living proof of that!). Users like these games with simple graphics because of a little thing called nostalgia, and that they can run these games on low-end hardware.
There's no shortage of software that can create pixel art, but most applications are either grossly over-featured, meant for photography or graphic design, or underdeveloped, because they are meant for children or for basic graphical tasks.
What makes mtPaint great is that it specializes in pixel art, has a tiny footprint—the application is about 391k, compiled (assuming Gtk is installed separately)—and it is designed to run efficiently on specs as low as 200MHz CPU with 16MB of available RAM.
Installing mtPaint
MtPaint is packaged and ready for Fedora, Debian, Slackware, and many other Linux distributions. It's also compatible with Windows. Its codebase is maintained by Dmitry Groshev at mtPaint's GitHub.
Interface
The mtPaint interface looks familiar if you've ever used a basic paint application. While the basics are as you'd expect, there are some differences in how mtPaint sees your canvas when compared to, say, GIMP or Krita.
Because one of the most fun things about mtPaint is how it makes pixel art easy and fun, I'll concentrate on the features related to that, but don't let that stop you from exploring all of mtPaint's many abilities.
The tool palette in mtPaint is the toolbar across the top of the window. It contains most of the usual tools, such as a pencil tool for freehand drawing, a paint bucket for fills, a text tool for text, a ruler to make straight lines, some selection tools, and some effects.
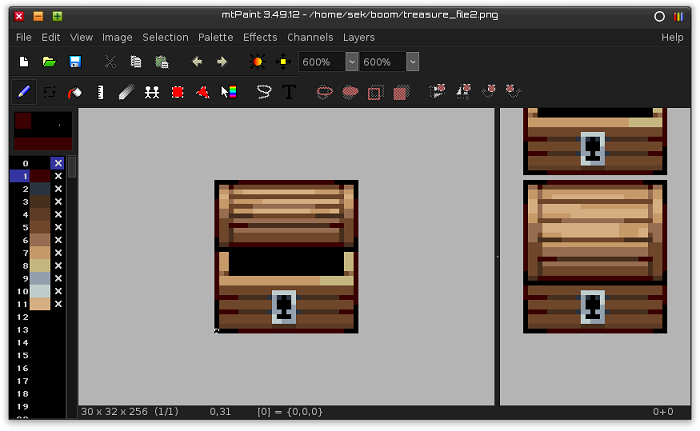
mtPaint user interface
The color palette is situated along the left side of the mtPaint window. There are 256 blocks for your main palette, because mtPaint defaults to an indexed color space. You can switch to a full RGB color space in Image > Convert to RGB, but for pixel art, 256 colors ought to be enough for anybody. (Actually, pixel artists of old would have loved a rich palette of 256 colors.)
Pixels
Modern pixels (to say nothing of subpixels) are too numerous and small to make true pixel art work the way it did back when monitors were 800x600. The main thing that makes pixel art feel like pixel art is its strict grid layout of squares that are either on or off (there are no squares that are only half filled). There are two ways to make this happen on modern hi-res monitors: magnify your canvas so that you're working on the pixel level or constrain your artwork to big square brushes aligned to a grid.
If you're happy to emulate pixel art by painting on a grid, activate the Snap to Tile Grid mode in the View menu. Choose your brush style and size with the brush palette, which is next to the main color swatches in the top left corner of the mtPaint window.
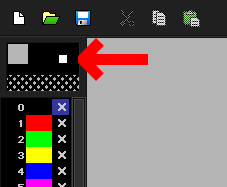
mtPaint brush window
If you want to actually work on the pixel level, then mtPaint is happy to help. A drop-down menu for magnification is located in the top toolbar. Zoom in as much as you want, and start painting pixels!
Indexing, channels, and alpha
The default canvas in mtPaint is black. It's not that funky checkerboard that's become a shorthand for transparency that seasoned photo editors are used to, and it's not the paper white that digital painters are used to. This is significant to you especially if you're designing something like sprites for video games and need an alpha channel so that. I'll talk more about the alpha channel later. In the meantime, you can fill in the canvas with whatever color you want with the paint bucket tool.
The alpha channel is difficult for people to grasp, because it is, by its very nature, invisible. Any attempt to make it visible confuses people, because it defies its own concept. If it helps, think of the alpha channel, whatever that is, as the "green screen" of graphics applications, with the added bonus that you don't have to do the green screen removal, as you do in a video editor.
You do, however, have to define what that green screen is going to be, so mtPaint knows what indexed color to drop in favor of alpha invisibility. The default for mtPaint is black, situated at Index 0.
By default, mtPaint replaces Index 0 black with alpha. There's some flexibility. For instance, using the green from Index 2 instead of black from Index 0, you can tell mtPaint's Save As function to use Index 2 as alpha instead of its default 0 value:
The alpha index setting is in the Save As dialogue window.
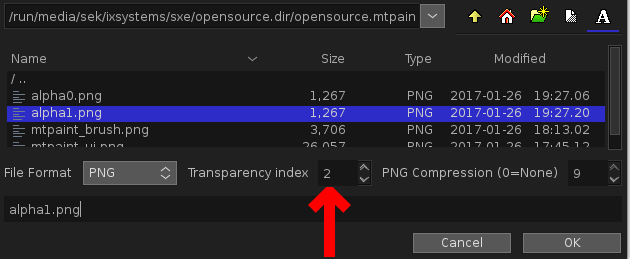
mtPaint transparency index
If you're using mtPaint for video game graphics, set your alpha channel to the same index number so that your video game engine keys channel to transparency (unless your engine does that automatically, not all do). If you don't need an alpha channel, set Index to -1.
You can change the transparency index setting in Image >Preferences > Files > Transparency Index.
Because mtPaint's default is to use Index 0 as its alpha placement, it's easier to just use Index 0 black for index manipulation unless you're used to working in an indexed colorspace.
Color
Whether or not you're working with an indexed color space, the color swatches down the left side of mtPaint are customizable as either your literal color map (in the case of indexed color space) or a handy reference for your most-used swatches.
To change the color of a swatch, double click the index number to the swatch's left. This brings up a standard color picker.
Move back and forth between indexed and full RGB color space through the Image menu. Using RGB unlocks any index that was previously applied, so if you open an image and it only has eight slots for colors, just convert to RGB, and then back to an index space using a wider spectrum.
Layers
Most graphic applications have some concept of layers, which enables you to isolate different elements of your art. Find the Layer Window in the View menu, or by pressing the L key on your keyboard.
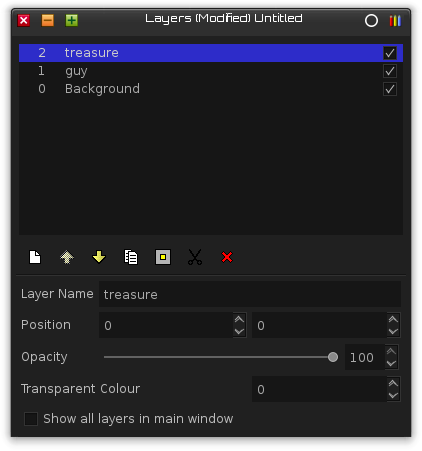
The Layers Window is your view of all existing layers and, most importantly, the stacking order (also called "z-index") of those layers. From the Layers Window, you can select layers, delete layers, and re-order layers.
Initially, your mtPaint canvas only has one layer: the background layer. Since layers and animation are closely tied in mtPaint, let's use one to learn the other.
Layers and animation
Who doesn't love animated GIFs? Well, stop loving them and start creating you own in mtPaint.
Animated GIFs are actually pretty easy to generate if you do them as a flipbook. Draw one frame, save it, draw the next, save it, and so on. When you have all the frames you want, use an application like gifsicle to string the images together.
The problem with that approach is that you're painting each frame by hand. For 24 frames, you paint 24 images.
With mtPaint, you can animate more efficiently. You can tween using the layer interface. If you've ever done paper cutout animation, the principle is the same. It's easiest if you have artwork at the ready, so if you don't have assets yet, spend some time to create or gather some from a free culture site like OpenGameArt.
When you're ready to animate, create an empty document in mtPaint and open your first image. Usually, your initial image will be the backdrop (the part that doesn't change) of your animation, but it doesn't have to be.
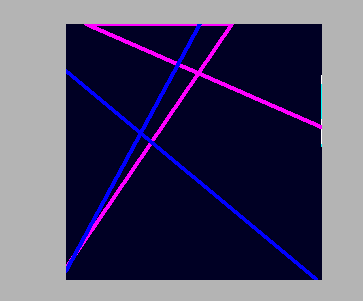
mtPaint initial image
Press the V key on your keyboard, or go to the View menu and select View Window. This splits the mtPaint window into two parts. The left is your canvas, as usual, and on the right is on your layer interface.
From the Layers menu, select New Layer. Accept the default settings for your new layer. When the new layer is added, it gets added over your first. Don't panic, it didn't just erase your first image, it just obscured it.
Now that a new layer exists, you can place something into that layer. You may know this as Open As Layer if you're a GIMP user, but in mtPaint, it's (somewhat confusingly) just Open. Open an asset, ignoring the warning that you might lose all of your work in that layer, because the layer's empty anyway.
Repeat this process for each asset you want to use in your animation. It's common to call such assets "sprites" in both animation and video game development. Here's a backdrop layer with two sprites, for a total of three layers:
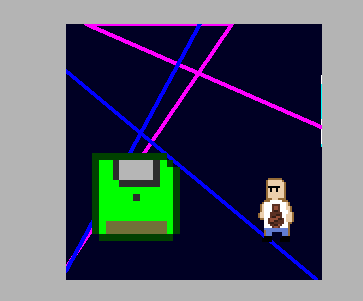
mtPaint three layers
Before continuing, save each layer individually, even if they already exist on your hard drive. Make a dedicated directory on your drive for this project, and then click on each layer and save it from the File menu. Once everything is saved, create a dopesheet by navigating to the Layers menu and select Save As. The layer arrangement gets saved as a plain text file, and it's where mtPaint records each movement that your sprites make.
Now that you have a backdrop and some layers with your actors and props, and everything is all saved into a dedicated directory, all that's left to do is animate.
In the layer panel (the one on the right), click and drap your props and actors within your backdrop image. For each movement you make, go to the Layers menu and select Set Key Frame. Click OK to accept the default key frame number.
Move your sprites and set a new key frame. Since the point of tweening is that you don't have to animate every single frame, you can control how much animation happens between key frames by moving your sprites from their starting position to their end position, and incrementing the Key Frame count by the number of steps you want mtpaint to tween for you.
In other words, if you want your actor to move across the screen in six "steps," then move your actor to its end point on screen and then select New Key Frame from the Layers menu and create key frame number six. For faster motion, you might enter three instead. For slower motion, you might enter nine.
Exporting animation
When you've finished your animation, select Configure Animation from the Layers menu. Set the end frame to the number of key frames you've created, and then click the Preview button. If you're happy with the way your animation looks, click the Create Frames button to write out all the frames, key frames, and in-between frames alike, to disk.
To save the final animation as an animated GIF, click the Save button.
Pixelated is beautiful
Pixel art has a retro charm to it, but I think its appeal goes beyond memories of Zelda and Metroid. Pixel art is mapped and structured; sure, all bitmapped graphics are, but the thing we call "pixel art" makes it obvious. You can "see" the pixels, the shading, and the tricks the artist had to resort to in order to suggest details that can't be rendered in 32x32 grids. Learn to embrace it, but most of all, learn to make it!



3 Comments