

Learning management systems (LMS) are the software powering online education, enabling teachers and trainers to share coursework, administer assessments, and track students' learning. There are a variety of LMSes available from proprietary vendors, but an enduring open source choice is Moodle.
Moodle has been available for almost two decades. It was started by Martin Dougiamas, a Curtin University student and employee, who saw possibilities for improvements that became Moodle in 2001. As of early 2018, over 2.4 million students worldwide, from K-12 through higher education, are using Moodle. While it originally grew from Martin's vision, Moodle has a large and robust community of developers and other contributors that make the product a compelling choice over proprietary options.
Installing packages
Moodle is at home on any Linux-based distribution, but this tutorial uses the Ubuntu 16.04 platform. Moodle also requires a web server and database server to be installed. This example uses Nginx and MariaDB, but Apache and either MySQL or Postgres also work.
To install those packages on your Ubuntu 16.04 machine, enter the following command:
sudo apt install mariadb-server mariadb-client nginxConfiguring the database
Before starting database setup, configure your database server to ensure it is secure and ready for Moodle by using the following command:
sudo /usr/bin/mysql_secure_installationJust follow the prompts to set a root password and secure your installation.
You'll also need to change some of the configuration options within MariaDB or MySQL that Moodle requires, so navigate to /etc/mysql/conf.d/ and add some options to your my.cnf file:
sudo vi /etc/mysql/conf.d/my.cnf
[client]
default-character-set = utf8mb4

[mysqld]
innodb_file_format = Barracuda
innodb_file_per_table = 1
innodb_large_prefix

character-set-server = utf8mb4
collation-server = utf8mb4_unicode_ci
skip-character-set-client-handshake

[mysql]
default-character-set = utf8mb4
Now configure your database for Moodle:
sudo mysql –u root –p
CREATE DATABASE moodledb;
CREATE USER 'moodleuser'@'localhost' IDENTIFIED BY ‘my_secure_password’;
GRANT ALL ON moodledb.* TO 'moodleuser'@'localhost’;
FLUSH privileges;Installing other packages
Moodle also requires PHP and several other packages for language support, image manipulation, spell checking, and other internal operations:
sudo apt-get install php7.0-fpm graphviz aspell php7.0-pspell php7.0-curl php7.0-gd php7.0-intl php7.0-mysql php7.0-xml php7.0-xmlrpc php7.0-ldap php7.0-zip php7.0-soap php7.0-mbstringNow configure PHP for Moodle. In both the /etc/php/7.0/cli and /etc/php/7.0/fpm directories, there is a php.ini file. Find and change cgi.fix_pathinfo = 1 to cgi.fix_pathinfo = 0:
sudo vi /etc/php/7.0/cli/php.ini
sudo vi /etc/php/7.0/fpm/php.ini
Configuring Nginx for Moodle
For Moodle to function, change the configuration of the default site served up by Nginx:
cd /etc/nginx/sites-available
sudo vi defaultKeep it simple for your basic installation:
server {

        listen 80;

        server_name _;

        root /var/www/html/moodle;
        index index.php index.html index.htm;

        location / {
                try_files $uri $uri/ =404;
        }
        location ~ [^/]\.php(/|$) {
                fastcgi_split_path_info ^(.+\.php)(/.+)$;
                fastcgi_pass unix:/run/php/php7.0-fpm.sock;
                fastcgi_index index.php;
                include fastcgi_params;
                fastcgi_param   PATH_INFO       $fastcgi_path_info;
                fastcgi_param   SCRIPT_FILENAME $document_root$fastcgi_script_name;
        }
}
For public deployments, the server must be properly configured for SSL. Let's Encrypt is a good option with instructions for using it with Nginx.
Restarting services
Now that everything is installed and configured for Moodle's requirements, restart some services to continue the installation:
sudo systemctl restart nginx
sudo systemctl restart php7.0-fpm
sudo systemctl restart mysql
Installing Git and cloning the Moodle source to the server
While you can download a ZIP file with the Moodle source and place it on your server, choosing instead to install Moodle with Git enables easy upgrades for both major and minor version updates. First, install Git:
sudo apt install gitNext, clone it to /var/www (or your alternate location of choice) on your server:
cd /var/www/
sudo git clone git://git.moodle.org/moodle.gitAfter that finishes, you will have a Moodle directory that you can switch over to and start the configuration:
cd moodle
sudo git branch -aYou will see a list of available Moodle versions to configure for your installation; select the current version (e.g., Moodle 3.4). Tell Git you're going to track and check out that version:
sudo git branch --track MOODLE_34_STABLE origin/MOODLE_34_STABLE
sudo git checkout MOODLE_34_STABLEWorking in the web browser
Now open your web browser to your newly created site either by IP address or the canonical name you gave this site. For example, if your server has the IP address of 192.168.1.20, then open your web browser to https://192.168.1.20/ and Moodle will open to the initial configuration page for your installation.
As you enter the final configuration, the Moodle installation process will configure the language options, the public address of your server (where Moodle is installed), and finally where the moodledata directory is stored.
You will notice that Moodle lists the location of your Moodledata directory where Moodle stores its cache files, course backups, and other temporary files. By default, Moodle chooses to store that within your main Moodle directory on your web server. You can move this to another location for security purposes if you wish, for example creating this directory under the /var directory:
sudo mkdir /var/moodledataAnd then give the www-data user access to this directory:
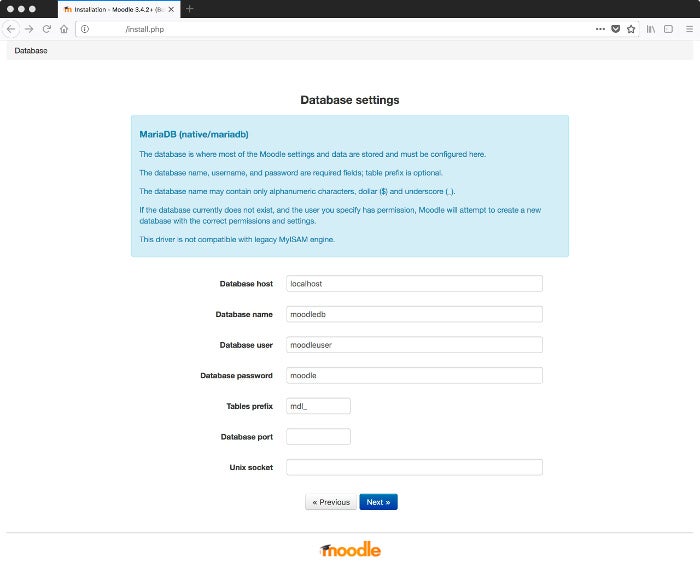
sudo chown -R www-data:www-data /var/moodledataNext, Moodle will ask about the database server and tables you set up earlier.
opensource.com
Moodle will ask you to agree to the license agreement, then do some pre-checks before creating the database tables. If there are problems, Moodle will highlight the missing item or required configuration change.
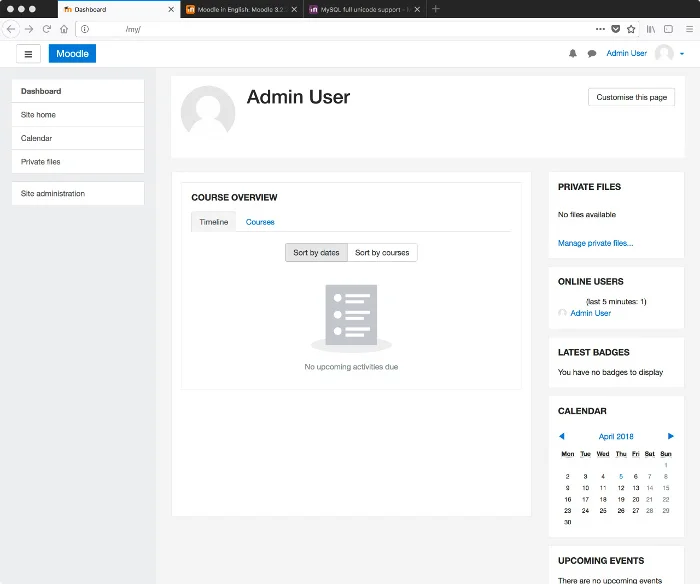
Complete the few remaining setup options—create an administrator account, your site name, and short site name—and you can even register your Moodle installation with https://moodle.net if you'd like.
Congratulations! You'll finally arrive at your Moodle site.
opensource.com
Experimenting with Moodle
Now that you have installed Moodle, you can experiment with a number of things:
- Creating courses in your new Moodle server
- Creating users or configuring LDAP authentication
- Adding plugins to extend Moodle's features
- Connecting with other Moodle users in the Moodle forums
Moodle has a number of excellent resources, from video tutorials to online documentation, to help you start developing your server and placing course content up for others to learn and enjoy.
Steve will be speaking at LinuxFest Northwest this year. See program highlights or register to attend.


Comments are closed.