Web components are a collection of open source technologies such as JavaScript and HTML that allow you to create custom elements that you can use and reuse in web apps. The components you create are independent of the rest of your code, so they're easy to reuse across many projects.
Best of all, it's a platform standard supported by all major modern browsers.
What's in a web component?
- Custom elements: This JavaScript API allows you to define new types of HTML elements.
- Shadow DOM: This JavaScript API provides a way to attach a hidden separate Document Object Model (DOM) to an element. This encapsulates your web component by keeping the styling, markup structure, and behavior isolated from other code on the page. It ensures that styles are not overridden by external styles or, conversely, that a style from your web component doesn't "leak" into the rest of the page.
- HTML templates: The element allows you to define reusable DOM elements. The element and its contents are not rendered in the DOM but can still be referenced using JavaScript.
Write your first web component
You can write a simple web component with your favorite text editor and JavaScript. This how-to uses bootstrap to generate simple stylings then creates a simple card web component to display the temperature of a location passed to it as an attribute. The component uses the Open Weather API, which requires you to generate an APPID/APIKey by signing in.
The syntax of calling this web component requires the location's longitude and latitude:
<weather-card longitude='85.8245' latitude='20.296' />Create a file named weather-card.js that will contain all the code for your web component. Start by defining your component. This can be done by creating a template element and adding some simple HTML elements into it:
const template = document.createElement('template');

template.innerHTML = `
  <div class="card">
    <div class="card-body"></div>
  </div>
`
Start defining the WebComponent class and its constructor:
class WeatherCard extends HTMLElement {
  constructor() {
    super();
    this._shadowRoot = this.attachShadow({ 'mode': 'open' });
    this._shadowRoot.appendChild(template.content.cloneNode(true));
  }
  ….
}
The constructor attaches the shadowRoot and sets it to open mode. Then the template is cloned to shadowRoot.
Next, access the attributes. These are the longitude and latitude, and you need them to make a GET request to the Open Weather API. This needs to be done in the connectedCallback function. You can use the getAttribute method to access the attributes or define getters to bind them to this object:
get longitude() {
  return this.getAttribute('longitude');
}

get latitude() {
  return this.getAttribute('latitude');
}
Now define the connectedCallBack method that fetches weather data whenever it is mounted:
connectedCallback() {
  var xmlHttp = new XMLHttpRequest();
  const url = `https://api.openweathermap.org/data/2.5/weather?lat=${this.latitude}&lon=${this.longitude}&appid=API_KEY`
  xmlHttp.open("GET", url, false);
  xmlHttp.send(null);
  this.$card = this._shadowRoot.querySelector('.card-body');
  let responseObj = JSON.parse(xmlHttp.responseText);
  let $townName = document.createElement('p');
  $townName.innerHTML = `Town: ${responseObj.name}`;
  this._shadowRoot.appendChild($townName);
  let $temperature = document.createElement('p');
  $temperature.innerHTML = `${parseInt(responseObj.main.temp - 273)} °C`
  this._shadowRoot.appendChild($temperature);
}
Once the weather data is retrieved, additional HTML elements are added to the template. Now, your class is defined.
Finally, define and register a new custom element by using the method window.customElements.define:
window.customElements.define('weather-card', WeatherCard);The first argument is the name of the custom element, and the second argument is the defined class. Here's a link to the entire component.
You've written your first web component! Now it's time to bring it to the DOM. To do that, you must load the JavaScript file with your web component definition in your HTML file (name it index.html):
<!DOCTYPE html>
<html>

<head>
  <meta charset="UTF-8">
</head>

<body>
  <weather-card longitude='85.8245' latitude='20.296'></weather-card>
  <script src='./weather-card.js'></script>
</body>

</html>
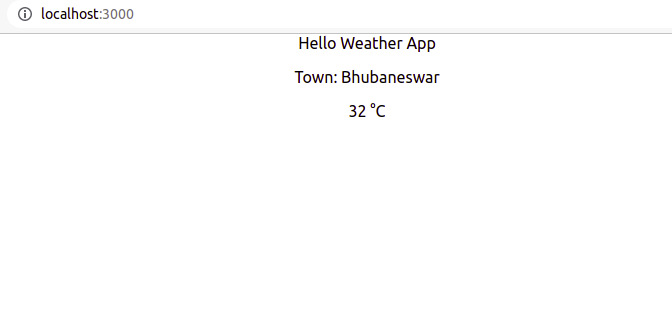
Here's your web component in a browser:

(Ramakrishna Pattnaik, CC BY-SA 4.0)
Because web components need only HTML, CSS, and JavaScript, they are natively supported by browsers and can be used seamlessly with frontend frameworks, including React and Vue. The following simple code snippet shows how to use web components with a simple React App bootstrapped with Create React App. For this, you need to import the weather-card.js file you defined earlier and use it as a component:
import './App.css';
import './weather-card';

function App() {
  return (
  <weather-card longitude='85.8245' latitude='20.296'></weather-card>
  );
}

export default App;
Lifecycle of a web component
All components follow a lifecycle from initialization to removal from the DOM (i.e., unmount). Methods are associated with each lifecycle event so that you can control the components better. The various lifecycle events of a web component include:
- Constructor: The constructor for a web component is called before it is mounted, meaning it's created before the element is attached to the document. It's used for initializing local state, binding event handlers, and creating the shadow DOM. The constructor must make a call to
super()to call the class the Web Component class extends. - ConnectedCallBack: This is called when an element is mounted (that is, inserted into the DOM tree). It deals with initializations creating DOM nodes and is used mostly for operations like instantiating network requests. React developers can relate it to
componentDidMount. - attributeChangedCallback: This method accepts three arguments:
name,oldValue, andnewValue. It is called whenever one of the component's observed attributes gets changed. Attributes are declared observed attributes using a staticobservedAttributesgetter:
static get observedAttributes() { return ['name', '_id']; }attributeChangedCallbackwill be called whenever the attribute name or_idis changed. - DisconnectedCallBack: This is called when an element is removed from the DOM tree (i.e., unmounted). It is equivalent to React's
componentWillUnmount. It is used to free resources that won't be garbage-collected automatically, like unsubscribing from DOM events, stopping interval timers, or unregistering all registered callbacks. - AdoptedCallback: It is called each time the custom element is moved to a new document. It only occurs when dealing with IFrames.
Modular open source
Web components can be a powerful way to develop web apps. Whether you're comfortable with JavaScript or just getting started with it, it's easy to create reusable code with this great open standard, no matter what browser your target audience uses.


Comments are closed.