

If you’ve ever wondered about the performance of your Raspberry Pi, then you might need a dashboard for your Pi. In this article, I demonstrate how to quickly building an on-demand monitoring dashboard for your Raspberry Pi so you can see your CPU performance, memory and disk usage in real time, and add more views and actions later as you need them.
If you’re already using Appsmith, you can also import the sample app directly and get started.
Appsmith
Appsmith is an open source, low-code app builder that helps developers build internal apps like dashboards and admin panels easily and quickly. It’s a great choice for your dashboard, and reduces the time and complexity of traditional coding approaches.
For the dashboard in this example, I display usage stats for:
- CPU
- Percentage utilization
- Frequency or clock speed
- Count
- Temperature
- Memory
- Percentage utilization
- Percentage available memory
- Total memory
- Free memory
- Disk
- Percentage disk utilization
- Absolute disk space used
- Available disk space
- Total disk space
Creating an endpoint
You need a way to get this data from your Raspberry Pi (RPi) and into Appsmith. The psutils Python library is useful for monitoring and profiling, and the Flask-RESTful Flask extension creates a REST API.
Appsmith calls the REST API every few seconds to refresh data automatically, and gets a JSON object in response with all desired stats as shown:
{ "cpu_count": 4,
"cpu_freq": [
600.0,
600.0,
1200.0 ],
"cpu_mem_avail": 463953920,
"cpu_mem_free": 115789824,
"cpu_mem_total": 971063296,
"cpu_mem_used": 436252672,
"cpu_percent": 1.8,
"disk_usage_free": 24678121472,
"disk_usage_percent": 17.7,
"disk_usage_total": 31307206656,
"disk_usage_used": 5292728320,
"sensor_temperatures": 52.616 }
1. Set up the REST API
If your Raspberry Pi doesn’t have Python on it yet, open a terminal on your Pi and run this install command:
$ sudo apt install python3Now set up a Python virtual environment for your development:
$ python -m venv PiDataNext, activate the environment. You must do this after rebooting your Pi.
$ source PiData/bin/activate
$ cd PiData
To install Flask and Flask-RESTful and dependencies you’ll need later, create a file in your Python virtual environment called requirements.txt and add these lines to it:
flask
flask-restful
gunicorn
Save the file, and then use pip to install them all at once. You must do this after rebooting your Pi.
(PyData)$ python -m pip install -r requirements.txtNext, create a file named pi_stats.py to house the logic for retrieving the RPi’s system stats with psutils. Paste this code into your pi_stat.py file:
from flask import Flask
from flask_restful import Resource, Api
import psutil
app = Flask(__name__)

api = Api(app)
class PiData(Resource):
    def get(self):
        return "RPI Stat dashboard"

api.add_resource(PiData, '/get-stats')

if __name__ == '__main__':
    app.run(debug=True)
Here’s what the code is doing:
- Use app = Flask(name) to define the app that nests the API object.
- Use Flask-RESTful’s API method to define the API object.
- Define PiData as a concrete Resource class in Flask-RESTful to expose methods for each supported HTTP method.
- Attach the resource,
PiData, to the API object,api, withapi.add_resource(PiData, '/get-stats'). - Whenever you hit the URL
/get-stats,PiDatais returned as the response.
2. Read stats with psutils
To get the stats from your Pi, you can use these built-in functions from psutils:
cpu_percentage,cpu_count,cpu_freq, andsensors_temperaturesfunctions for the percentage utilization, count, clock speed, and temperature respectively, of the CPUsensors_temperaturesreports the temperature of all the devices connected to the RPi. To get just the CPU’s temperature, use the keycpu-thermal.virtual_memoryfor total, available, used, and free memory stats in bytes.disk_usageto return the total, used, and free stats in bytes.
Combining all of the functions in a Python dictionary looks like this:
system_info_data = {
'cpu_percent': psutil.cpu_percent(1),
'cpu_count': psutil.cpu_count(),
'cpu_freq': psutil.cpu_freq(),
'cpu_mem_total': memory.total,
'cpu_mem_avail': memory.available,
'cpu_mem_used': memory.used,
'cpu_mem_free': memory.free,
'disk_usage_total': disk.total,
'disk_usage_used': disk.used,
'disk_usage_free': disk.free,
'disk_usage_percent': disk.percent,
'sensor_temperatures': psutil.sensors_temperatures()\['cpu-thermal'
][0].current, }
The next section uses this dictionary.
3. Fetch data from the Flask-RESTful API
To see data from your Pi in the API response, update pi_stats.py to include the dictionary system_info_data in the class PiData:
from flask import Flask
from flask_restful import Resource, Api
import psutil
app = Flask(__name__)
api = Api(app)

class PiData(Resource):
    def get(self):
        memory = psutil.virtual_memory()
        disk = psutil.disk_usage('/')
        system_info_data = {
            'cpu_percent': psutil.cpu_percent(1),
            'cpu_count': psutil.cpu_count(),
            'cpu_freq': psutil.cpu_freq(),
            'cpu_mem_total': memory.total,
            'cpu_mem_avail': memory.available,
            'cpu_mem_used': memory.used,
            'cpu_mem_free': memory.free,
            'disk_usage_total': disk.total,
            'disk_usage_used': disk.used,
            'disk_usage_free': disk.free,
            'disk_usage_percent': disk.percent,
            'sensor_temperatures': psutil.sensors_temperatures()['cpu-thermal'][0].current, }

    return system_info_data

api.add_resource(PiData, '/get-stats')

if __name__ == '__main__':
    app.run(debug=True)
Your script’s ready. Run the PiData.py script:
$ python PyData.py
 * Serving Flask app "PiData" (lazy loading)
 * Environment: production
 WARNING: This is a development server. Do not run this in a production environment.

 * Debug mode: on
 * Running on https://127.0.0.1:5000 (Press CTRL+C to quit)
 * Restarting with stat
 * Debugger is active!
You have a working API!
4. Make the API available to the internet
You can interact with your API on your local network. To reach it over the internet, however, you must open a port in your firewall and forward incoming traffic to the port made available by Flask. However, as the output of your test advised, running a Flask app from Flask is meant for development, not for production. To make your API available to the internet safely, you can use the gunicorn production server, which you installed during the project setup stage.
Now you can start your Flask API. You must do this any time you’ve rebooted your Pi.
$ gunicorn -w 4 'PyData:app'
Serving on https://0.0.0.0:8000
To reach your Pi from the outside world, open a port in your network firewall and direct incoming traffic to the IP address of your PI, at port 8000.
First, get the internal IP address of your Pi:
$ ip addr show | grep inetInternal IP addresses start with 10 or 192 or 172.
Next, you must configure your firewall. There’s usually a firewall embedded in the router you get from your internet service provider (ISP). Generally, you access your home router through a web browser. Your router’s address is sometimes printed on the bottom of the router, and it begins with either 192.168 or 10. Every device is different, though, so there’s no way for me to tell you exactly what you need to click on to adjust your settings. For a full description of how to configure your firewall, read Seth Kenlon’s article Open ports and route traffic through your firewall.
Alternately, you can use localtunnel to use a dynamic port-forwarding service.
Once you’ve got traffic going to your Pi, you can query your API:
$ curl https://example.com/get-stats
{
   "cpu_count": 4,
   "cpu_freq": [
      600.0,
      600.0,
      1200.0 ],
   "cpu_mem_avail": 386273280,
   ...
If you have gotten this far, the toughest part is over.
5. Repetition
If you reboot your Pi, you must follow these steps:
- Reactivate your Python environment with
source - Refresh the application dependencies with
pip - Start the Flask application with
gunicorn
Your firewall settings are persistent, but if you’re using localtunnel, then you must also start a new tunnel after a reboot.
You can automate these tasks if you like, but that’s a whole other tutorial. The final section of this tutorial is to build a UI on Appsmith using the drag-and-drop widgets, and a bit of Javascript, to bind your RPi data to the UI. Believe me, it’s easy going from here on out!
Build the dashboard on Appsmith.
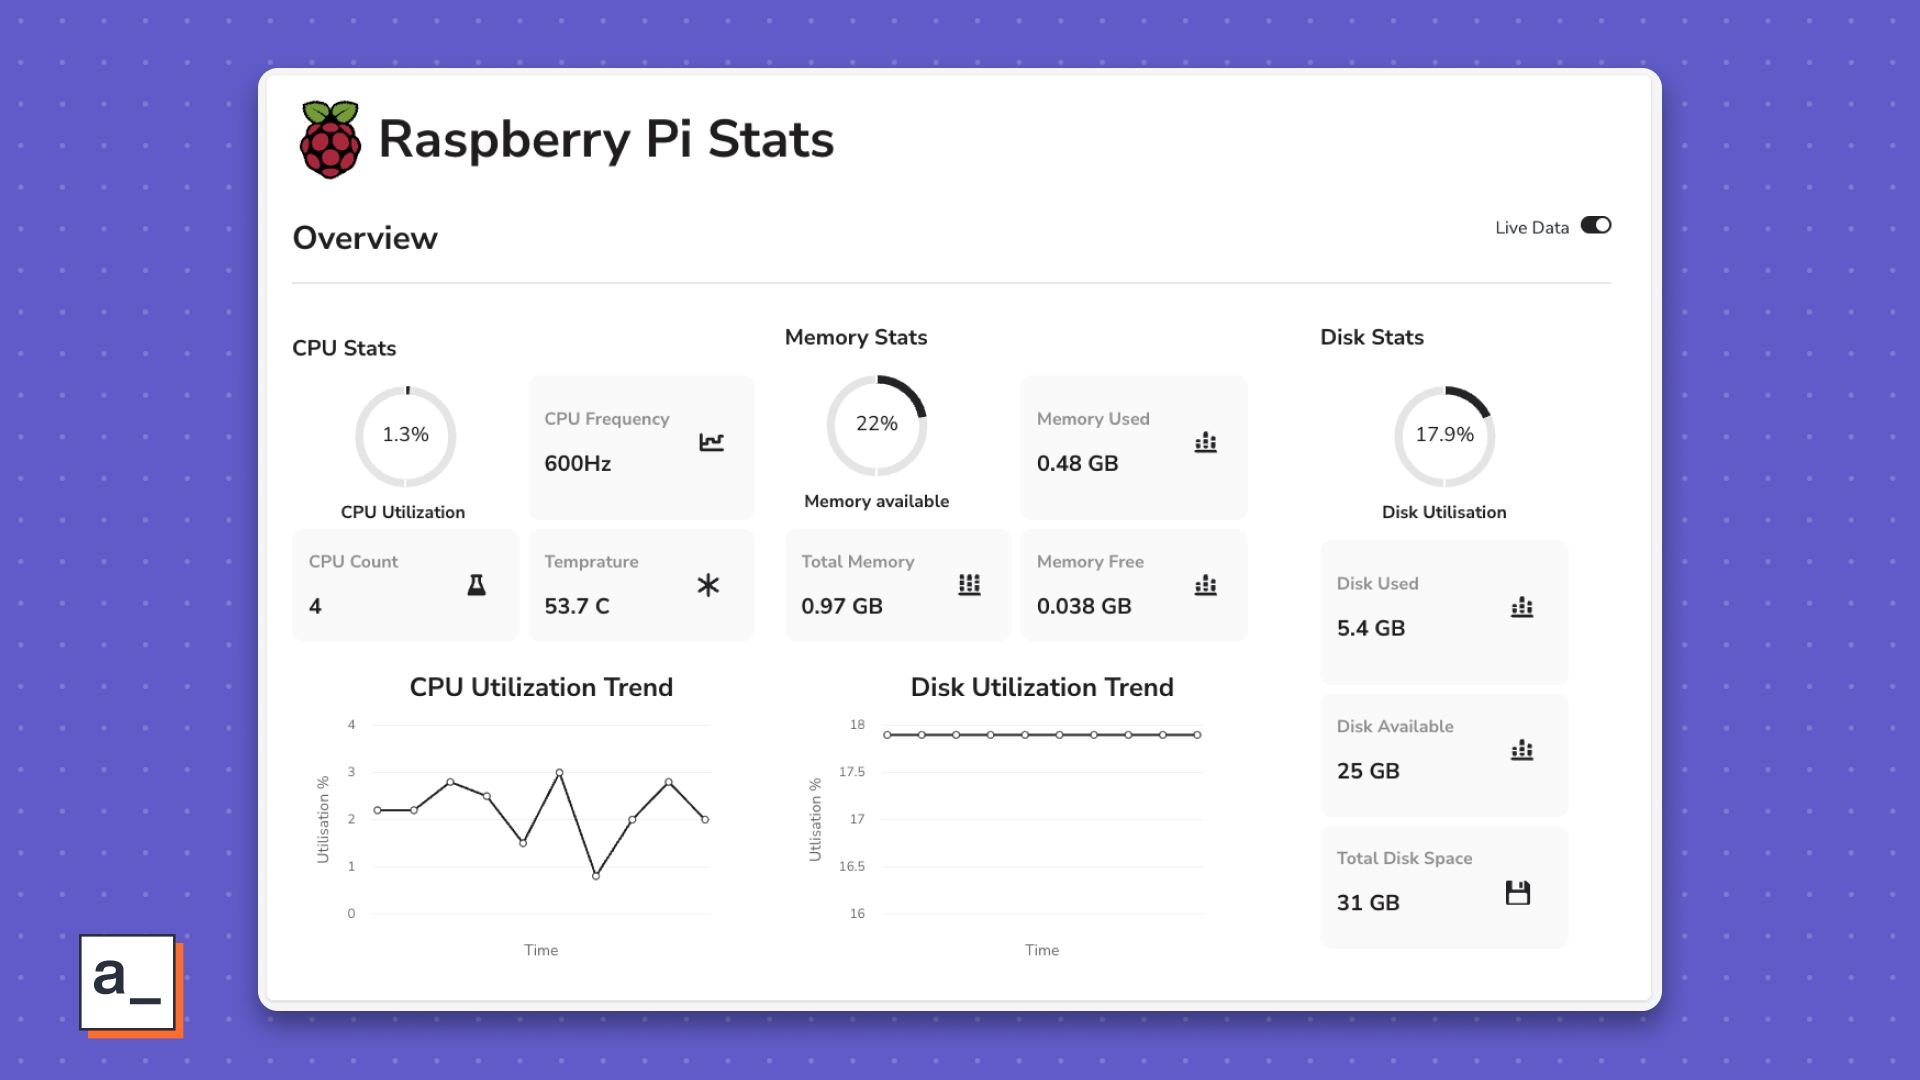
(Keyur Paralkar, CC BY-SA 4.0)
To get to a dashboard like this, you need to connect the exposed API endpoint to Appsmith, build the UI using Appsmith’s widgets library, and bind the API’s response to your widgets. If you’re already using Appsmith, you can just import the sample app directly and get started.
If you haven’t done so already, sign up for a free Appsmith account. Alternately, you can self-host Appsmith.
Connect the API as an Appsmith datasource
Sign in to your Appsmith account.
- Find and click the + button next to QUERIES/JS in the left nav.
- Click Create a blank API.
- At the top of the page, name your project PiData.
- Get your API’s URL. If you’re using localtunnel, then that’s a
localtunnel.meaddress, and as always append/get-statsto the end for the stat data. Paste it into the first blank field on the page, and click the RUN button.
Confirm that you see a successful response in the Response pane.
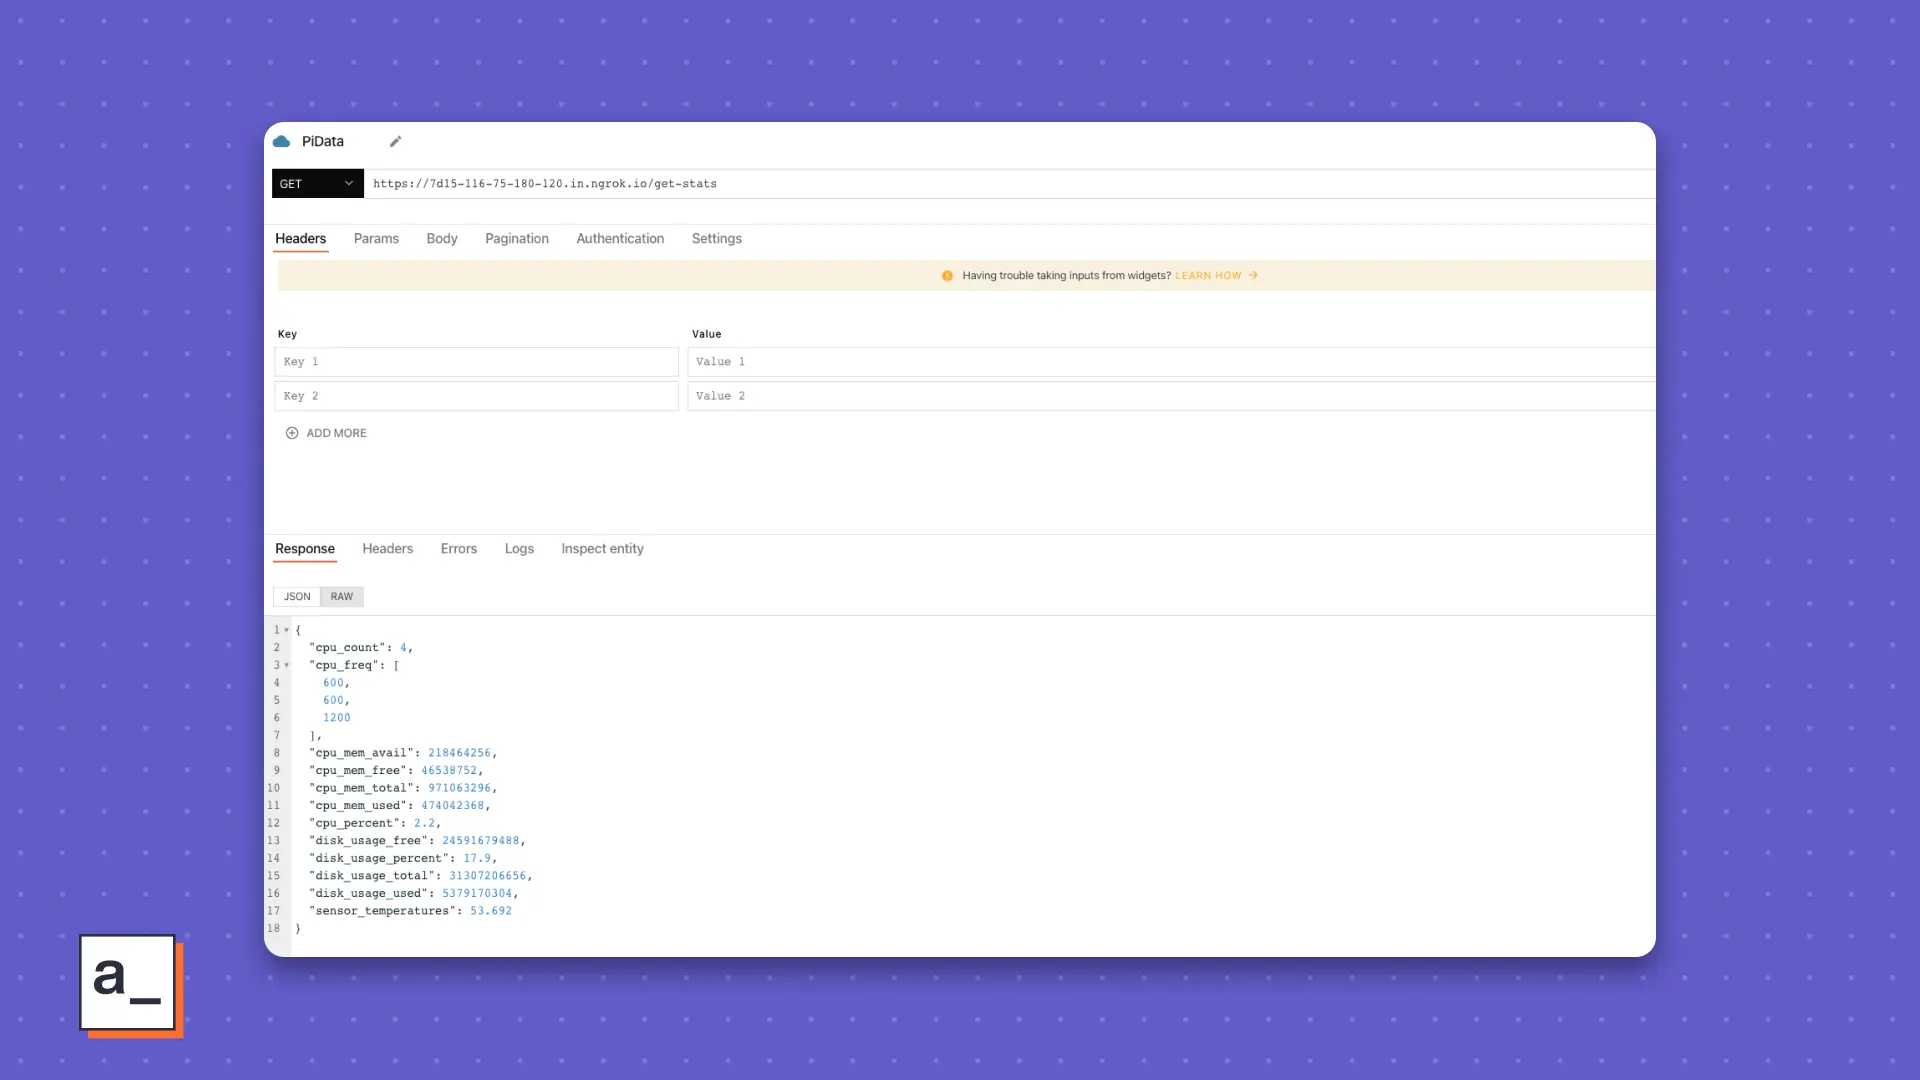
(Keyur Paralkar, CC BY-SA 4.0)
Build the UI
The interface for AppSmith is pretty intuitive, but I recommend going through building your first application on Appsmith tutorial if you feel lost.
For the title, drag and drop a Text, Image, and Divider widget onto the canvas. Arrange them like this:

(Keyur Paralkar, CC BY-SA 4.0)
The Text widget contains the actual title of your page. Type in something cooler than “Raspberry Pi Stats”.
The Image widget houses a distinct logo for the dashboard. You can use whatever you want.
Use a Switch widget for a toggled live data mode. Configure it in the Property pane to get data from the API you’ve built.
For the body, create a place for CPU Stats with a Container widget using the following widgets from the Widgets library on the left side:
- Progress Bar
- Stat Box
- Chart
Do the same for the Memory and Disk stats sections. You don’t need a Chart for disk stats, but don’t let that stop you from using one if you can find uses for it.
Your final arrangement of widgets should look something like this:
(Keyur Paralkar, CC BY-SA 4.0)
The final step is to bind the data from the API to the UI widgets you have.
Bind data to the widgets
Head back to the canvas and find your widgets in sections for the three categories. Set the CPU Stats first.
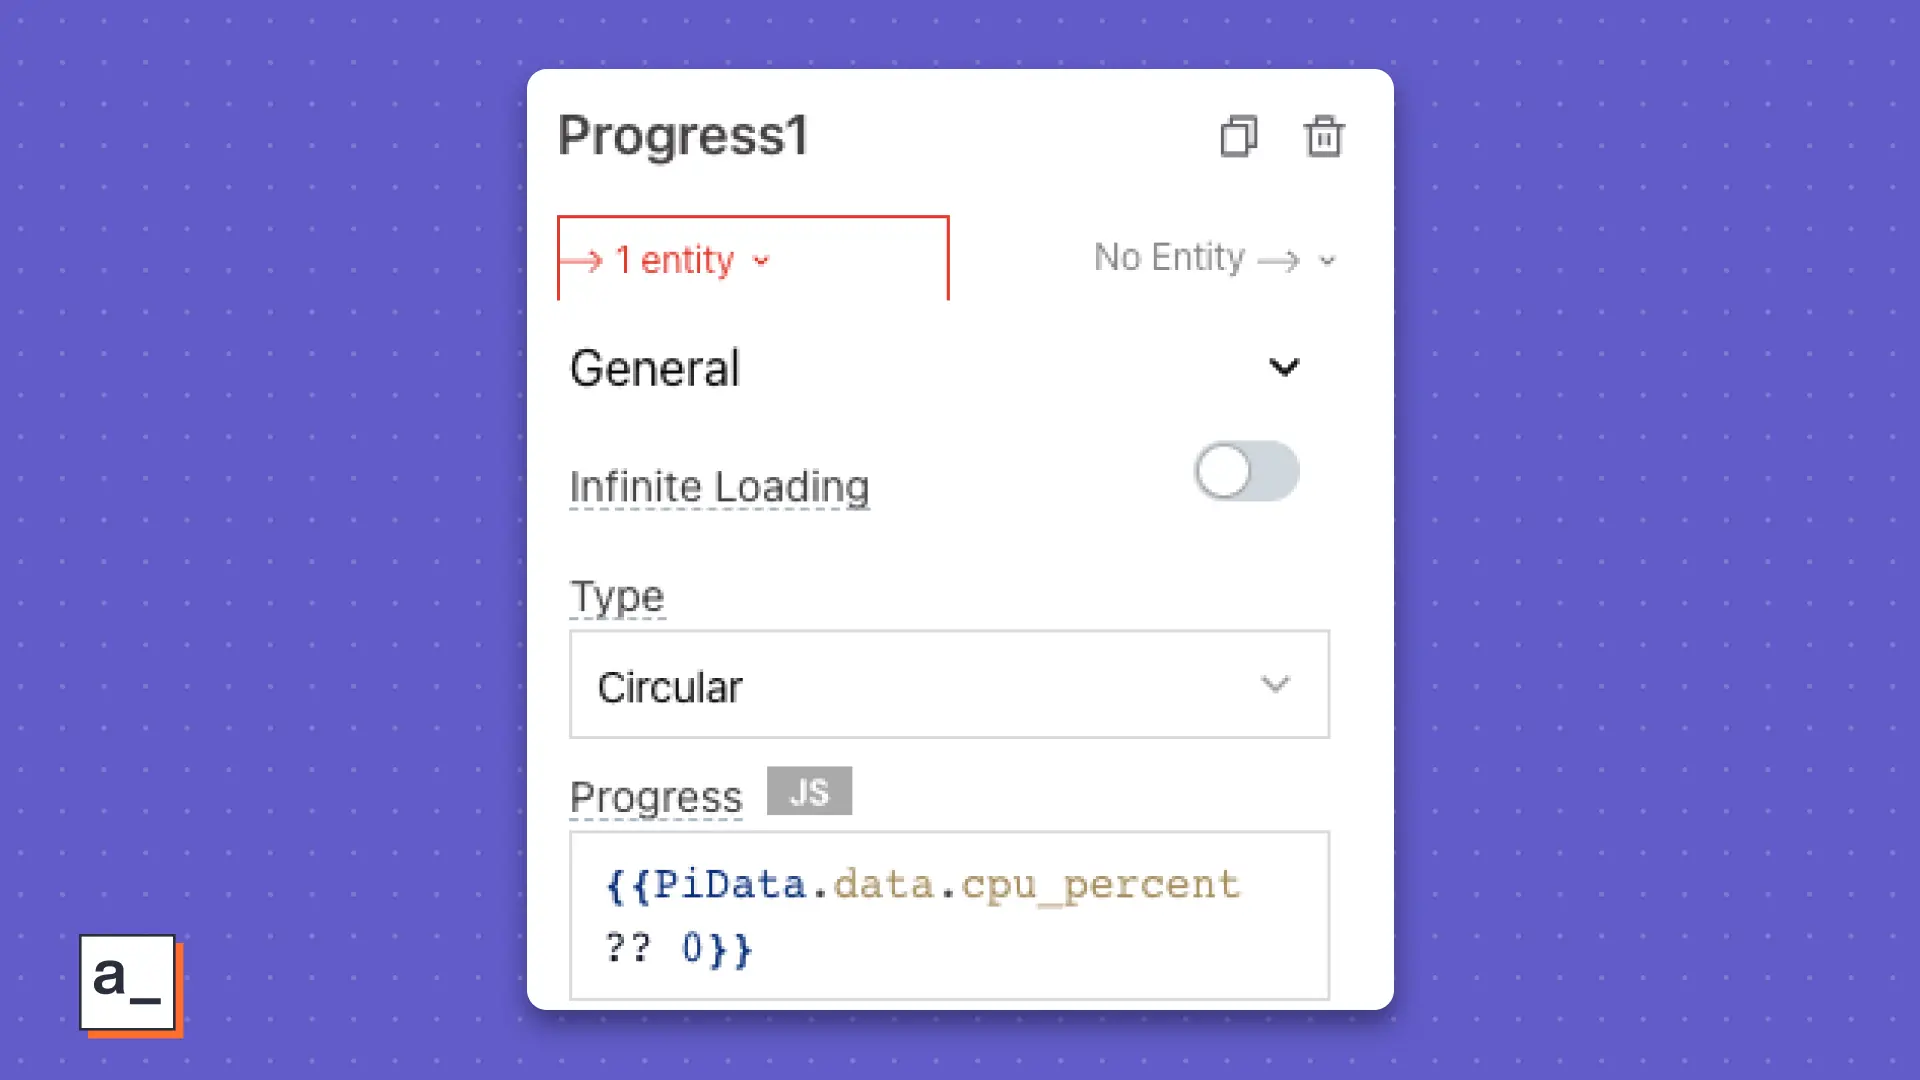
To bind data to the Progress Bar widget:
- Click the Progress Bar widget to see the Property pane on the right.
- Look for the Progress property.
- Click the JS button to activate Javascript.
- Paste
{{PiData.data.cpu_percent ?? 0}}in the field for Progress. That code references the stream of data from of your API namedPiData. Appsmith caches the response data within the.dataoperator ofPiData. The keycpu_percentcontains the data Appsmith uses to display the percentage of, in this case, CPU utilization. - Add a Text widget below the Progress Bar widget as a label.
(Keyur Paralkar, CC BY-SA 4.0)
There are three Stat Box widgets in the CPU section. Binding data to each one is the exact same as for the Progress Bar widget, except that you bind a different data attribute from the .data operator. Follow the same procedure, with these exceptions:
{{${PiData.data.cpu_freq[0]} ?? 0 }}to show clock speed.{{${PiData.data.cpu_count} ?? 0 }}for CPU count.{{${(PiData.data.sensor_temperatures).toPrecision(3)} ?? 0 }}for CPU temperature data.
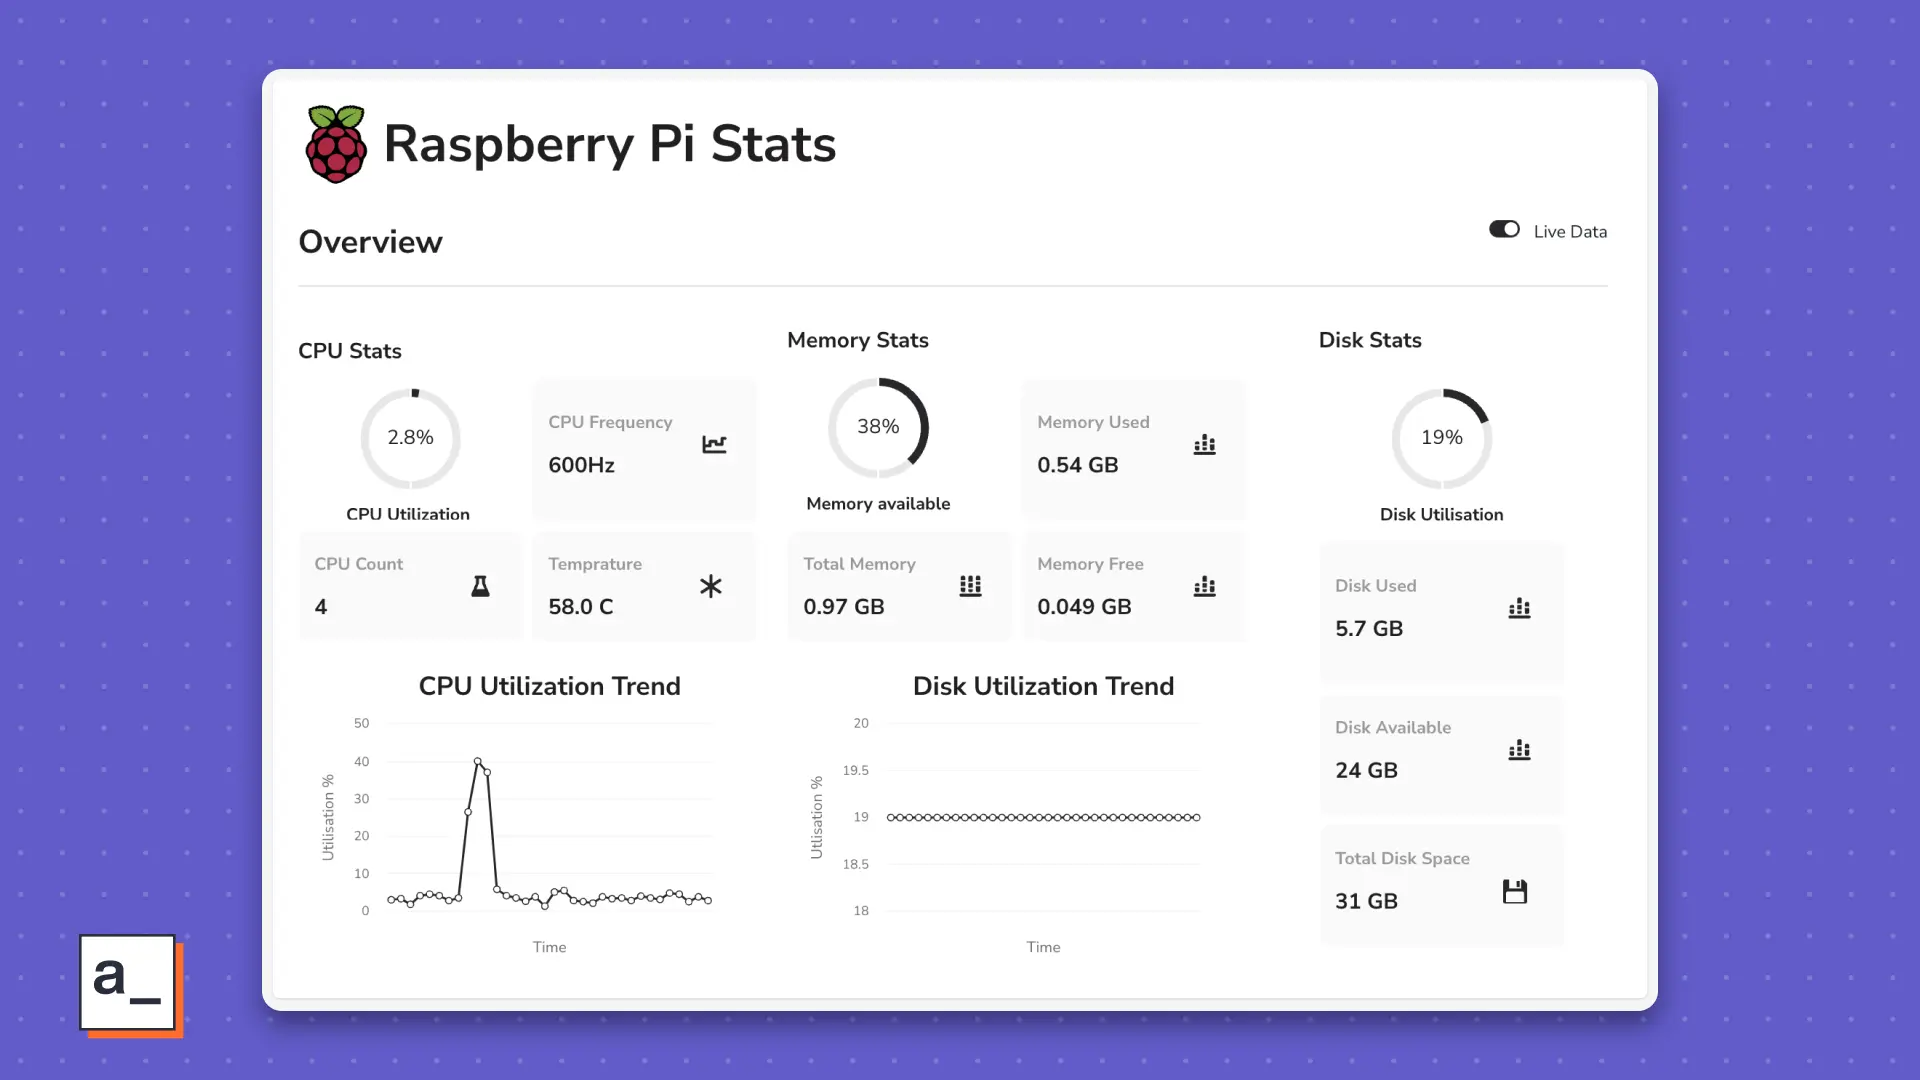
Assuming all goes to plan, you end up with a pretty dashboard like this one:
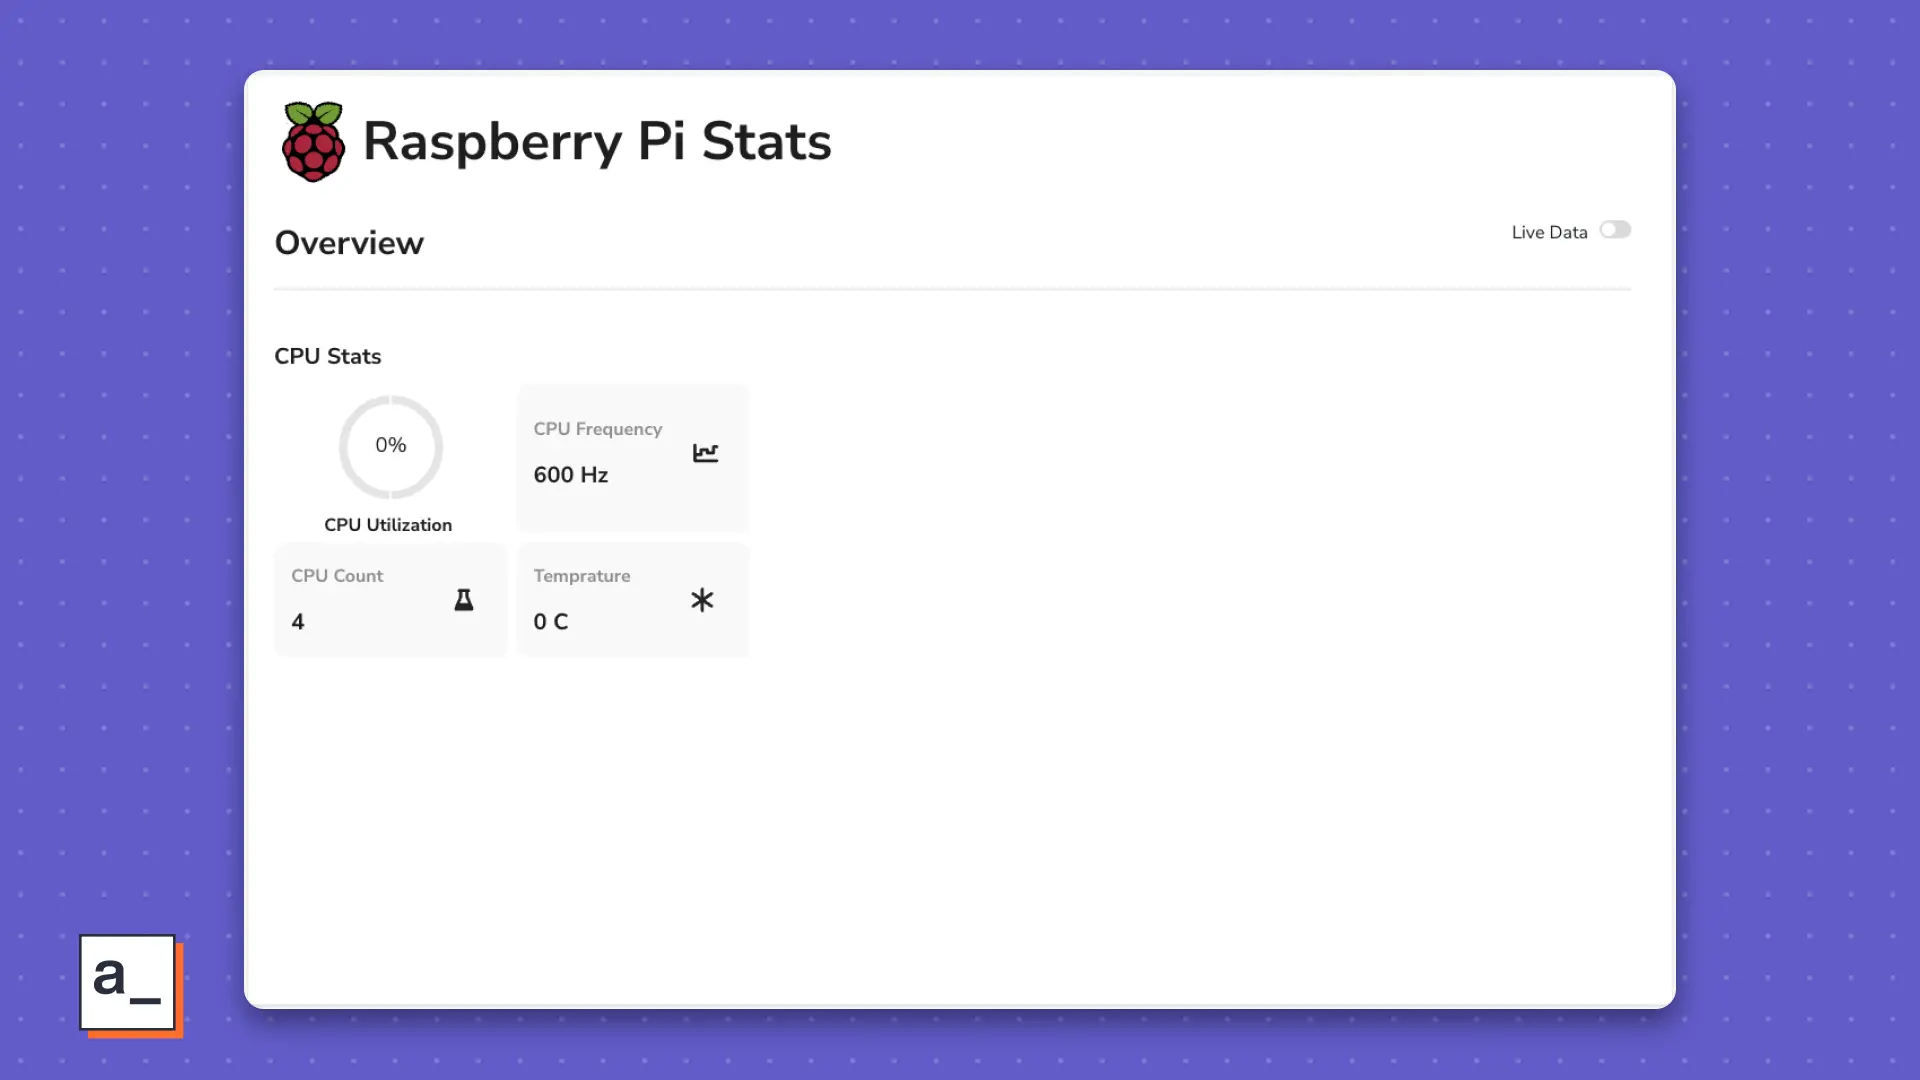
(Keyur Paralkar, CC BY-SA 4.0)
CPU utilization trend
You can use a Chart widget to display the CPU utilization as a trend line, and have it automatically update over time.
First, click the widget, find the Chart Type property on the right, and change it to LINE CHART. To see a trend line, store cpu_percent in an array of data points. Your API currently returns this as a single data point in time, so use Appsmith’s storeValue function (an Appsmith-native implementation of a browser’s setItem method) to get an array.
Click the + button next to QUERIES/JS and name it utils.
Paste this Javascript code into the Code field:
export default {
  getLiveData: () => {
  //When switch is on:
    if (Switch1.isSwitchedOn) {
      setInterval(() => {
        let utilData = appsmith.store.cpu_util_data;

        PiData.run()
          storeValue("cpu_util_data", [...utilData, {
            x: PiData.data.cpu_percent,
            y: PiData.data.cpu_percent
          }]);
        }, 1500, 'timerId')
      } else {
    clearInterval('timerId');
  }
},
initialOnPageLoad: () => {
  storeValue("cpu_util_data", []);
  }
}
To initialize the Store, you’ve created a JavaScript function in the object called initialOnPageLoad, and you’ve housed the storeValue function in it.
You store the values from cpu_util_data into the storeValue function using storeValue("cpu_util_data", []);. This function runs on page load.
So far, the code stores one data point from cpu_util_data in the Store each time the page is refreshed. To store an array, you use the x and y subscripted variables, both storing values from the cpu_percent data attribute.
You also want this data stored automatically by a set interval between stored values. When the function setInterval is executed:
- The value stored in
cpu_util_datais fetched. - The API
PiDatais called. cpu_util_datais updated asxandyvariables with the latestcpu_percentdata returned.- The value of
cpu_util_datais stored in the keyutilData. - Steps 1 through 4 are repeated if and only if the function is set to auto-execute. You set it to auto-execute with the Switch widget, which explains why there is a
getLiveDataparent function.
Navigate to the Settings tab to find all the parent functions in the object and set initialOnPageLoad to Yes in the RUN ON PAGE LOAD option.
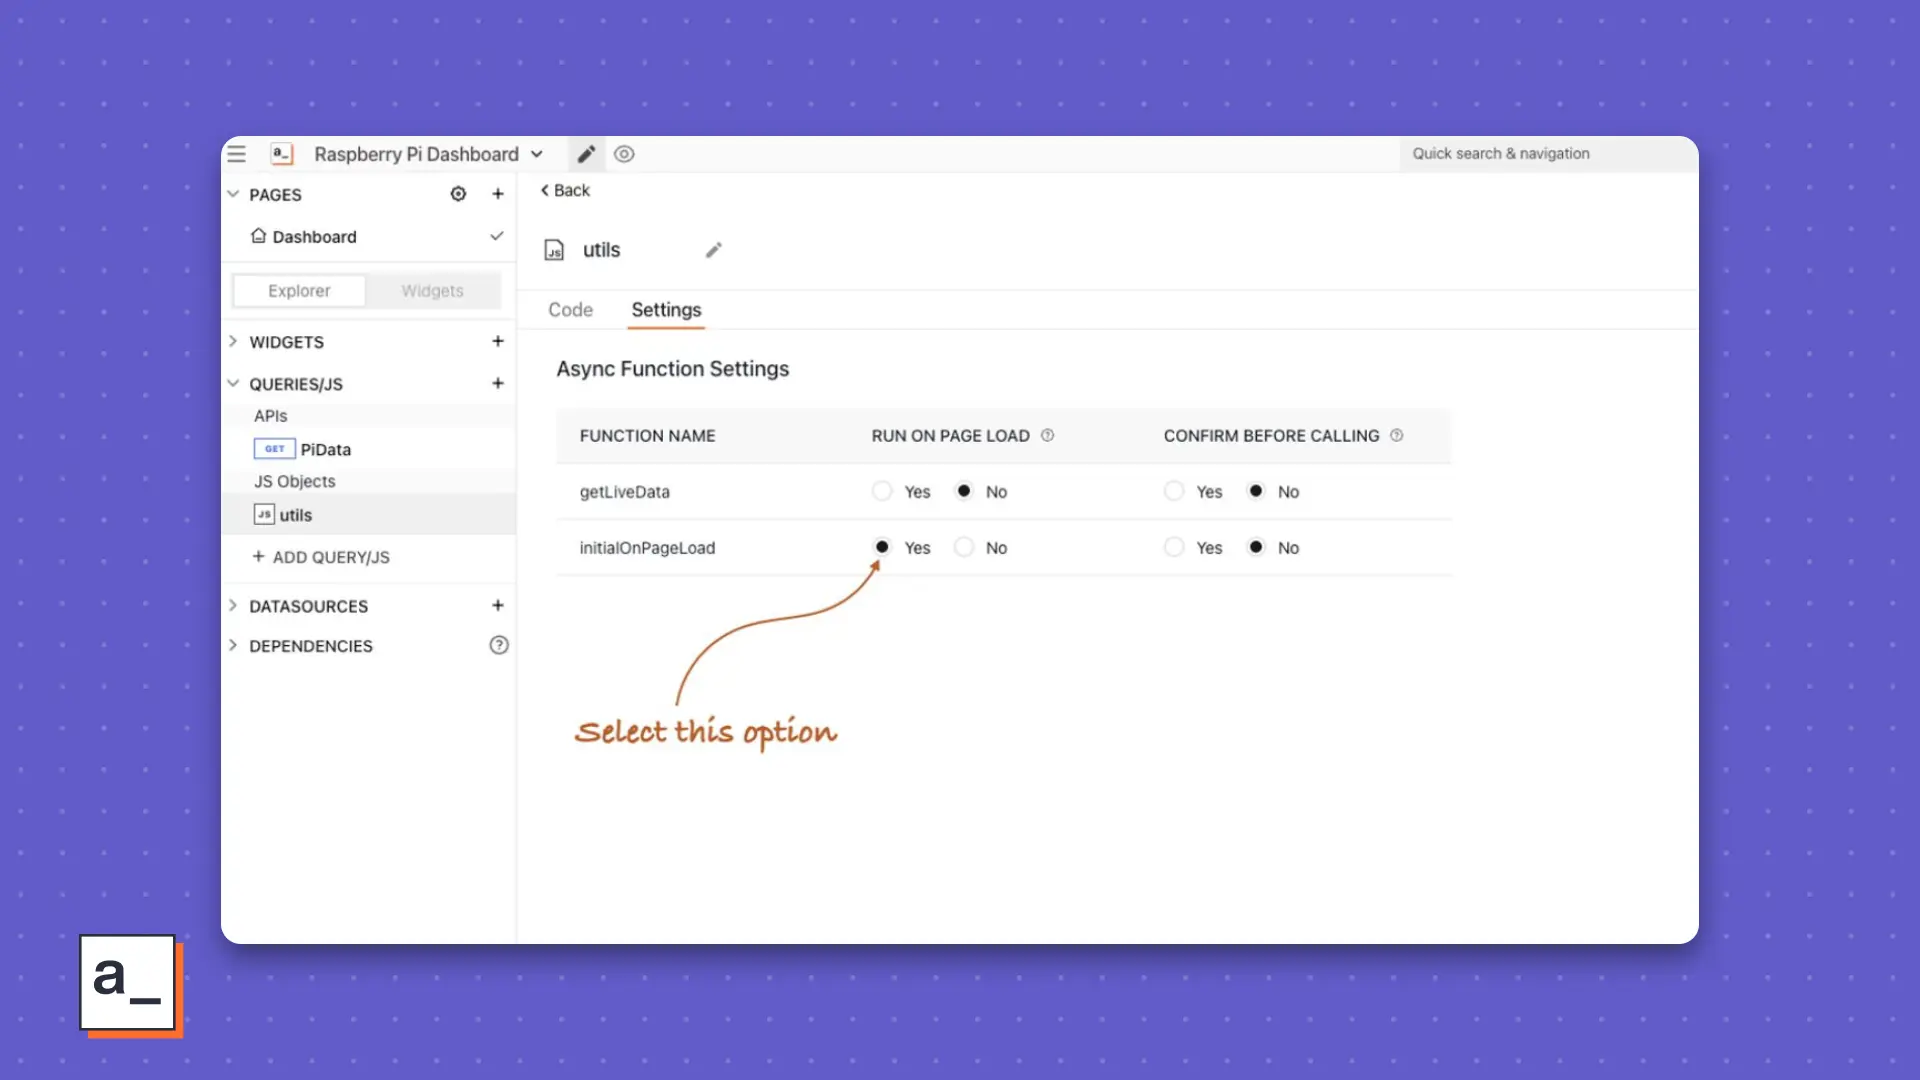
(Keyur Paralkar, CC BY-SA 4.0)
Now refresh the page for confirmation
Return to the canvas. Click the Chart widget and locate the Chart Data property. Paste the binding {{ appsmith.store.disk_util_data }} into it. This gets your chart if you run the object utils yourself a few times. To run this automatically:
- Find and click the Live Data Switch widget in your dashboard’s title.
- Look for the
onChangeevent. - Bind it to
{{ utils.getLiveData() }}. The Javascript object isutils, andgetLiveDatais the function that activates when you toggle the Switch on, which fetches live data from your Raspberry Pi. But there’s other live data, too, so the same switch works for them. Read on to see how.
Bind all the data
Binding data to the widgets in the Memory and Disk sections is similar to how you did it for the CPU Stats section.
For Memory, bindings change to:
{{( PiData.data.cpu_mem_avail/1000000000).toPrecision(2) \* 100 ?? 0 }}for the Progress Bar.{{ \${(PiData.data.cpu_mem_used/1000000000).toPrecision(2)} ?? 0 }} GB,{{ \${(PiData.data.cpu_mem_free/1000000000).toPrecision(2)} ?? 0}} GB, and{{ \${(PiData.data.cpu_mem_total/1000000000).toPrecision(2)} ?? 0 }} GBfor the three Stat Box widgets.
For Disk, bindings on the Progress Bar, and Stat Box widgets change respectively to:
{{ PiData.data.disk_usage_percent ?? 0 }}{{ \${(PiData.data.disk_usage_used/1000000000).toPrecision(2)} ?? 0 }} GB{{ \${(PiData.data.disk_usage_free/1000000000).toPrecision(2)} ?? 0 }} GBand{{ \${(PiData.data.disk_usage_total/1000000000).toPrecision(2)} ?? 0 }} GBfor the three Stat Box widgets.
The Chart here needs updating the utils object you created for CPU Stats with a storeValue key called disk_util_data nested under getLiveData that follows the same logic as cpu_util_data. For the disk utilization chart, we store disk_util_data that follows the same logic as that of the CPU utilization trend chart.
export default {
getLiveData: () => {
//When switch is on:
if (Switch1.isSwitchedOn) {
setInterval(() => {
const cpuUtilData = appsmith.store.cpu_util_data;
const diskUtilData = appsmith.store.disk_util_data;
PiData.run();
storeValue("cpu_util_data", [...cpuUtilData, { x: PiData.data.cpu_percent,y: PiData.data.cpu_percent }]);
storeValue("disk_util_data", [...diskUtilData, { x: PiData.data.disk_usage_percent,y: PiData.data.disk_usage_percent }]);
}, 1500, 'timerId')
} else {
clearInterval('timerId');
}
},
initialOnPageLoad: () => {
storeValue("cpu_util_data", []);
storeValue("disk_util_data", []);
}
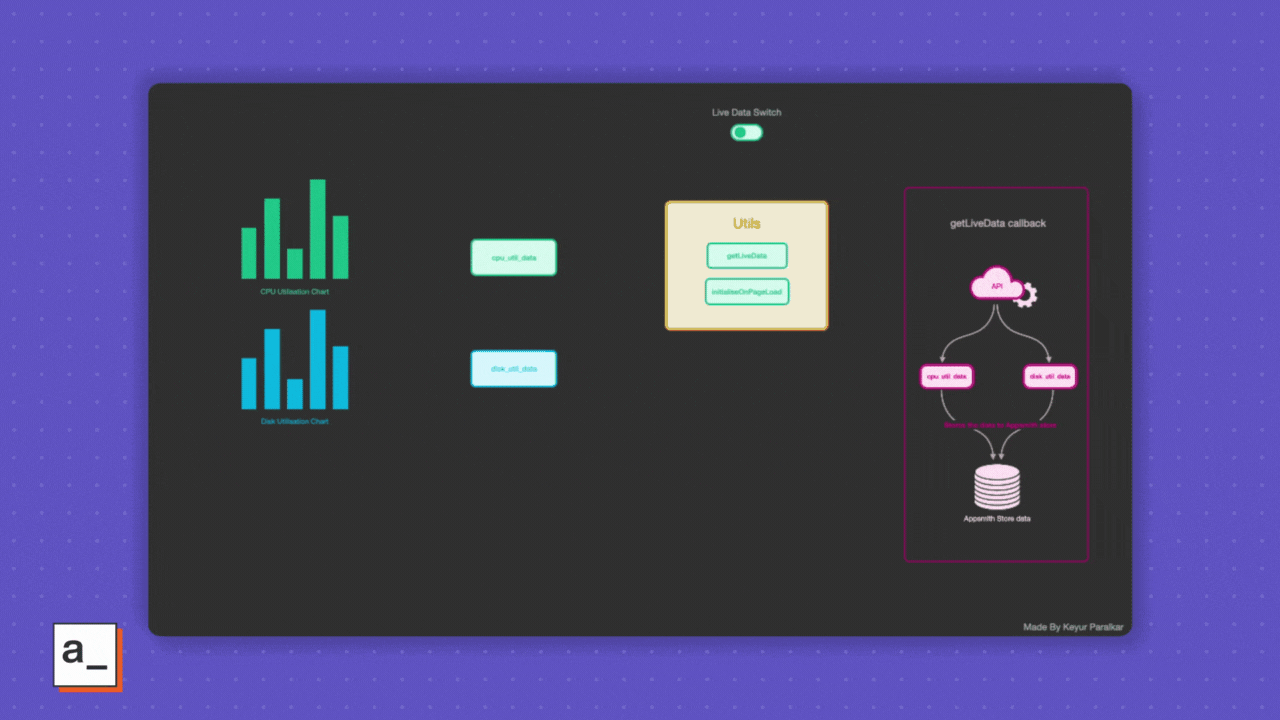
}Visualizing the flow of data triggered by the Switch toggling live data on and off with the utils Javascript object looks like this:
(Keyur Paralkar, CC BY-SA 4.0)
Toggled on, the charts change like this:
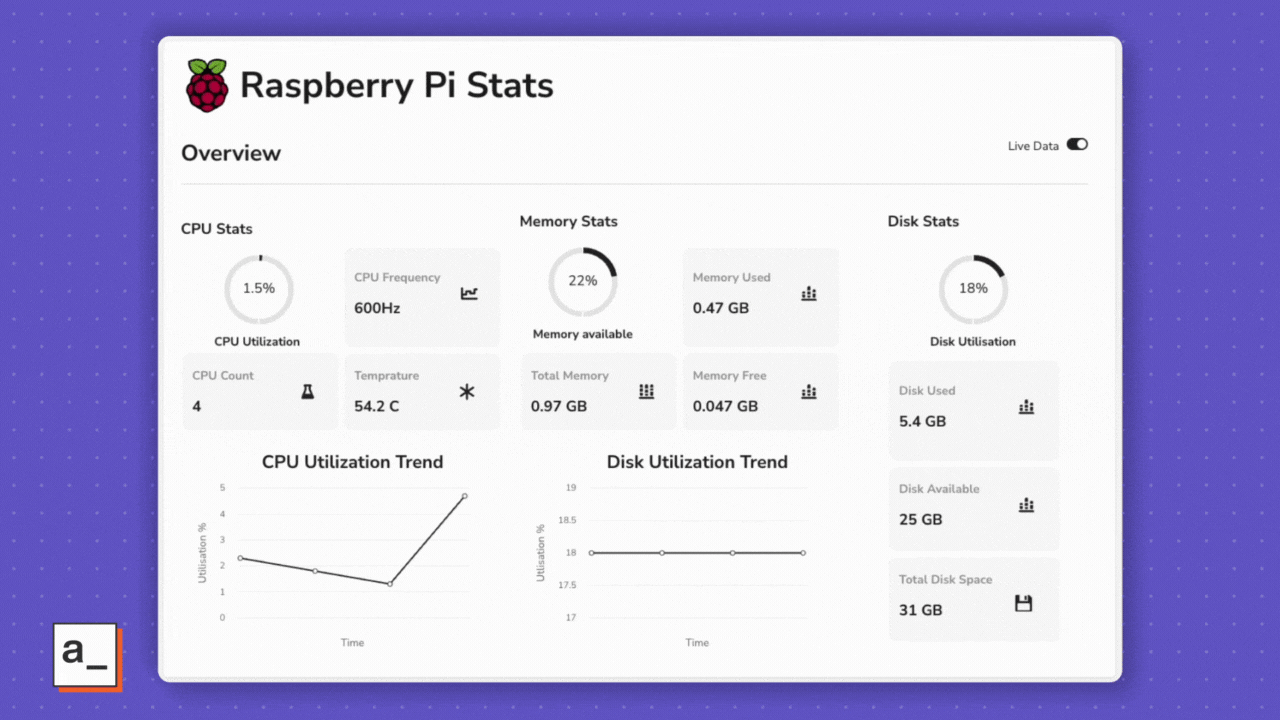
(Keyur Paralkar, CC BY-SA 4.0)
Pretty, minimalistic, and totally useful.
Enjoy
As you get more comfortable with psutils, Javascript, and Appsmith, I think you’ll find you can tweak your dashboard easily and endlessly to do really cool things like:
- See trends from the previous week, month, quarter, year, or any custom range that your RPi data allows
- Build an alert bot for threshold breaches on any stat
- Monitor other devices connected to your Raspberry Pi
- Extend
psutilsto another computer with Python installed - Monitor your home or office network using another library
- Monitor your garden
- Track your own life habits
Until the next awesome build, happy hacking!


Comments are closed.