How to set up a personal web server with a Raspberry Pi

734 readers like this.
How to use Python to hack your Eclipse IDE

Opensource.com

A personal web server is "the cloud," except you own and control it as opposed to a large corporation.

Owning a little cloud has a lot of benefits, including customization, free storage, free Internet services, a path into open source software, high-quality security, full control over your content, the ability to make quick changes, a place to experiment with code, and much more. Most of these benefits are immeasurable, but financially these benefits can save you over $100 per month.
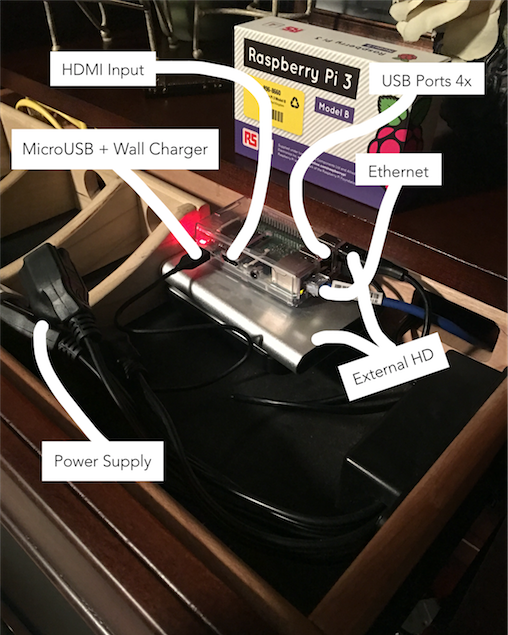
Raspberry Pi as a web server

Raspberry Pi as a web server, by Raspberry Pi Guy, CC-BY-SA 4.0

I could have used AWS, but I prefer complete freedom, full control over security, and learning how things are built.


  • Self web-hosting: No BlueHost or DreamHost
  • Cloud storage: No Dropbox, Box, Google Drive, Microsoft Azure, iCloud, or AWS
  • On-premise security
  • HTTPS: Let’s Encrypt
  • Analytics: Google
  • OpenVPN: Do not need private Internet access (at an estimated $7 per month)

Things I used:

  • Raspberry Pi 3 Model B
  • MicroSD Card (32GB recommended, Raspberry Pi Compatible SD Cards)
  • USB microSD card reader
  • Ethernet cable
  • Router connected to Wi-Fi
  • Raspberry Pi case
  • Amazon Basics MicroUSB cable
  • Apple wall charger
  • USB mouse
  • USB keyboard
  • HDMI cable
  • Monitor (with HDMI input)
  • MacBook Pro

Step 1: Setting up the Raspberry Pi

Download the most recent release of Raspbian (the Raspberry Pi operating system). Raspbian Jessie ZIP version is ideal [1]. Unzip or extract the downloaded file. Copy it onto the SD card. Pi Filler makes this process easy. Download Pi Filer 1.3 or the most recent version. Unzip or extract the downloaded file and open it. You should be greeted with this prompt:
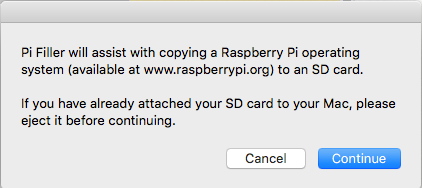
Pi Filler prompt

Make sure the USB card reader has NOT been inserted yet. If it has, eject it. Proceed by clicking Continue. A file explorer should appear. Locate the uncompressed Raspberry Pi OS file from your Mac or PC and select it. You should see another prompt like the one pictured below:
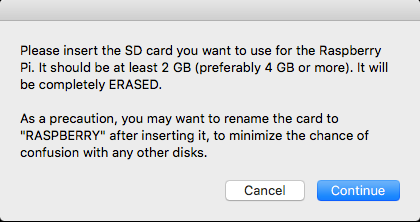
USB card reader prompt

Insert the MicroSD card (32GB recommended, 16GB minimum) into the USB MicroSD Card Reader. Then insert the USB reader into the Mac or PC. You can rename the SD card to "Raspberry" to distinguish it from others. Click Continue. Make sure the SD card is empty. Pi Filler will erase all previous storage at runtime. If you need to back up the card, do so now. When you are ready to continue, the Raspbian OS will be written to the SD card. It should take between one to three minutes. Once the write is completed, eject the USB reader, remove the SD card, and insert it into the Raspberry Pi SD card slot. Give the Raspberry Pi power by plugging the power cord into the wall. It should start booting up. The Raspberry Pi default login is:

username: pi

password: raspberry

When the Raspberry Pi has completed booting for the first time, a configuration screen titled "Setup Options" should appear like the image below [2]:
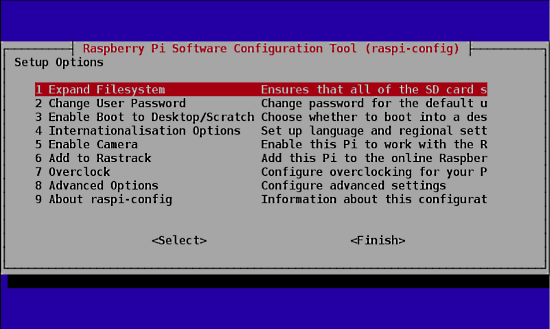
Raspberry Pi software configuration setup

Select the "Expand Filesystem" option and hit the Enter key [3]. Also, I recommend selecting the second option, "Change User Password." It is important for security. It also personalizes your Raspberry Pi.

(Note: For an extra layer of security install fail2ban. Fail2Ban blocks suspicious requests coming from the internet. For example, if there are too many attempts to guess the password, it will block that IP address. It can be installed by typing into terminal: $ sudo apt-get install fail2ban)

Select the third option in the setup options list, "Enable Boot To Desktop/Scratch" and hit the Enter key. It will take you to another window titled "Choose boot option" as shown in the image below.
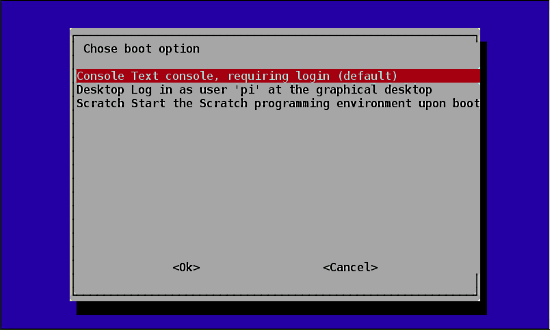
Choose boot option

In the "Choose boot option" window, select the second option, "Desktop log in as user 'pi' at the graphical desktop" and hit the Enter button [4]. Once this is done you will be taken back to the "Setup Options" page. If not, select the "OK" button at the bottom of this window and you will be taken back to the previous window.

Once both these steps are done, select the "Finish" button at the bottom of the page and it should reboot automatically. If it does not, then use the following command in the terminal to reboot.

$ sudo reboot

After the reboot from the previous step, if everything went well, you will end up on the desktop similar to the image below.
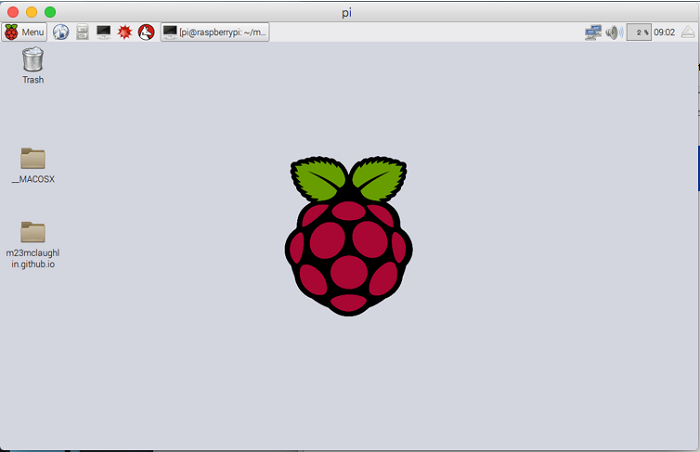
Raspberry Pi desktop

Once you are on the desktop, open a terminal and enter the following commands to update the firmware of the Raspberry Pi.

$ sudo apt-get update

$ sudo apt-get upgrade -y

$ sudo apt-get dist-upgrade -y

$ sudo rpi-update

This may take a few minutes. Now the Raspberry Pi is up-to-date and running.

Step 2: Configuring the Raspberry Pi

SSH, which stands for Secure Shell, is a cryptographic network protocol that lets you securely transfer data between your computer and your Raspberry Pi. You can control your Raspberry Pi from your Mac's command line without a monitor or keyboard.

To use SSH, first, you need your Pi's IP address. Open the terminal and type:

$ sudo ifconfig

If you are using Ethernet, look at the "eth0" section. If you are using Wi-Fi, look at the "wlan0" section.

Find "inet addr" followed by an IP address—something like 192.168.1.115, a common default IP I will use for the duration of this article.

With this address, open terminal and type:

$ ssh pi@192.168.1.115

For SSH on PC, see footnote [5].

Enter the default password "raspberry" when prompted, unless you changed it.

You are now logged in via SSH.

Remote desktop

Using a GUI (graphical user interface) is sometimes easier than a command line. On the Raspberry Pi's command line (using SSH) type:

$ sudo apt-get install xrdp

Xrdp supports the Microsoft Remote Desktop Client for Mac and PC.

On Mac, navigate to the app store and search for "Microsoft Remote Desktop." Download it. (For a PC, see footnote [6].)

After installation, search your Mac for a program called "Microsoft Remote Desktop." Open it. You should see this:
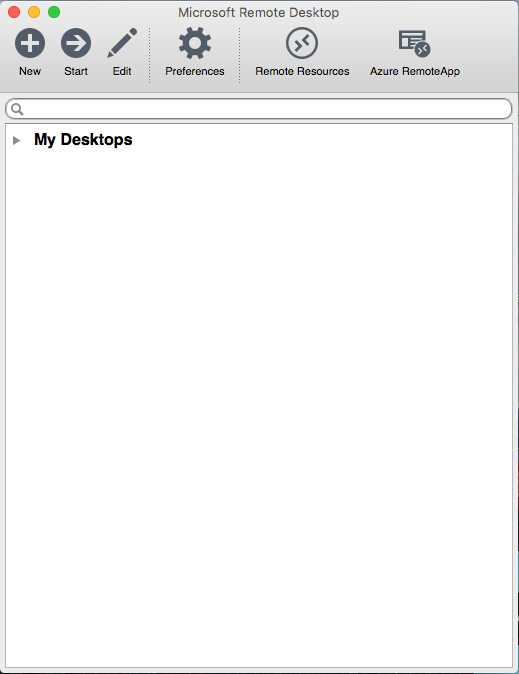
Microsoft Remote Desktop

Image by Raspberry Pi Guy, CC BY-SA 4.0


Click "New" to set up a remote connection. Fill in the blanks as shown below.
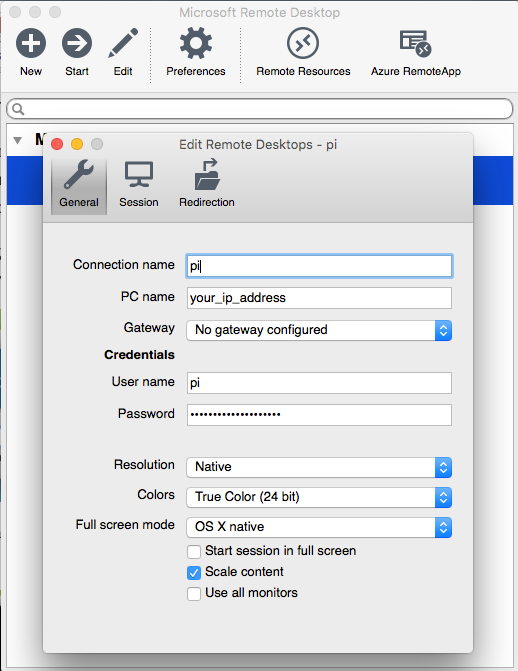
 

Setting up a remote connection

Image by Raspberry Pi Guy, CC BY-SA 4.0

Save it by exiting out of the "New" window.

You should now see the remote connection listed under "My Desktops." Double click it.

After briefly loading, you should see your Raspberry Pi desktop in a window on your screen, which looks like this:
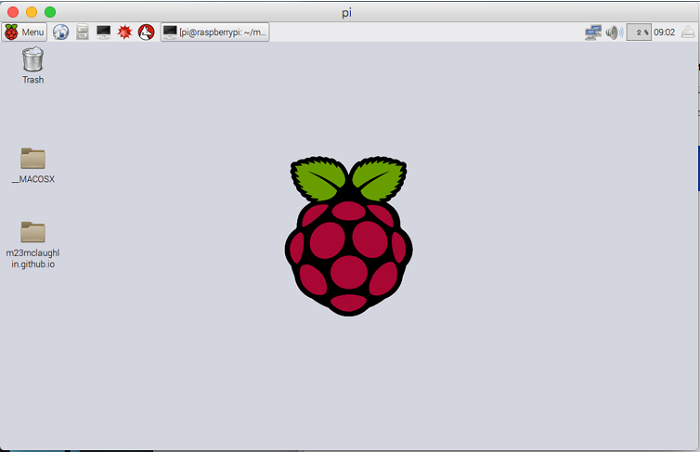
Raspberry Pi desktop

Perfect. Now, you don't need a separate mouse, keyboard, or monitor to control the Pi. This is a much more lightweight setup.

Static local IP address

Sometimes the local IP address 192.168.1.115 will change. We need to make it static. Type:

$ sudo ifconfig

Write down from the "eth0" section or the "wlan0" section, the "inet addr" (Pi's current IP), the "bcast" (the broadcast IP range), and the "mask" (subnet mask address). Then, type:

$ netstat -nr

Write down the "destination" and the "gateway/network."

Setting up a local IP address

The cumulative records should look something like this:

net address 192.168.1.115
bcast 192.168.1.255
mask 255.255.255.0
gateway 192.168.1.1
network 192.168.1.1
destination 192.168.1.0

With this information, you can set a static internal IP easily. Type:

$ sudo nano /etc/dhcpcd.conf

Do not use /etc/network/interfaces.

Then all you need to do is append this to the bottom of the file, substituting the correct IP address you want.

interface eth0
static ip_address=192.168.1.115
static routers=192.168.1.1
static domain_name_servers=192.168.1.1

Once you have set the static internal IP address, reboot the Raspberry Pi with:

$ sudo reboot

After rebooting, from terminal type:

$ sudo ifconfig

Your new static settings should appear for your Raspberry Pi.

Static global IP address

If your ISP (internet service provider) has already given you a static external IP address, you can skip ahead to the port forwarding section. If not, continue reading.

You have set up SSH, a remote desktop, and a static internal IP address, so now computers inside the local network will know where to find the Pi. But you still can't access your Raspberry Pi from outside the local Wi-Fi network. You need your Raspberry Pi to be accessible publicly from anywhere on the Internet. This requires a static external IP address [7].

It can be a sensitive process initially. Call your ISP and request a static external (sometimes referred to as static global) IP address. The ISP holds the decision-making power, so I would be extremely careful dealing with them. They may refuse your static external IP address request. If they do, you can't fault the ISP because there is a legal and operational risk with this type of request. They particularly do not want customers running medium- or large-scale Internet services. They might explicitly ask why you need a static external IP address. It is probably best to be honest and tell them you plan on hosting a low-traffic personal website or a similar small not-for-profit internet service. If all goes well, they should open a ticket and call you in a week or two with an address.

Port forwarding

This newly obtained static global IP address your ISP assigned is for accessing the router. The Raspberry Pi is still unreachable. You need to set up port forwarding to access the Raspberry Pi specifically.

Ports are virtual pathways where information travels on the Internet. You sometimes need to forward a port in order to make a computer, like the Raspberry Pi, accessible to the Internet because it is behind a network router. A YouTube video titled What is TCP/IP, port, routing, intranet, firewall, Internet by VollmilchTV helped me visually understand ports.

Port forwarding can be used for projects like a Raspberry Pi web server, or applications like VoIP or peer-to-peer downloading. There are 65,000+ ports to choose from, so you can assign a different port for every Internet application you build.

The way to set up port forwarding can depend on your router. If you have a Linksys, a YouTube video titled How to go online with your Apache Ubuntu server by Gabriel Ramirez explains how to set it up. If you don't have a Linksys, read the documentation that comes with your router in order to customize and define ports to forward.

You will need to port forward for SSH as well as the remote desktop.

Once you believe you have port forwarding configured, check to see if it is working via SSH by typing:

$ ssh pi@your_global_ip_address

It should prompt you for the password.

Check to see if port forwarding is working for the remote desktop as well. Open Microsoft Remote Desktop. Your previous remote connection settings should be saved, but you need to update the "PC name" field with the static external IP address (for example, 195.198.227.116) instead of the static internal address (for example, 192.168.1.115).

Now, try connecting via remote desktop. It should briefly load and arrive at the Pi's desktop.
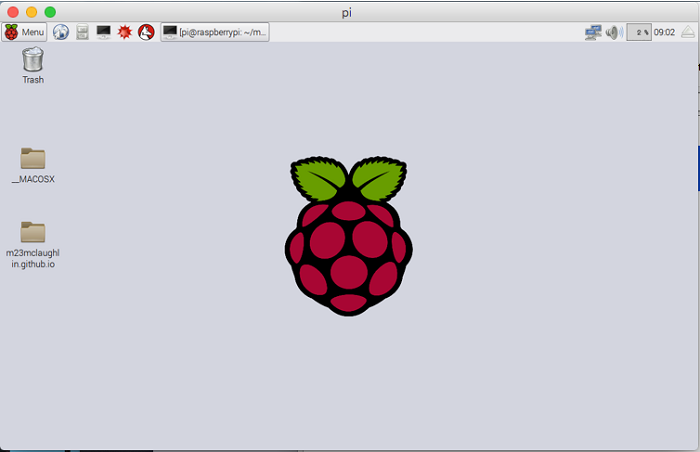
Raspberry Pi desktop

Good job. The Raspberry Pi is now accessible from the Internet and ready for advanced projects.

As a bonus option, you can maintain two remote connections to your Pi. One via the Internet and the other via the LAN (local area network). It's easy to set up. In Microsoft Remote Desktop, keep one remote connection called "Pi Internet" and another called "Pi Local." Configure Pi Internet's "PC name" to the static external IP address—for example, 195.198.227.116. Configure Pi Local's "PC name" to the static internal IP address—for example, 192.168.1.115. Now, you have the option to connect globally or locally.

If you have not seen it already, watch How to go online with your Apache Ubuntu server by Gabriel Ramirez as a transition into Project 2. It will show you the technical architecture behind your project. In our case, you are using a Raspberry Pi instead of an Ubuntu server. The dynamic DNS sits between the domain company and your router, which Ramirez omits. Beside this subtlety, the video is spot on when explaining visually how the system works. You might notice this tutorial covers the Raspberry Pi setup and port forwarding, which is the server-side or back end. See the original source for more advanced projects covering the domain name, dynamic DNS, Jekyll (static HTML generator), and Apache (web hosting), which is the client-side or front end.

Footnotes

[1] I do not recommend starting with the NOOBS operating system. I prefer starting with the fully functional Raspbian Jessie operating system.

[2] If "Setup Options" does not pop up, you can always find it by opening Terminal and executing this command:

$ sudo-raspi-config

[3] We do this to make use of all the space present on the SD card as a full partition. All this does is expand the operating system to fit the entire space on the SD card, which can then be used as storage memory for the Raspberry Pi.

[4] We do this because we want to boot into a familiar desktop environment. If we do not do this step, the Raspberry Pi boots into a terminal each time with no GUI.

[5]
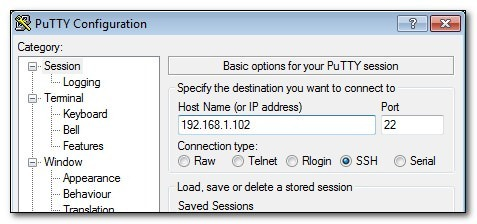
PuTTY configuration

Download and run PuTTY or another SSH client for Windows. Enter your IP address in the field, as shown in the above screenshot. Keep the default port at 22. Hit Enter, and PuTTY will open a terminal window, which will prompt you for your username and password. Fill those in, and begin working remotely on your Pi.

[6] If it is not already installed, download Microsoft Remote Desktop. Search your computer for Microsoft Remote Desktop. Run it. Input the IP address when prompted. Next, an xrdp window will pop up, prompting you for your username and password.

[7] The router has a dynamically assigned external IP address, so in theory, it can be reached from the Internet momentarily, but you'll need the help of your ISP to make it permanently accessible. If this was not the case, you would need to reconfigure the remote connection on each use.

For the original source, visit Mitchell McLaughlin's Full-Stack Computer Projects.

22 Comments

Minor code typo: in the footnotes, I think "sudo-rasps-config" should be "sudo raspi-config".

That aside, it's great to see a tutorial that really goes into every required step, so thanks.

Thanks for catching that! I went in and fixed the typo.

In reply to by agistras (not verified)

on windows before d/l installing anything in start menu search bar type mstsc
if its installed it will show up, if not then follow steps listed above

Could I use an old rPi 2?

You should be able to. As long as your running the same software as in the article, I don't think you should run into any problems. Comment back if all goes well.

In reply to by Lloyd (not verified)

Is there any benefit to using XRDP/microsoft instead of the pre-installed VNC? They're conflicting right now, so to be able to use xrdp I'll have to remove/reconfigure...

If I remember correctly, I used XRDP simply because the configuration was more user-friendly. But, as you know, VNC is great as well, so feel free to use at your convenience. If you end up configuring VNC and don't mind showing documentation, I can append it in the footnotes. Just email me at mitch(dot)mclaughlin1(at)gmail(dot)com.

In reply to by Matt R (not verified)

Hi Mitchell, while technically accurate, this is a terrible idea! Putting a linux server (effectively what the Raspberry Pi is) on the internet without even basic security hardening is a recipe for disaster. You would see port scans (which would quickly identify the ports you forwarded) within 30 seconds, and intrusion attempts using default usernames and passwords withing five minutes. I would guess that within 24 hours of following this article, your Pi would be owned by some hacker somewhere, and used to spew email Spam and participate in DDOS attacks.

The hacker, once they are in your Pi would also have complete access to your home network, leaving you open to man-in-the-middle attacks, password sniffing and all manner of other attacks on you and the rest of the internet.

Sorry if this all sounds melodramatic - but it is reality.

If you want to do this and you are prepared to accept the fact that you will probably have some bad guy roaming around your Pi at some point, there are some basic things you need to do - firstly you MUST change all default passwords, in fact you should delete the "pi" user and replace it with another username. You should also remove the "sudo" capabilities for that user. Really you shouldn't allow SSH or RDP interfaces from the internet at all. You should use firewall (either the software one on the Pi or the one on your internet router) to create protection around the Pi, ideally between the internet and the Pi, and the Pi and the rest of your home network (a so called DMZ).

Seriously, anyone reading this - DON'T DO THIS without a good understanding of at least the basic principles of internet security. It will not end well.

Hi Paul, thank you for the thoughtful and thorough response. Security is foundational to any system and without it, you have nothing, as you have alluded to. However, I am glad to have this discussion now and I will do my best to address the issues you have raised concern with.

Like every project, it brings certain freedoms and with freedoms comes responsibilities. This project is no different. To be fair, this tutorial, if it was not clear, is intended to be the first step in setting up a personal web server not a completely scalable system. If I had the autonomy to include my entire personal web server setup in this article I would have. I get into more sophisticated personal server security techniques in later tutorials on my blog where the bulk of this project resides: https://mitchellmclaughlin.com/server.html as linked to in the original article.

What I can point to immediately is after the first boot in this article it explicitly states:

"Select the 'Expand Filesystem' option and hit the Enter key [3]. Also, I recommend selecting the second option, 'Change User Password.' It is important for security. It also personalizes your Raspberry Pi."

This change to a secure password occurs before the device is connected on the internet. So, in the improbable scenario, where an immediate brute-force attack was launched on the server upon entering the internet, a strong password would be sufficient to negate any immediate intrusion. Now, we can discuss how and what a strong password looks like. However, that lies outside the immediate steps of this tutorial. I'd refer to: http://www.usatoday.com/story/tech/columnist/komando/2015/05/15/strong-…

Out of brevity, I did not mention in the article, but I wanted to, is installing 'fail2ban'. Fail2Ban blocks suspicious requests coming from the internet. For example, if there are too many attempts to guess the password, it will block that IP address. To anyone reading this, I recommend installing this package and I can revise the original article to include it. It can be installed by typing into Terminal:

$ sudo apt-get install fail2ban

I will reiterate changing the default password and installing Fail2Ban is the minimum someone can do for basic security of the server. Failure to do so is an assumption of risk.

As always, keeping the operating system, applications, and software packages up to date is good practice for security. I explain this on my blog, but it's worth repeating. This will prevent any recently fixed bugs from being exploited. To make sure the system is up to date, type in Terminal:

$ sudo apt-get update
$ sudo apt-get upgrade

Raspbian operating systems (Jessie and PIXEL) are flavors of Linux Debian, and Debian comes preinstalled with a firewall. If I remember correctly, both ufw (uncomplicated firewall) and iptables (another firewall package) are both preinstalled on Debian. And in later and more advanced tutorials on my blog, you will find explicit instructions for configuring iptables & Apache (web server software) where it reads:

$ cd /etc/network
$ sudo iptables -A INPUT -p tcp - -sport 80 -j ACCEPT
$ sudo iptables -A INPUT -p tcp - -sport 443 -j ACCEPT
$ sudo iptables -L
$ sudo iptables-save

I also then share a link to further educate and allow customization of the iptables firewall. https://fedoraproject.org/wiki/How_to_edit_iptables_rules

One thing I purposefully have not mentioned in this response is 2-factor authentication. This is the next logical step in securing a personal web server, however I have not yet found documentation on the web that implements it correctly. If I find it, I will update it here.

I want to further specifically address two comments you made.

You mention, "firstly you MUST change all default passwords, in fact you should delete the "pi" user and replace it with another username." As I said, I do recommend that as a minimum for security. However, I can't force any reader to do something they don't want. So, it’s discretionary.

You mention, "You should also remove the 'sudo' capabilities for that user." Let me elaborate. That is more secure, but I defer this decision to the user. Some prefer the convenience of using sudo over the added security even though it may not be best practice.

Permissioning and ssh keys can increase security, but I won't further discuss those topics in this response.

I think it's important to step back and keep in mind the big picture. Security is very important, yes. But personally, I caution myself from over-protecting a system. The extent to which a system administrator becomes overly paranoid or unintentionally locks him or herself out can be equally problematic (Unfortunately, I have experienced it, and it's not fun). In that extreme case, security can become paralyzing and I do not advocate for that. Balancing security principles with flexibility is difficult, but I tend to leave it up to each person. Said another way, we are debating philosophy, but I think it's clear we agree on the facts.

I also hope you are sensitive to fear mongering about security. Security can be a complex issue in targeted attacks, but speaking about it with sophisticated language to the average user can be unfavorable. To anyone reading, I'd say, basic security on the web is not extremely complicated. Taking basic steps, such as having a strong password, will prevent most intrusions and that should be the goal.

In the end, I think we agree on many things Paul. And if everyone can takeaway something from the discussion, it's that taking security as seriously as you do is something to be emulated.

For further reading on basic web server security see: https://www.codelitt.com/blog/my-first-10-minutes-on-a-server-primer-fo…

In reply to by Paul Harris (not verified)

Thanks Mitchell for your comprehensive response. I think one reason we are approaching this from different perspectives is that you see this article as a part of a wider topic; that of your blog. I, like many others I suspect came across this article from a link in an opensource.com newsletter, thus without any of the context you mention.

The suggestions you provided to further secure the Raspberry Pi are good and are common sense, but to my mind, reading this as a stand alone article they should be explicitly referenced, even if it is just via a single sentence.

If you think for a moment about the people who will click through to read your article, they are probably not experts; more likely beginners or intermediates, and as such they are likely to be following this guide step by step to get their Pi onto the Internet. Thus, merely suggesting that default passwords are changed undermines the criticality of doing this, particularly as the reader has no context for WHY this is important and what can (will) happen if they don't.

As for your final points, unfortunately I cannot agree. If one is in a safe environment then computing should absolutely be fun, and I wouldn't have written any of my comments. Even if you are in an Internet facing "cloud" or physical/virtual server environment then the impact of not securing your server correctly is that the data on your server and the operating system is forfeit, but the impact is contained, Putting an unsecured bridge between the Internet and your home network is however, something different though - all your devices are now succeptable to attack and penetration.

Additionally, compromised servers (be they through social engineering, exploits, bugs or incompetent system administrators) are a major problem for the rest of the Internet. There are groups who generate significant money from finding unsecured Internet nodes and using them to launch attacks, or renting them out to others. I firmly believe that we are all accountable for our actions, whether in person or online. If you are competent to create an Internet node, you should be competent to secure it. My concern, which I still hold, is that you make the former a tutorial but without connection to the latter (in the format of a single article).

In reply to by raspberrypiguy

This article does more than make me nervous. The advice in it is so wrong on so many levels that I'm floored that Open Source allowed it to be published without peer review by a security expert first.

Paul did a great job of highlighting just some of what is wrong with it. In addition to Paul's comments, I'll add another key factor that was missed. One key principle for minimizing computer security threats is to eliminate _all_ unnecessary software from any Internet facing server. Therefore, booting up into a graphical interface and advocating for the use of a remote desktop UI for administration is, frankly, a terrible idea precisely because it introduces so much additional, unnecessary software. Windows server admins don't even do this anymore if they can help it.

Really, if someone wants to explore standing up a server on the Internet, they are FAR better off doing so by paying a vendor who knows how to administer one safely. They can then study how the vendor did so, and they've got a professional resource to contact if something goes wrong.

If someone wants to just learn about how to manage servers, then they should do so using only an internally facing hardware. Under no circumstances should any newbie be standing up an Internet facing server without first learning the basics about all the hard parts of computer security that are not covered in this article.

In reply to by Paul Harris (not verified)

Thank you for the comment Rock. I responded with similar logic above in my response to Paul. However, this tutorial, if you will, is akin to constructing a house from scratch. It builds the framework and is the skeleton for the home. No one is suggesting that secure door locks, a secure garage door, and basic knowledge about security are secondary. I'm suggesting, home security, in reality, can't be implemented prior to building the infrastructure. And at some point between building the infrastructure and outfitting the home with luxury furniture, secure door locks *should* be put in place.

I view your logic somewhat comparable to, well, the average homeowner is not allowed to have a yard unless the entire yard is perfectly fabricated, cohesive, mowed, and a healthy green. And my response would be, but how can someone grow a beautiful, natural lawn from scratch without first planting the seeds? And how can it grow into maturity when the initial environment is not conducive or accepting to stages of growth and risk taking? And if your response is, "don't grow it, hire professionals". I would say, not good enough. I'll explain why. I never wanted to grow it in the beginning, but the professionals scammed me and I can no longer trust them. So, I arrived at the next logical option of doing it myself.

In short, I think your concerns are valid, I would just ask you are open to other view points as well.

In reply to by sgtrock (not verified)

rpi-update is NOT recommended unless a RPi engineer advises you, mostly for new hardware support. It will update to the latest and mostly unstable version of Raspbian and most likely things will stop working. Stick to dis-upgrade for the latest stable evrsion.

That can be the downside of upgrading, but it should be fair to say upgrading also cleans up security holes that can be exploited too.

In reply to by Hans Otten (not verified)

Normal users are advised to do updates including security and os fixes and latest supported and tested updates as follows:

sudo apt-get update
sudo apt-get upgrade
sudo apt-get dist-upgrade

rpi-update is NOT advisable, it will fetch the latest bleeding edge unstable, unsupported, work in progress, version of Raspbian likely to break things. This is why I think your recipe is a bad advise.

In reply to by raspberrypiguy

XRDP will work but requires the removal of the default installed and operational VNC first.

Hi, i have a problem becouse my cgi binaries are compiled for intel platform and i dont have the source code. How can i run intel binaries in raperberry. Tks Alisson

I would say, try to use the Raspbian operating systems or else things can get problematic. If you can't do that, maybe try to remove the cgi packages.

With reference to a static external IP, I use the free service provided by No-IP to have a domain name pointing to my dynamic IP address at home. I have a daemon running on my router that periodically updates the A record of the domain name so I can access my home network via a known entity. DuckDNS and others are also available. I do it this was as my ISP charges extra for a static address.

Creative Commons LicenseThis work is licensed under a Creative Commons Attribution-Share Alike 4.0 International License.

Are you new to open source?

Browse our collection of resources.