

If your OpenStack hosted virtual instances need network connectivity you’re going to have to create a network. There are multiple kinds of networks and in order to make the right choice you will need to understand at least two very important network attributes: ‘router:external’ and ‘shared.’ Unless you know what these attributes and their combinations mean, it will be difficult to make the optimal network choice.
In this article, we’ll explain the four types of networks these attributes dictate and how to configure them and briefly explain some typical use cases. Some of these exercises apply to tenants and others are for administrators only. Examples are given to work through this exercise on a KVM-hosted Red Hat or RDO all-in-one OpenStack instance. This has been tested on Red Hat OpenStack Platform 8, 9, 10 and RDO Mitaka and Newton.
The four types explained
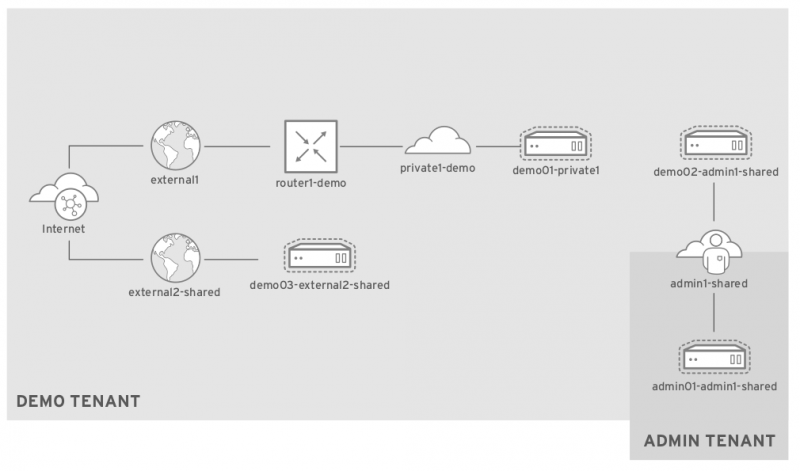
The table below gives an overview of the types of networks we’re going to create and their names.
| router-external | shared | network type | name in this exercise | description |
| false | false | vxlan | private1-demo | Typical tenant network, which is only usable by members of the tenant. Typically an overlay (vxlan, gre). |
| false | true | vxlan | admin1-shared | This can be shared by multiple tenants with RBAC on who can use it. Typically an overlay (vxlan, gre). |
| true | false | flat | external1 | Typical external network, where the scope is all tenants. Can only be created by administrators. Tenants connect their router for external access. Typically a ‘flat’ or ‘vlan’ network. |
| true | true | flat | external2-shared | Scope is all tenants. Can only be created by administrators. Tenants can connect directly to it. Typically known as a ‘provider’ network and is ‘flat’ or ‘vlan.’ |
Logical network topology
OpenStack all-in-one build
An all-in-one instance is handy for understanding new concepts where separate roles are not required. Troubleshooting and configuration are considerably simplified, and that is what we’re going to use for our examples. If you have a Red Hat subscription, you can follow these instructions. You can also sign up for a 60 day Red Hat OpenStack Platform evaluation.
For an RDO instance, go here for a quick installation guide, and be sure to enable the additional repositories on this page.
When your packstack build is complete, log in as root and run the following commands to verify your OpenStack deployment is working:
. ./keystonerc_admin
openstack catalog list
neutron agent-list
nova service-list
nova boot --flavor m1.tiny --image cirros --nic net-name=private admin01
Once you have established the health of OpenStack, delete the virtual instance you just created along with the ‘Public’ and ‘Private’ networks (and their subnets) and ‘router1’ created by the packstack installation.
KVM host configuration
The KVM host for this exercise will have three networks:
| Linux bridge name | KVM network name, VM nic | Purpose |
| virbr0 | default, eth0 | Direct access the OpenStack virtual host. |
| virbr1 | external1, eth1 | External access for instances, either through SNAT or floating IPs. |
| virbr2 | external2, eth2 | Eirect external access. |
Your KVM host probably already comes with a default network on eth0 that with bridge virbr0. We’ll define and then create the other two external networks. Be sure to do this as root:
cat > /tmp/external1.xml << EOF
<network>
 <name>external1</name>
 <forward mode='nat'>
   <nat>
     <port start='1024' end='65535'/>
   </nat>
 </forward>
 <bridge name='virbr1' stp='on' delay='0'/>
 <mac address='52:54:00:73:a0:8e'/>
 <ip address='172.16.0.1' netmask='255.255.255.192'>
 </ip>
</network>
EOF

cat > /tmp/external2.xml << EOF
<network>
 <name>external2</name>
 <forward mode='nat'>
   <nat>
     <port start='1024' end='65535'/>
   </nat>
 </forward>
 <bridge name='virbr2' stp='on' delay='0'/>
 <mac address='52:54:00:61:98:8c'/>
 <ip address='172.16.0.65' netmask='255.255.255.192'>
 </ip>
</network>
EOF
Now create these networks and start them:
virsh net-define /tmp/external1.xml; virsh net-define /tmp/external2.xml
virsh net-autostart external1; virsh net-autostart external2
virsh net-start external1; virsh net-start external2
Now add a VNIC to the OpenStack all-in-one instance for each external network. Do this from the KVM host:
dom=<your Red Hat Enterprise Linux or RDO instance name from ‘virsh list’>
virsh attach-interface --domain $dom --type network --source external1 --model virtio --config --live
virsh attach-interface --domain $dom --type network --source external2 --model virtio --config --live
Verify the KVM host
$ virsh net-list
Name              State   Autostart Persistent
----------------------------------------------------------
default           active yes        yes
external1         active yes        yes
external2         active yes        yes

$ brctl show
bridge name    bridge id    STP enabled    interfaces
virbr0    8000.525400ce5983    yes    virbr0-nic
virbr1    8000.52540073a08e    yes    virbr1-nic
virbr2    8000.52540061988c    yes    virbr2-nic

$ route
Kernel IP routing table
Destination  Gateway      Genmask      Flags Metric Ref Use Iface
172.16.0.0   0.0.0.0      255.255.255.192 U 0   0     0 virbr1
172.16.0.64  0.0.0.0      255.255.255.192 U 0   0     0 virbr2
192.168.122.0  0.0.0.0            255.255.255.0     U      0          0          0 virbr0
OpenStack all-in-one configuration
We need to make some changes to the packstack delivered Neutron configuration to remove the single Linux bridge ‘br-ex’ and re-add new bridges br-ex and br-ex2 and the flat networks we’ll attach them to:
yum install crudini -y
crudini --set /etc/neutron/l3_agent.ini DEFAULT external_network_bridge #blank this
crudini --set /etc/neutron/l3_agent.ini DEFAULT gateway_external_network_id  #blank this
crudini --set /etc/neutron/plugins/ml2/ml2_conf.ini ml2 type_drivers  vxlan,flat
crudini --set /etc/neutron/plugins/ml2/ml2_conf.ini ml2 network_vlan_ranges physnet1,physnet2
crudini --set /etc/neutron/plugins/ml2/openvswitch_agent.ini ovs bridge_mappings physnet1:br-ex,physnet2:br-ex2
Note that it is up to you what you want to call your network_vlan_ranges when using ‘flat’ networks. These will be the ‘--provider:physical_network’ names when you create your external networks. External bridge names (br-ex*) are also your choice.
Now create the interface configurations for Open vSwitch:
cat >  /etc/sysconfig/network-scripts/ifcfg-br-ex << EOF
DEVICE=br-ex
ONBOOT=yes
HOTPLUG=no
NM_CONTROLLED=no
PEERDNS=no
DEVICETYPE=ovs
TYPE=OVSBridge
BOOTPROTO=static
IPADDR=172.16.0.1
NETMASK=255.255.255.192
EOF

cat >  /etc/sysconfig/network-scripts/ifcfg-eth1 << EOF
DEVICE=eth1
ONBOOT=yes
HOTPLUG=no
NM_CONTROLLED=no
PEERDNS=no
DEVICETYPE=ovs
TYPE=OVSPort
OVS_BRIDGE=br-ex
BOOTPROTO=none
EOF

cat >  /etc/sysconfig/network-scripts/ifcfg-br-ex2 << EOF
DEVICE=br-ex2
ONBOOT=yes
HOTPLUG=no
NM_CONTROLLED=no
PEERDNS=no
DEVICETYPE=ovs
TYPE=OVSBridge
BOOTPROTO=static
IPADDR=172.16.0.65
NETMASK=255.255.255.192
EOF

cat >  /etc/sysconfig/network-scripts/ifcfg-eth2 << EOF
DEVICE=eth2
ONBOOT=yes
HOTPLUG=no
NM_CONTROLLED=no
PEERDNS=no
DEVICETYPE=ovs
TYPE=OVSPort
OVS_BRIDGE=br-ex2
BOOTPROTO=none
EOF
Verify Open vSwitch external bridge
Once you have completed those configuration steps you will want to reboot your virtual host. The bridges created should look like the following after the reboot:
ovs-vsctl list-ports br-ex

eth1
phy-br-ex

ovs-vsctl list-ports br-ex2

eth2
phy-br-ex2
Neutron networks, subnets, and routers
Finally, we’re ready to get down to business and create the networks we’ve been talking about. The following series of commands will create networks, subnets, routers, security group rules, instances and floating IPs. When this is complete you’ll have the four different types of networks ready for use.
External networks
The following series creates our external networks. Note that both networks use ‘router:external=true’ and they are both ‘network_type=flat’, but each network is on a different physical_network and the 2nd one has the ‘--shared’ attribute:
. ~/keystonerc_admin
neutron net-create external1  --router:external=True  --provider:network_type=flat  --provider:physical_network=physnet1

neutron subnet-create --name external1-subnet --disable-dhcp external1 172.16.0.0/26 --allocation-pool start=172.16.0.2,end=172.16.0.62

neutron net-create external2-shared --shared --router:external=True --provider:network_type=flat --provider:physical_network=physnet2

neutron subnet-create external2-shared --name external2-shared-subnet --allocation-pool\
 start=172.16.0.66,end=172.16.0.126  --gateway 172.16.0.65 172.16.0.64/26
Tenant network and router
Tenant networks are where you can create your own private rfc 1918 address spaces. Tenants can provision any combination of networks, subnets, and routers to meet their needs. They can define their own broadcast domains and determine which instances are externally accessible through floating IP addresses.
The following creates a private or ‘tenant’ network and subnet. It also creates a router to attach it to external network external1 Note that we are switching to the ‘demo’ project for these networks:
. ~/keystonerc_demo
neutron net-create private1-demo

neutron subnet-create private1-demo 10.0.1.0/24 --name private1-demo-subnet
Note that this network was created with these by default:
neutron net-show -c 'router:external' -c shared private1-demo
+-----------------+-------+
| Field           | Value |
+-----------------+-------+
| router:external | False |
| shared          | False |
+-----------------+-------+

neutron router-create router1-demo

neutron router-gateway-set router1-demo external1

neutron router-interface-add router1-demo private1-demo-subnet
The router gateways should be pingable. Perform this command and ping the gateway IPs it returns:
neutron router-list -c external_gateway_info | grep -o "172.16.0.[0-9]*"Security group rules, virtual instances, and floating IPs
Before creating virtual instances, let’s open the ports for ICMP and SSH in the default security group so we will be able to connect to them:
. ~/keystonerc_demo
neutron security-group-rule-create --direction ingress \
   --ethertype IPv4 --protocol tcp --port-range-min 22 \
   --port-range-max 22 default

neutron security-group-rule-create --direction ingress \
   --ethertype IPv4 --protocol icmp default

nova boot --flavor m1.tiny --image cirros --nic\
 net-id=$(neutron net-show private1-demo -c id -f value) demo01-private1

nova floating-ip-create external1

nova floating-ip-associate demo01-private1 $(neutron floatingip-list -c floating_ip_address -f value)

nova list  #the floating IP should be pingable and you should be able to ssh to this instance through it.
What did you just do? You created external networks and an instance on a private tenant network with the following characteristics:
Outbound access: This instance can access the external1 network through its router (router1-demo). Its source address will be 'SNATed' to that of its floating IP address. That 'SNATing' takes place in the router namespace. If this instance did not have a floating IP, however, it would still have external1 network access. The router, in this case, will SNAT the source address to be that of its own public IP address.
Inbound access: This instance is known to the outside world by it’s floating IP address, which router1-demo will respond to ARP requests for. That IP is DNAT’ed to that of its local IP address in the router namespace.
Note: to see these NATing rules dump them from the router namespace:
. ~/keystonerc_demo
ip netns exec qrouter-$(neutron router-show router1-demo -c id -f value) iptables -S -t nat
Tenant network access: This instance is in the same broadcast domain as any other instance on the private1-demo network. Because the vxlan overlay network abstracts the underlying physical network, this broadcast domain extends across compute nodes where these instances are hosted.
View the network topology from the Horizon console
. ~/keystonerc_admin
echo $OS_AUTH_URL
echo $OS_USERNAME
echo $OS_PASSWORD
Point your browser at the URL above. Log in with the OS_USERNAME and OS_PASSWORD from ~/keystonerc_admin. From the ‘Project’ tab select the ‘demo’ project (you will need to add admin as a member of the demo project first). Now select ‘Network/Network Topology.’ Here you’ll see the networks we created; be sure to try the two views - topology and graph. Keep this view in front of you as we try to understand what we are doing.
Shared tenant network
A tenant network can be created with the ‘--shared’ attribute which allows other tenants to attach their own instances to it. By default, only the admin tenant can create a shared tenant network but it is possible for other tenants to do so with RBAC. See Role-Based Access Control for networks. This type of network can be useful when two or more projects have instances that benefit from being in the same broadcast domain, thus bypassing the need to share with floating IP addresses.
. ~/keystonerc_admin
nova secgroup-add-rule default icmp -1 -1 0.0.0.0/0 #allow icmp through default security group

nova secgroup-add-rule default tcp 22 22 0.0.0.0/0 #allow ssh through default security group

neutron net-create --shared --router:external=false admin1-shared

neutron subnet-create admin1-shared 10.0.9.0/24 --name admin1-shared-subnet
Now create an instance on the shared tenant network from the admin project:
nova boot --flavor m1.tiny --image cirros --nic\
 net-id=$(neutron net-show admin1-shared -c id -f value) admin01-admin1-shared
Now create an instance on the shared tenant network from the demo project:
. ~/keystonerc_demo
nova boot --flavor m1.tiny --image cirros --nic\
 net-id=$(neutron net-show admin1-shared -c id -f value) demo02-admin1-shared
What did you just do? If you log into either of these instances using the instance/console option from Horizon you will notice that they are on the same subnet, even though they are in different projects. This type of network can be useful for sharing instances between projects; the only other choice for doing so is with floating IPs. The shared network (admin1-shared) can be seen and joined by any tenant by default. Note that there is no external network access from this network unless you add a router and set the gateway to external1.
Shared external network
On a shared, external network tenants can connect their instances directly to an external network and get a floating IP address assigned automatically. We’ll use the external2-shared network already created above.
. ~/keystonerc_demo
nova boot --flavor m1.tiny --image cirros --nic net-name=external2-shared demo03-external2-shared

nova console-log demo03-external2-shared
You will probably notice from the console log output that the instance failed to contact the metadata service:
checking https://169.254.169.254/2009-04-04/instance-id
failed 1/20: up 3.03. request failed
failed 2/20: up 8.09. request failed
failed 3/20: up 11.09. request failed
etc…
You may be able to ping the instance, but if you want instances on external2-shared to have access to the metadata service then in /etc/neutron/dhcp_agent.ini set:
crudini --set /etc/neutron/dhcp_agent.ini DEFAULT enable_isolated_metadata True

systemctl restart neutron-dhcp-agent
This is necessary because you are not connecting to this network through a router, which is normally where metadata service access comes from. Now reboot the instance and check the console log again:
nova reboot demo03-external2-shared

nova console-log dem03-external2-shared
Now you should see this in the log:
checking https://169.254.169.254/2009-04-04/instance-id
successful after 1/20 tries: up 2.04. iid=i-000000ef
What did we just do? By creating an instance on this shared, external network you bypass the need for using a router for external access. Additionally, you get what amounts to a floating IP by default. Lastly, the broadcast domain is the external subnet. So, any instance on this subnet is in the same broadcast domain regardless of the tenant, the same characteristic of the shared tenant networks we looked at previously. If a tenant is accessing instances by floating IPs only on their private network then they might be better off with a shared, external network.
Use the right network attributes for the right job
By understanding the characteristics of these four types of networks you’ll be off to a good start in harnessing the flexibility of Neutron. Floating IP’s can get to be a scarce IPv4 resource, for example. As a workaround, you could rely on NAT, or use shared private networks to save yourself some headaches. By understanding your use-cases you’ll be able to select the right network type for yourself and/or your customers.
This article was originally published on the Red Hat blog as a part of a series from Red Hat Technical Account Managers (TAM).


Comments are closed.