

I demonstrated how I manage OpenStack using Terraform in my previous article. Using Terraform as Infrastructure as Code (IaC) is a significant advantage, but it also requires the staff to support it. Sometimes, all you really need is the ability to provision infrastructure as timed resources, with no intention of building lasting data structures. When I design a flexible environment, I prefer the declarative language of Ansible.
Ansible's flexibility allows me to design for use cases that include:
- A test environment that's timed and can be deleted after use.
- A training environment provided for a specific amount of time and then destroyed.
- Moving from a manual to an automated infrastructure when Terraform is difficult because it maps your existing infrastructure.
Install Ansible and OpenStack SDK
First, you need to install Ansible and its SDK. For this, you must have Docker or Podman installed.
I use the pip installation of Ansible:
$ python3 -m pip install ansible-navigator --userThe ansible-navigator command gets used by AWX or Red Hat Ansible Automation Platform to run Ansible playbooks. Unlike the previous ansible-playbook or ansible ad-hoc commands, this creates a container and execution environment.
You must build your execution environment with an OpenStack SDK. For this, I strongly recommend the article by Gineesh Madapparambath on how to create an execution environment.
After creation, use your Ansible execution environment to configure your image:
$ ansible-navigator imagesChoose which image to use and run a playbook:
$ ansible-navigator run main.yaml --stdout
Sample playbook
My sample playbook uses the same structure I demonstrated in my Terraform article:
$ cat >> main.yaml << EOF
---
- hosts: localhost
  vars:
    flavors:
      - name: "small"
        ram: 4096
        vcpus: 1
      - name: "medium"
        ram: 8096
        vcpus: 2
      - name: "large"
        ram: 16384
        vcpus: 4
      - name: "xlarge"
        ram: 32768
        vcpus: 8

  tasks:
  - name: create flavors
    openstack.cloud.compute_flavor:
      state: present
      name: "{{ item.name }}"
      ram: "{{ item.ram }}"
      vcpus: "{{ item.vcpus }}"
      disk: 0
    loop:
      - flavors

  - name: create external network
    openstack.cloud.network:
      state: present
      name: "external-network"
      provider_network_type: "flat"
      provider_physical_network: "physnet1"
      external: true

  - name: create external subnet
    openstack.cloud.subnet:
      state: present
      name: "external-subnet"
      network_name: "external-network"
      cidr: "10.0.0.0/8"
      gateway_ip: "10.0.0.1"
      dns_nameservers:
        - "10.0.0.254"
        - "10.0.0.253"
      allocation_pool_start: "10.0.0.2"
      allocation_pool_end: "10.0.254.254"

  - name: create external router
    openstack.cloud.router:
      name: "external-router"
      state: present
      network: "external-network"

  - name: create Cirros image
    openstack.cloud.image:
      name: cirros
      container_format: bare
      disk_format: qcow2
      state: present
      filename: cirros-0.6.1-x86_64-disk.img

  - name: create Demo project
    openstack.cloud.project:
      state: present
      name: "Demo"
      enabled: True

  - name: create demo-user
    openstack.cloud.user:
      state: present
      name: "demo-user"
      password: "demo"
      default_project: "Demo"
EOF
Results
After you run the playbook, you get networks:
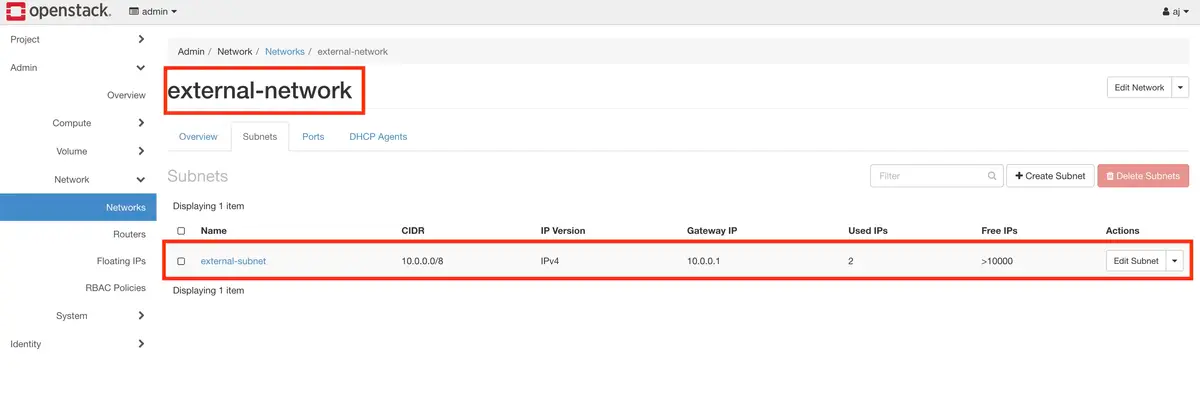
(AJ Canlas, CC BY-SA 4.0)
You also get flavors:
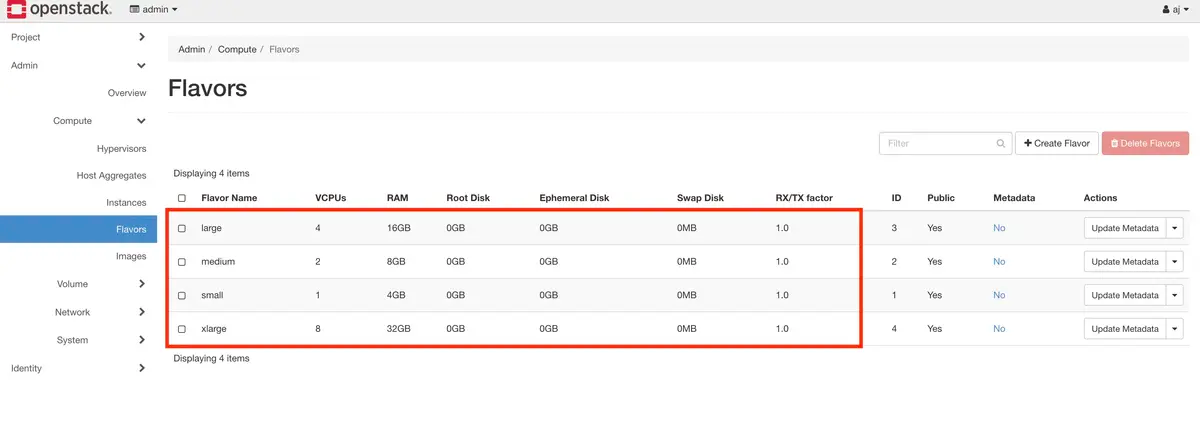
(AJ Canlas, CC BY-SA 4.0)
And images:
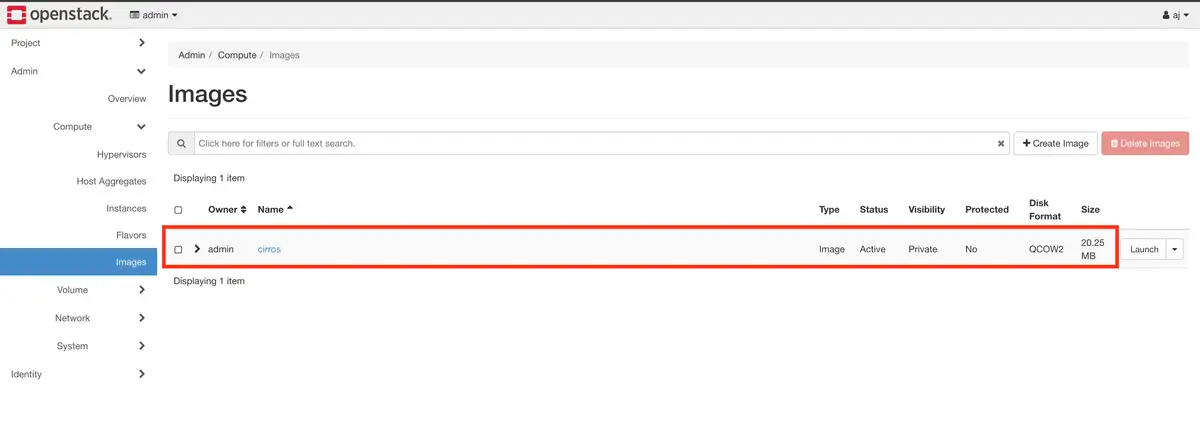
(AJ Canlas, CC BY-SA 4.0)
And a demo project:
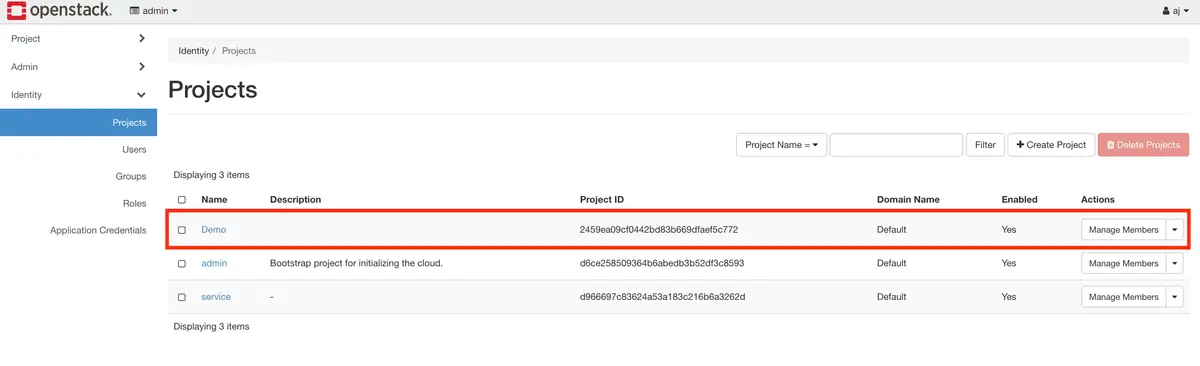
(AJ Canlas, CC BY-SA 4.0)
The right tool
There's no single right or wrong answer for how you automate. How you implement your automation depends on your organization's needs, infrastructure, system design, and staff resources. Select one of the great open source tools out there to get started. Put in the effort now, and save yourself a lot of work in the future.


Comments are closed.