

In a recent article about lightweight image viewers, author Scott Nesbitt mentioned display, one of the components in ImageMagick. ImageMagick is not merely an image viewer—it offers a large number of utilities and options for image editing. This tutorial will explain more about using the display command and other command-line utilities in ImageMagick.
With a number of excellent image editors available, you may be wondering why someone would choose a mainly non-GUI, command-line based program like ImageMagick. For one thing, it is rock-solid dependable. But an even bigger benefit is that it allows you to set up methods to edit a large number of images in a particular way.
This introduction to common ImageMagick commands should get you started.
The display command
Let's start with the command Scott mentioned: display. Say you have a directory with a lot of images you want to look at. Start display with the following command:
cd Pictures
display *.JPG
This will load your JPG files sequentially in alphanumeric order, one at a time in a simple window. Left-clicking on an image brings up a simple, standalone menu (the only GUI feature you'll see in ImageMagick).
opensource.com
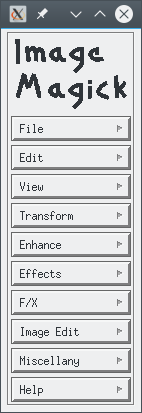
Here's what you'll find in the display menu:
- File contains the options Open, Next, Former, Select, Save, Print, Delete, New, Visual Directory, and Quit. Select picks a specific image file to display, Visual Directory shows all of the files (not just the images) in the current working directory. If you want to scroll through all the selected images, you can use Next and Former, but it's easier to use their keyboard shortcuts (Spacebar for the next image and Backspace for the previous).
- Edit offers Undo, Redo, Cut, Copy, and Paste, which are just auxiliary commands to more specific editing process. Undo is especially useful when you're playing around with different edits to see what they do.
- View has Half Size, Original Size, Double Size, Resize, Apply, Refresh, and Restore. These are mostly self-explanatory and, unless you save the image after applying one of them, the image file isn't changed. Resize brings up a dialog to name a specific size either in pixels, with or without constrained dimensions, or a percentage. I'm not sure what Apply does.
- Transform shows Crop, Chop, Flop, Flip, Rotate Right, Rotate Left, Rotate, Shear, Roll, and Trim Edges. Chop uses a click-drag operation to cut out a vertical or horizontal section of the image, pasting the edges together. The best way to learn how these features work is to play with them, rather than reading about them.
- Enhance provides Hue, Saturation, Brightness, Gamma, Spiff, Dull, Contrast Stretch, Sigmoidal Contrast, Normalize, Equalize, Negate, Grayscale, Map, and Quantize. These are operations for color manipulation and adjusting brightness and contrast.
- Effects has Despeckle, Emboss, Reduce Noise, Add Noise, Sharpen, Blur, Threshold, Edge Detect, Spread, Shade, Raise, and Segment. These are fairly standard image editing effects.
- F/X options are Solarize, Sepia Tone, Swirl, Implode, Vignette, Wave, Oil Paint, and Charcoal Draw, also very common effects in image editors.
- Image Edit contains Annotate, Draw, Color, Matte, Composite, Add Border, Add Frame, Comment, Launch, and Region of Interest. Launch will open the current image in GIMP (in my Fedora at least). Region of Interest allows you to select an area to apply editing; press Esc to deselect the region.
- Miscellany offers Image Info, Zoom Image, Show Preview, Show Histogram, Show Matte, Background, Slide Show, and Preferences. Show Preview seems interesting, but I struggled to get it to work.
- Help shows Overview, Browse Documentation, and About Display. Overview gives a lot of basic information about display and includes a large number of built-in keyboard equivalents for various commands and operations. In my Fedora, Browse Documentation took me nowhere.
Although display's GUI interface provides a reasonably competent image editor, ImageMagick also provides 89 command-line options, many of which correspond to the menu items above. For example, if I'm displaying a directory of digital images that are larger than my screen size, rather than resizing them individually after they appear on my screen, I can specify:
display -resize 50% *.JPGMany of the operations in the menus above can also be done by adding an option in the command line. But there are others that aren't available from the menu, including ‑monochrome, which converts the image to black and white (not grayscale), and ‑colors, where you can specify how many colors to use in the image. For example, try these out:
display -resize 50% -monochrome *.JPG
display -resize 50% -colors 8 *.JPGThese operations create interesting images. Try enhancing colors or making other edits after reducing colors. Remember, unless you save and overwrite them, the original files remain unchanged.
The convert command
The convert command has 237 options—yes 237—that provide a wide range of things you can do (some of which display can also do). I'll only cover a few of them, mostly sticking with image manipulation. Two simple things you can do with convert would be:
convert DSC_0001.JPG dsc0001.png
convert *.bmp *.pngThe first command would convert a single file (DSC_0001) from JPG to PNG format without changing the original. The second would do this operation on all the BMP images in a directory.
If you want to see the formats ImageMagick can work with, type:
identify -list formatLet's pick through a few interesting ways we can use the convert command to manipulate images. Here is the general format for this command:
convert inputfilename [options] outputfilenameYou can have multiple options, and they are done in the order they are arranged, from left to right.
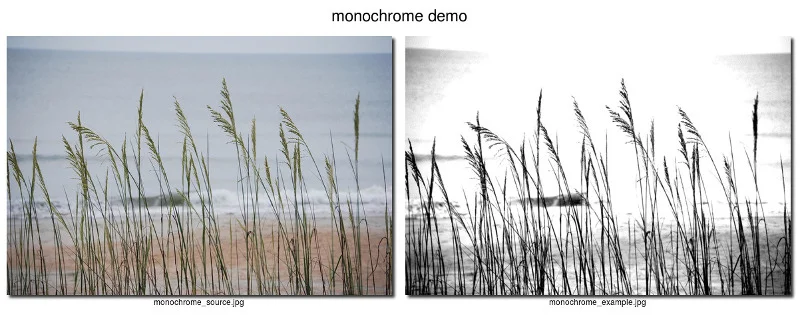
Here are a couple of simple options:
convert monochrome_source.jpg -monochrome monochrome_example.jpg
opensource.com
convert DSC_0008.jpg -charcoal 1.2 charcoal_example.jpg

opensource.com
The ‑monochrome option has no associated setting, but the ‑charcoal variable needs an associated factor. In my experience, it needs to be a small number (even less than 1) to achieve something that resembles a charcoal drawing, otherwise you get pretty heavy blobs of black. Even so, the sharp edges in an image are quite distinct, unlike in a charcoal drawing.
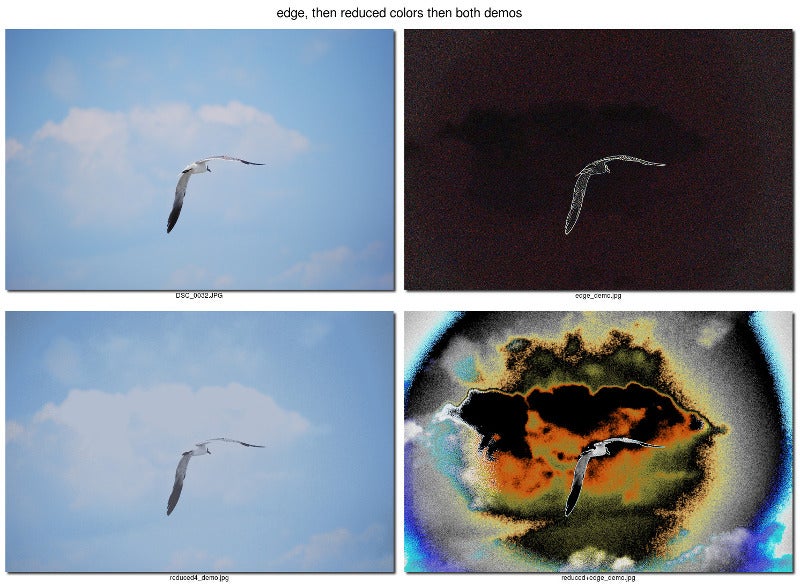
Now let's look at these:
convert DSC_0032.JPG -edge 3 edge_demo.jpg
convert DSC_0032.JPG -colors 4 reduced4_demo.jpg
convert DSC_0032.JPG -colors 4 -edge 3 reduced+edge_demo.jpg
opensource.com
The original image is in the upper left. In the first command, I applied an ‑edge option with a setting of 3 (see the upper-right image)—anything less than that was too subtle for my liking. In the second command (the lower-left image), we have reduced the number of colors to four, which doesn't look much different from the original. But look what happens when we combine these two in the third command (lower-right image)! Perhaps it's a bit garish, but who would have expected this result from the original image or either option on its own?
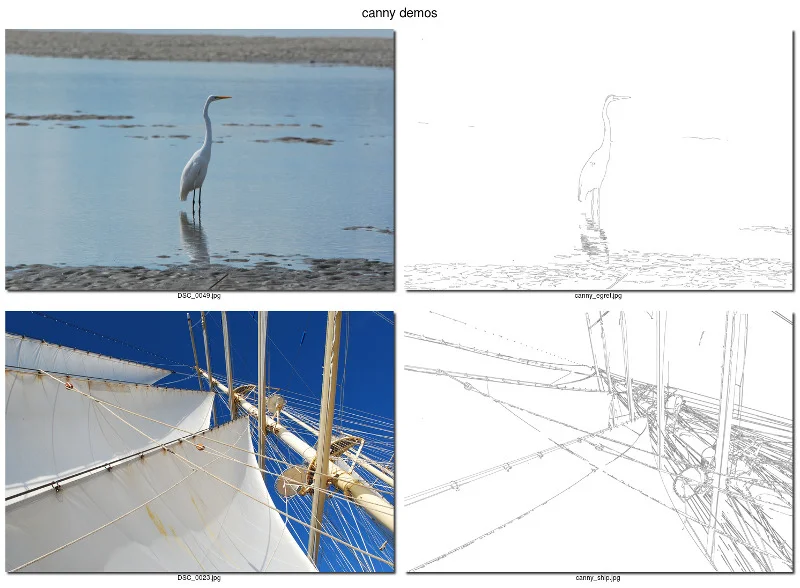
The ‑canny command provided another surprise. This is another kind of edge detector, called a "multi-stage algorithm." Using ‑canny alone produces a mostly black image and some white lines. I followed that with a ‑negate command:
     convert DSC_0049.jpg -canny 0x1 -negate canny_egret.jpg
     convert DSC_0023.jpg -canny 0x1 -negate canny_ship.jpg
opensource.com
It's a bit minimalist, but I think it resembles a pen-and-ink drawing, a rather remarkable difference from the original photos. It doesn't work well with all images; generally, it works best with images with sharp lines. Elements that are out of focus are likely to disappear; notice how the background sandbar in the egret picture doesn't show up because it is blurred. Also notice in the ship picture, while most edges show up very well, without colors we lose the gestalt of the picture, so perhaps this could be the basis for some digital coloration or even coloring after printing.
The montage command
Finally, I want to talk about the montage command. I've already shown examples of it above, where I have combined single images into composites.
Here's how I generated the charcoal example (note that it would all be on one line):
     montage -label %f DSC_0008.jpg charcoal_example.jpg -geometry +10+10
           -resize 25% -shadow -title 'charcoal demo' charcoal_demo.jpg
The -label option labels each image with its filename (%f) underneath. Without the ‑geometry option, all the images would be thumbnail size (120 pixels wide), and +10+10 manages the border size. Next, I resized the entire final composite (‑resize 25%) and added a shadow (with no settings, so it's the default), and finally created a title for the montage.
You can place all the image names at the end, with the last image name the file where the montage is saved. This might be useful to create an alias for the command and all its options, then I can simply type the alias followed by the appropriate filenames. I've done this on occasion to reduce the typing needed to create a series of montages.
In the ‑canny examples, I had four images in the montage. I added the ‑tile option, specifically ‑tile 2x, which created a montage of two columns. I could have specified a matrix, ‑tile 2x2, or ‑tile x2 to produce the same result.
There is a lot more to learn about ImageMagick, so I plan to write more about it, maybe even about using Perl to script ImageMagick commands. ImageMagick has extensive documentation, although the site is short on examples or showing results, and I think the best way to learn is by experimenting and changing various settings and options.


7 Comments