

In my introduction to ImageMagick, I showed how to use the application's menus to edit and add effects to your images. In this follow-up, I'll show additional ways to use this open source image editor to view your images.
Another effect
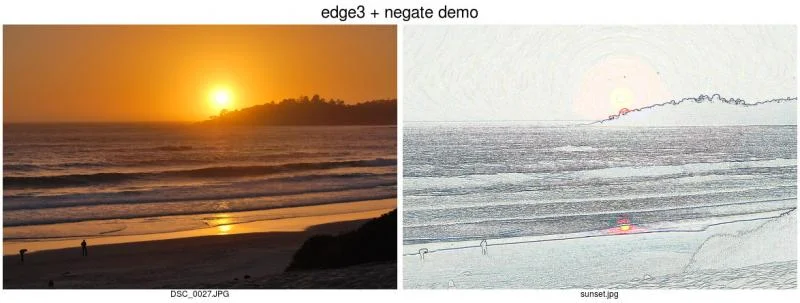
Before diving into advanced image viewing with ImageMagick, I want to share another interesting, yet simple, effect using the convert command, which I discussed in detail in my previous article. This involves the
-edge option, then negate:
convert DSC_0027.JPG -edge 3 -negate edge3+negate.jpg
opensource.com
There are a number of things I like about the edited image—the appearance of the sea, the background and foreground vegetation, but especially the sun and its reflection, and also the sky.
Using display to view a series of images
If you're a command-line user like I am, you know that the shell provides a lot of flexibility and shortcuts for complex tasks. Here I'll show one example: the way ImageMagick's display command can overcome a problem I've had reviewing images I import with the Shotwell image manager for the GNOME desktop.
Shotwell creates a nice directory structure that uses each image's Exif data to store imported images based on the date they were taken or created. You end up with a top directory for the year, subdirectories for each month (01, 02, 03, and so on), followed by another level of subdirectories for each day of the month. I like this structure, because finding an image or set of images based on when they were taken is easy.
This structure is not so great, however, when I want to review all my images for the last several months or even the whole year. With a typical image viewer, this involves a lot of jumping up and down the directory structure, but ImageMagick's display command makes it simple. For example, imagine that I want to look at all my pictures for this year. If I enter display on the command line like this:
display -resize 35% 2017/*/*/*.JPGI can march through the year, month by month, day by day.
Now imagine I'm looking for an image, but I can't remember whether I took it in the first half of 2016 or the first half of 2017. This command:
display -resize 35% 201[6-7]/0[1-6]/*/*.JPGrestricts the images shown to January through June of 2016 and 2017.
Using montage to view thumbnails of images
Now say I'm looking for an image that I want to edit. One problem is that display shows each image's filename, but not its place in the directory structure, so it's not obvious where I can find that image. Also, when I (sporadically) download images from my camera, I clear them from the camera's storage, so the filenames restart at DSC_0001.jpg at unpredictable times. Finally, it can take a lot of time to go through 12 months of images when I use display to show an entire year.
This is where the montage command, which puts thumbnail versions of a series of images into a single image, can be very useful. For example:
montage -label %d/%f -title 2017 -tile 5x -resize 10% -geometry +4+4 2017/0[1-4]/*/*.JPG 2017JanApr.jpgFrom left to right, this command starts by specifying a label for each image that consists of the filename (%f) and its directory (%d) structure, separated with /. Next, the command specifies the main directory as the title, then instructs the montage to tile the images in five columns, with each image resized to 10% (which fits my monitor's screen easily). The geometry setting puts whitespace around each image. Finally, it specifies which images to include in the montage, and an appropriate filename to save the montage (2017JanApr.jpg). So now the image 2017JanApr.jpg becomes a reference I can use over and over when I want to view all my images from this time period.
Managing memory
You might wonder why I specified just a four-month period (January to April) for this montage. Here is where you need to be a bit careful, because montage can consume a lot of memory. My camera creates image files that are about 2.5MB each, and I have found that my system's memory can pretty easily handle 60 images or so. When I get to around 80, my computer freezes when other programs, such as Firefox and Thunderbird, are running the background. This seems to relate to memory usage, which goes up to 80% or more of available RAM for montage. (You can check this by running top while you do this procedure.) If I shut down all other programs, I can manage 80 images before my system freezes.
Here's how you can get some sense of how many files you're dealing with before running the montage command:
ls 2017/0[1-4/*/*.JPG > filelist; wc -l filelistThe command ls generates a list of the files in our search and saves it to the arbitrarily named filelist. Then, the wc command with the -l option reports how many lines are in the file, in other words, how many files ls found. Here's my output:
163 filelistOops! There are 163 images taken from January through April, and creating a montage of all of them would almost certainly freeze up my system. I need to trim down the list a bit, maybe just to March or even earlier. But what if I took a lot of pictures from April 20 to 30, and I think that's a big part of my problem. Here's how the shell can help us figure this out:
ls 2017/0[1-3]/*/*.JPG > filelist; ls 2017/04/0[1-9]/*.JPG >> filelist; ls 2017/04/1[0-9]/*.JPG >> filelist; wc -l filelistThis is a series of four commands all on one line, separated by semicolons. The first command specifies the number of images taken from January to March; the second adds April 1 through 9 using the >> append operator; the third appends April 10 through 19. The fourth command, wc -l, reports:
81 filelistI know 81 files should be doable if I shut down my other applications.
Managing this with the montage command is easy, since we're just transposing what we did above:
montage -label %d/%f -title 2017 -tile 5x -resize 10% -geometry +4+4 2017/0[1-3]/*/*.JPG 2017/04/0[1-9]/*.JPG 2017/04/1[0-9]/*.JPG 2017Jan01Apr19.jpgThe last filename in the montage command will be the output; everything before that is input and is read from left to right. This took just under three minutes to run and resulted in an image about 2.5MB in size, but my system was sluggish for a bit afterward.
Displaying the montage
When you first view a large montage using the display command, you may see that the montage's width is OK, but the image is squished vertically to fit the screen. Don't worry; just left-click the image and select View > Original Size. Click again to hide the menu.
I hope this has been helpful in showing you new ways to view your images. In my next article, I'll discuss more complex image manipulation.


2 Comments