

Jenkins is a well-known open source continuous integration and continuous development automation tool. It has an excellent supporting community, and hundreds of plugins and developers have been using it for years.
This article will provide a brief guide on how to get started with Pipelines and multibranch pipelines.
Why pipelines?
- Developers can automate the integration, testing, and deployment of their code, going from source code to product consumers many times using one tool.
- Pipelines "as code" known as Jenkinsfiles can be saved in any source control system. In previous Jenkins versions, jobs were only configured using the UI. With Jenkinfiles, pipelines are more maintainable and portable.
- Multi-branch pipelines integrate with Git so that different branches, features, and releases can have independent pipelines enabling each developer to customize their development/deployment process.
- Non-technical members of a team can trigger and customize builds using parameters, analyze test reports, receive email alerts and have a better understanding of the build and deployment process through the pipeline stage view (improved in latest versions with the Blue Ocean UI).
- Jenkins can also be installed using Docker and pipelines can interact with Docker agents.
If you have not used Jenkins Pipelines before, I recommend reading the documentation before getting started here, as it includes a complete description and introduction to the technology as well as the benefits of using it.
Requirements:
- Jenkins 2.89.2 (WAR) with Java 8 is the version used in this how-to
- Plugins used (To install:
Manage Jenkins → Manage Plugins →Available):- Pipeline: declarative
- Blue Ocean
- Cucumber reports
Getting started with Jenkins Pipelines
This is the Jenkinsfile I used (you can also access this code on GitHub):
pipeline {
    agent any
    stages {
stage('testing pipeline'){
          steps{
      echo 'test1'
                sh 'mkdir from-jenkins'
                sh 'touch from-jenkins/test.txt'
                }
        }
}
}
1. Click on New Item.
opensource.com
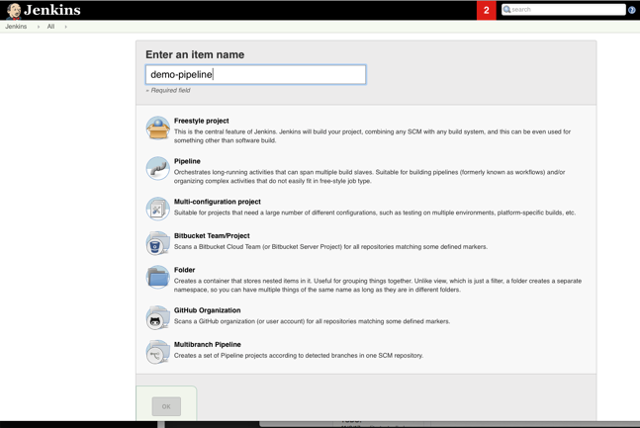
2. Name the project, select Pipeline, and click OK.
opensource.com
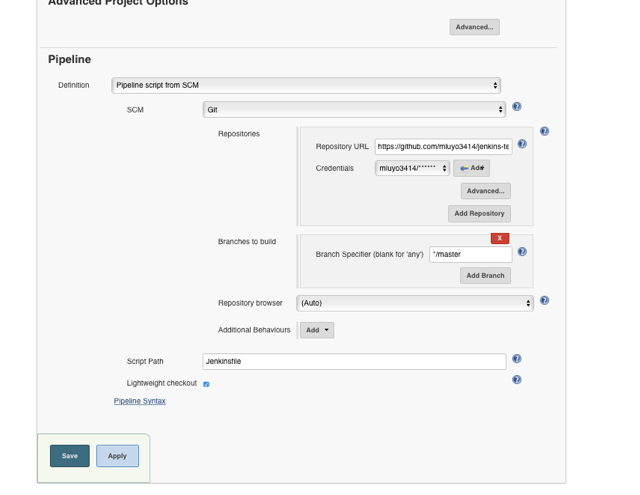
3. The configuration page displays once the project is created. In the Definition segment, you must decide to either obtain the Jenkinsfile from source control management (SCM) or create the Pipeline script in Jenkins. Hosting the Jenkinsfile in SCM is recommended so that it is portable and maintainable.
opensource.com
The SCM I chose was Git with simple user and pass credentials (SSH can also be used). By default, Jenkins will look for a Jenkinsfile in that repository unless it's specified otherwise in the Script Path directory.
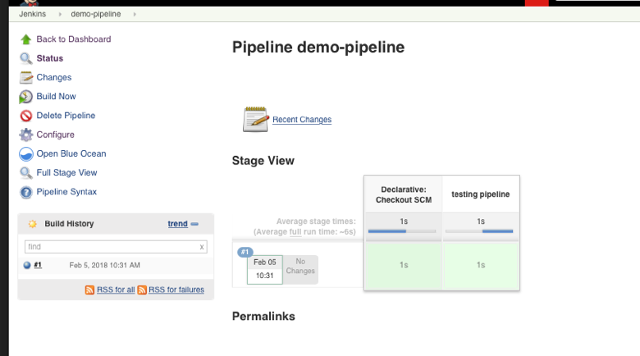
4. Go back to the job page after saving the Jenkinsfile and select Build Now. Jenkins will trigger the job. Its first stage is to pull down the Jenkinsfile from SCM. It reports any changes from the previous run and executes it.
opensource.com
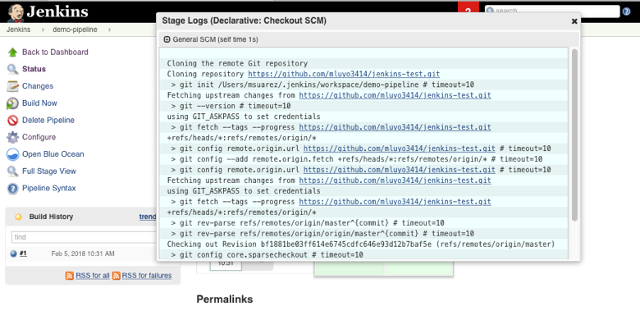
Clicking on Stage View provides console information:
opensource.com
Using Blue Ocean
Jenkins' Blue Ocean provides a better UI for Pipelines. It is accessible from the job's main page (see image above).
opensource.com
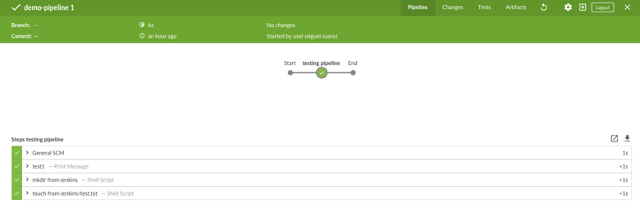
This simple Pipeline has one stage (in addition to the default stage): Checkout SCM, which pulls the Jenkinsfile in three steps. The first step echoes a message, the second creates a directory named from-jenkins in the Jenkins workspace, and the third puts a file called test.txt inside that directory. The path for the Jenkins workspace is $user/.jenkins/workspace, located in the machine where the job was executed. In this example, the job is executed in any available node. If there is no other node connected then it is executed in the machine where Jenkins is installed—check Manage Jenkins > Manage nodes for information about the nodes.
Another way to create a Pipeline is with Blue Ocean's plugin. (The following screenshots show the same repo.)
1. Click Open Blue Ocean.
Screenshot by Miguel Suarez
2. Click New Pipeline.
opensource.com
3. Select SCM and enter the repository URL; an SSH key will be provided. This must be added to your Git SSH keys (in Settings →SSH and GPG keys).
opensource.com
4. Jenkins will automatically detect the branch and the Jenkinsfile, if present. It will also trigger the job.

opensource.com
Pipeline development:
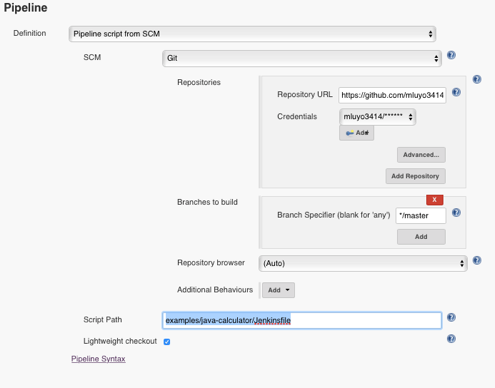
The following Jenkinsfile triggers Cucumber tests from a GitHub repository, creates and archives a JAR, sends emails, and exposes different ways the job can execute with variables, parallel stages, etc. The Java project used in this demo was forked from cucumber/cucumber-jvm to mluyo3414/cucumber-jvm. You can also access the Jenkinsfile on GitHub. Since the Jenkinsfile is not in the repository's top directory, the configuration has to be changed to another path:
opensource.com
pipeline {
    // 1. runs in any agent, otherwise specify a slave node
    agent any
    parameters {
// 2.variables for the parametrized execution of the test: Text and options
        choice(choices: 'yes\nno', description: 'Are you sure you want to execute this test?', name: 'run_test_only')
        choice(choices: 'yes\nno', description: 'Archived war?', name: 'archive_war')
        string(defaultValue: "your.email@gmail.com", description: 'email for notifications', name: 'notification_email')
    }
//3. Environment variables
environment {
firstEnvVar= 'FIRST_VAR'
secondEnvVar= 'SECOND_VAR'
thirdEnvVar= 'THIRD_VAR'
}
//4. Stages
    stages {
        stage('Test'){
             //conditional for parameter
            when {
                environment name: 'run_test_only', value: 'yes'
            }
            steps{
                sh 'cd examples/java-calculator && mvn clean integration-test'
            }
        }
//5. demo parallel stage with script
        stage ('Run demo parallel stages') {
steps {
        parallel(
        "Parallel stage #1":
                  {
                  //running a script instead of DSL. In this case to run an if/else
                  script{
                    if (env.run_test_only =='yes')
                        {
                        echo env.firstEnvVar
                        }
                    else
                        {
                        echo env.secondEnvVar
                        }
                  }
         },
        "Parallel stage #2":{
                echo "${thirdEnvVar}"
                }
                )
             }
        }
    }
//6. post actions for success or failure of job. Commented out in the following code: Example on how to add a node where a stage is specifically executed. Also, PublishHTML is also a good plugin to expose Cucumber reports but we are using a plugin using Json.

post {
        success {
        //node('node1'){
echo "Test succeeded"
            script {
    // configured from using gmail smtp Manage Jenkins-> Configure System -> Email Notification
    // SMTP server: smtp.gmail.com
    // Advanced: Gmail user and pass, use SSL and SMTP Port 465
    // Capitalized variables are Jenkins variables – see https://wiki.jenkins.io/display/JENKINS/Building+a+software+project
                mail(bcc: '',
                     body: "Run ${JOB_NAME}-#${BUILD_NUMBER} succeeded. To get more details, visit the build results page: ${BUILD_URL}.",
                     cc: '',
                     from: 'jenkins-admin@gmail.com',
                     replyTo: '',
                     subject: "${JOB_NAME} ${BUILD_NUMBER} succeeded",
                     to: env.notification_email)
                     if (env.archive_war =='yes')
                     {
             // ArchiveArtifact plugin
                        archiveArtifacts '**/java-calculator-*-SNAPSHOT.jar'
                      }
                       // Cucumber report plugin
                      cucumber fileIncludePattern: '**/java-calculator/target/cucumber-report.json', sortingMethod: 'ALPHABETICAL'
            //publishHTML([allowMissing: false, alwaysLinkToLastBuild: false, keepAll: true, reportDir: '/home/reports', reportFiles: 'reports.html', reportName: 'Performance Test Report', reportTitles: ''])
            }
        //}
        }
        failure {
            echo "Test failed"
            mail(bcc: '',
                body: "Run ${JOB_NAME}-#${BUILD_NUMBER} succeeded. To get more details, visit the build results page: ${BUILD_URL}.",
                 cc: '',
                 from: 'jenkins-admin@gmail.com',
                 replyTo: '',
                 subject: "${JOB_NAME} ${BUILD_NUMBER} failed",
                 to: env.notification_email)
                 cucumber fileIncludePattern: '**/java-calculator/target/cucumber-report.json', sortingMethod: 'ALPHABETICAL'
//publishHTML([allowMissing: true, alwaysLinkToLastBuild: false, keepAll: true, reportDir: '/home/tester/reports', reportFiles: 'reports.html', reportName: 'Performance Test Report', reportTitles: ''])
        }
    }
}
Always check Pipeline Syntax to see how to use the different plugins in the Jenkinsfile.
opensource.com
An email notification indicates the build was successful:

opensource.com
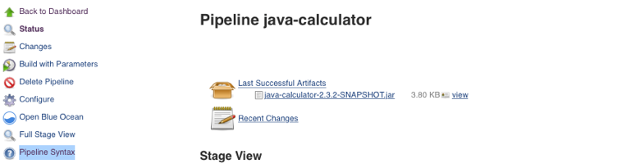
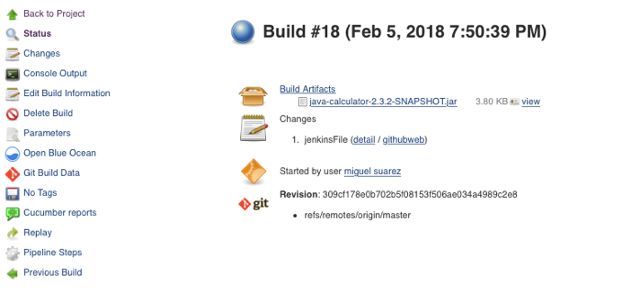
Archived JAR from a successful build:
opensource.com
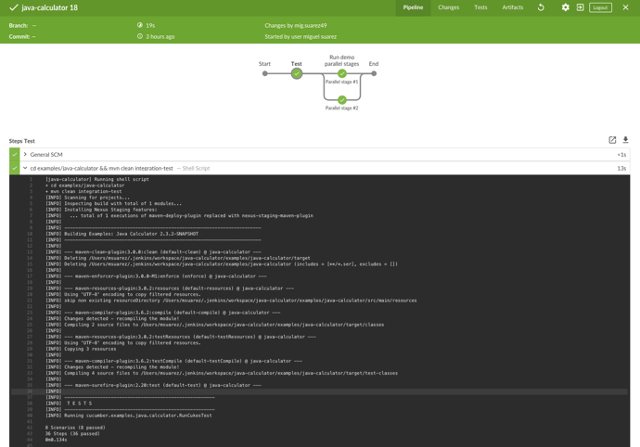
You can access Cucumber reports on the same page.

opensource.com
opensource.com
How to create a multibranch pipeline
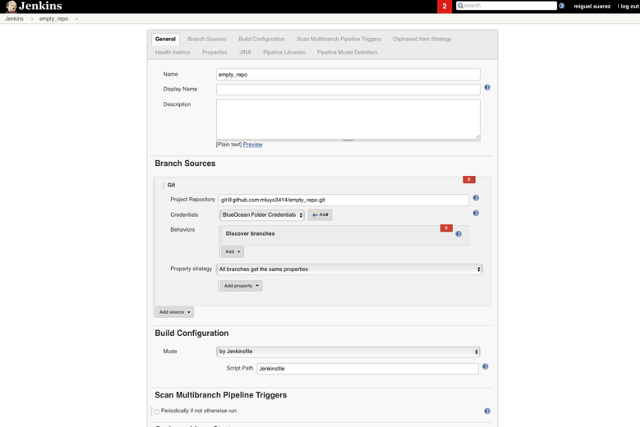
If your project already has a Jenkinsfile, follow the Multibranch Pipeline project instructions in Jenkins' docs. It uses Git and assumes credentials are already configured. This is how the configuration looks in the traditional view:
opensource.com
If this is your first time creating a Pipeline, follow these steps:
1. Select Open Blue Ocean.
Screenshot by Miguel Suarez
2. Select New Pipeline.
opensource.com
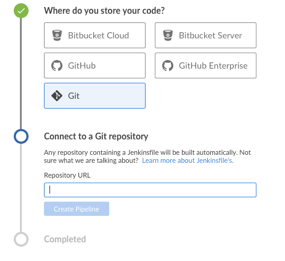
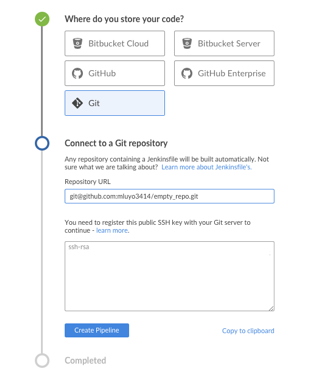
3. Select Git and insert the Git repository address. This repository does not currently have a Jenkinsfile. An SSH key will be generated; it will be used in the next step.
opensource.com
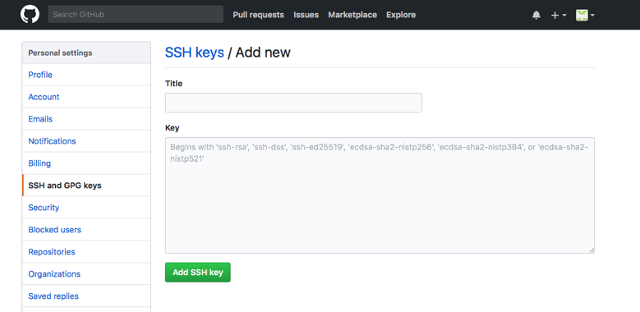
4. Go to GitHub. Click on the profile avatar in the top-right corner and select Settings. Then select SSH and GPG Keys from the left-hand menu and insert the SSH key Jenkins provides.
opensource.com
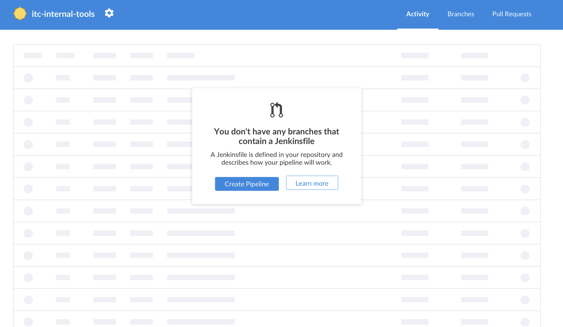
5. Go back to Jenkins and click Create Pipeline. If the project does not contain a Jenkinsfile, Jenkins will prompt you to create a new one.
opensource.com
6. Once you click Create Pipeline, an interactive Pipeline diagram will prompt you to add stages by clicking +. You can add parallel or sequential stages and multiple steps to each stage. A list offers different options for the steps.

opensource.com
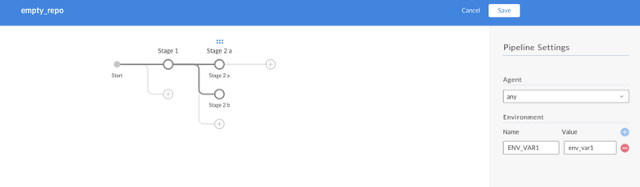
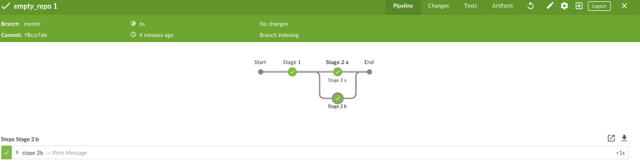
7. The following diagram shows three stages (Stage 1, Stage 2a, and Stage 2b) with simple print messages indicating steps. You can also add environment variables and specify in which agent the Jenkinsfile will be executed.
opensource.com
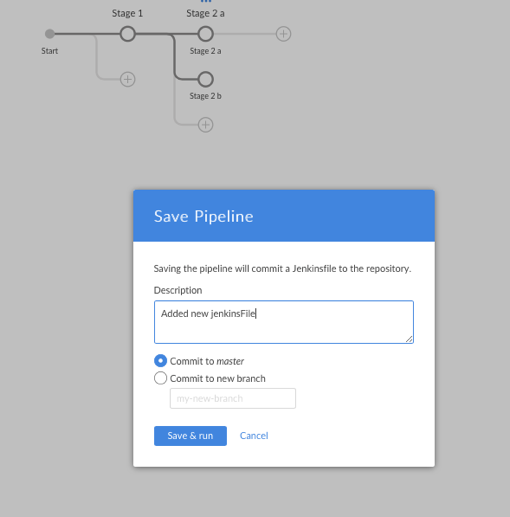
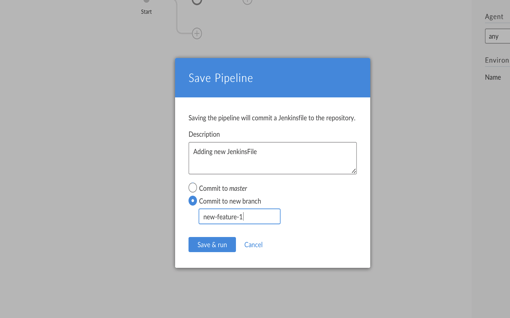
Click Save, then commit the new Jenkinsfile by clicking Save & Run.
opensource.com
You can also add a new branch.
opensource.com
8. The job will execute.

opensource.com
opensource.com
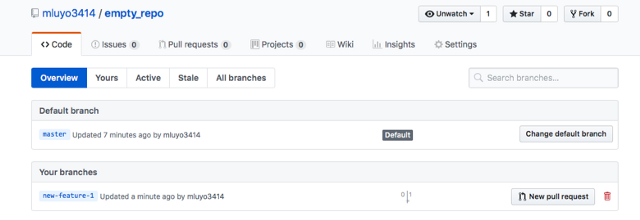
If a new branch was added, you can see it in GitHub.
opensource.com
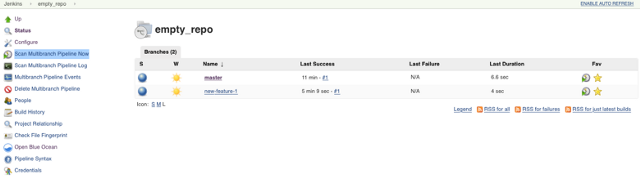
9. If another branch with a Jenkinsfile is created, you can discover it by clicking Scan Multibranch Pipeline Now. In this case, a new branch called new-feature-2 is created in GitHub from Master (only branches with Jenkinsfiles are displayed in Jenkins).
opensource.com
After scanning, the new branch appears in Jenkins.
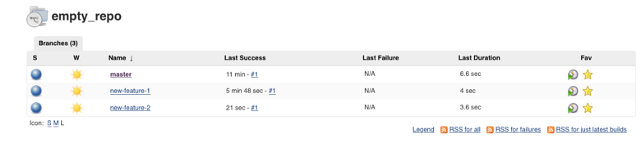
opensource.com
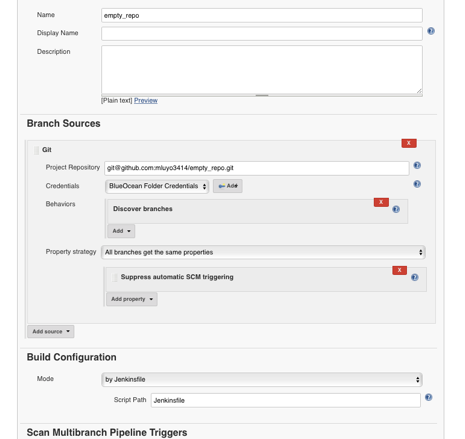
This new feature was created using GitHub directly; Jenkins will detect new branches when it performs a scan. If you don't want the newly discovered Pipelines to be executed when discovered, change the settings by clicking Configure on the job's Multibranch Pipeline main page and adding the property Suppress automatic SCM triggering. This way, Jenkins will discover new Pipelines but they will have to be manually triggered.
opensource.com
This article was originally published on the ITNext channel on Medium and is reprinted with permission.


Comments are closed.