Get the highlights in your inbox every week.
Build a private social network with a Raspberry Pi | Opensource.com
Build a private social network with a Raspberry Pi
Step-by-step instructions on how to create your own social network with low-cost hardware and simple setup.

Social networks have revolutionized people's lives in the last several years. People use social channels every day to stay connected with friends and family. But a common question remains regarding privacy and data security. Even if social networks have created complex privacy policies to protect users, maintaining your data in your own server is always the best option if you don't want to make them available to the public.
Again, a Raspberry Pi—Raspbian Lite version can be very versatile to help you put a number of useful home services (see also my Raspberry Pi projects article) in place. Some addictive features can be achieved by searching for open source software and testing it with this fantastic device. An interesting example to try is installing OpenSource Social Network in your Raspberry Pi.
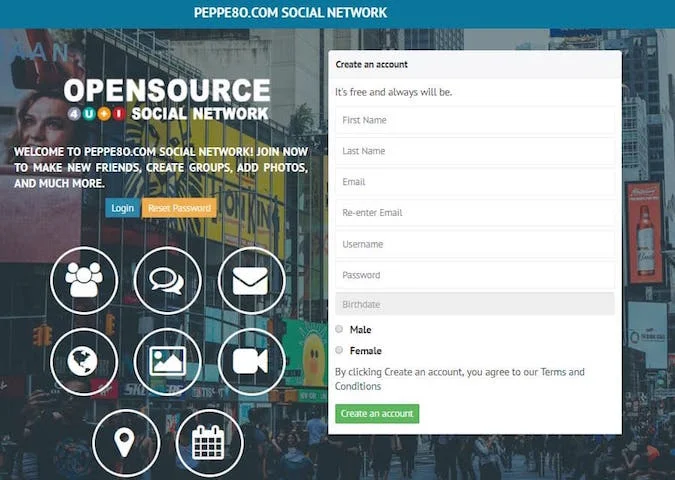
What Is OpenSource Social Network?
OpenSource Social Network (OSSN) is a rapid-development social networking software written in PHP, that essentially allows you to make a social networking website. OSSN can be used to build different types of social apps, such as:
- Private Intranets
- Public/Open Networks
- Community
OSSN supports features like:
- Photos
- Profile
- Friends
- Smileys
- Search
- Chat
OSSN runs on a LAMP server. It has very poor hardware requirements, but an amazing user interface, which is also mobile-friendly.
What we need
This project is very simple and, because we're installing only remote web services, we only need a few cheap parts. I'm going to use a Raspberry Pi 3 model B+, but it should also work with Raspberry Pi 3 model A+ or newer boards.
Hardware:
- Raspberry Pi 3 model B+ with its power supply
- a micro SD card (better if it is a performing card, at least 16GB)
- a Desktop PC with an SFTP software (for example, the free Filezilla) to transfer installation packages into your RPI.
Step-by-step procedure
We'll start by setting up a classic LAMP server. We'll then set up database users and install OpenSource Social Network.
1. Install Raspbian Buster Lite OS
For this step, you can simply follow my Install Raspbian Buster Lite in your Raspberry Pi article.
Make sure that your system is up to date. Connect via ssh terminal and type following commands:
sudo apt-get update
sudo apt-get upgrade
LAMP (Linux–Apache–Mysql–Php) servers usually come with the MySQL database. In our project, we'll use MariaDB instead, because it is lighter and works with Raspberry Pi.
3. Install Apache server:
sudo apt-get install apache2 -y
4. Install PHP:
sudo apt-get install php -y
sudo apt-get install mariadb-server php-mysql -y
PhpMyAdmin is not mandatory in OpenSource Social Network, but I suggest that you install it because it simplifies database management.
sudo apt-get install phpmyadmin
- Select apache (mandatory) with space and press OK.
- Select Yes to configure the database for phpMyAdmin with dbconfig-common.
- Enter your favorite phpMyAdmin password and press OK.
- Enter your phpMyAdmin password again to confirm and press OK
7. Grant phpMyAdmin user DB privileges to manage DBs:
We'll connect to MariaDB with root user (default password is empty) to grant permissions. Remember to use semicolons at the end of each command row as shown below:
sudo mysql -uroot -p
grant all privileges on *.* to 'phpmyadmin'@'localhost';
flush privileges;
quit
sudo systemctl restart apache2.service
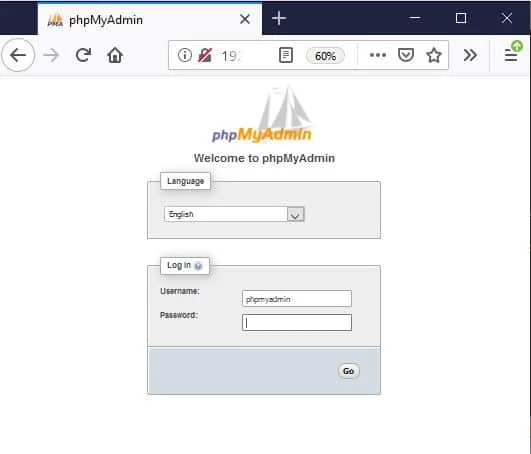
Default phpMyAdmin login credentials are:
- user: phpmyadmin
- password: the one you set up in the phpMyAdmin installation step
Installing other open source social network-required packages and setting up PHP
We need to prepare our system for OpenSource Social Network's first setup wizard. Required packages are:
- PHP version any of 5.6, 7.0, 7.1
- MYSQL 5 OR >
- APACHE
- MOD_REWRITE
- PHP Extensions cURL & Mcrypt should be enabled
- PHP GD Extension
- PHP ZIP Extension
- PHP settings allow_url_fopen enabled
- PHP JSON Support
- PHP XML Support
- PHP OpenSSL
So we'll install them with following terminal commands:
sudo apt-get install php7.3-curl php7.3-gd php7.3-zip php7.3-json php7.3-xml
1. Enable MOD_REWRITE:
sudo a2enmod rewrite
sudo nano /etc/apache2/sites-available/000-default.conf
<VirtualHost *:80>
ServerAdmin webmaster@localhost
DocumentRoot /var/www/html
ErrorLog ${APACHE_LOG_DIR}/error.log
CustomLog ${APACHE_LOG_DIR}/access.log combined
# SECTION TO ADD --------------------------------
<Directory /var/www/html>
Options Indexes FollowSymLinks MultiViews
AllowOverride All
Require all granted
</Directory>
# END SECTION TO ADD --------------------------------
</VirtualHost>
sudo apt install php-dev libmcrypt-dev php-pear
sudo pecl channel-update pecl.php.net
sudo pecl install mcrypt-1.0.2
sudo nano /etc/php/7.3/apache2/php.ini
6. Another setting that I suggest is editing the PHP max upload file size up to 16 MB:
sudo nano /etc/php/7.3/apache2/php.ini
upload_max_filesize = 16M
sudo systemctl restart apache2.service
Install OSSN
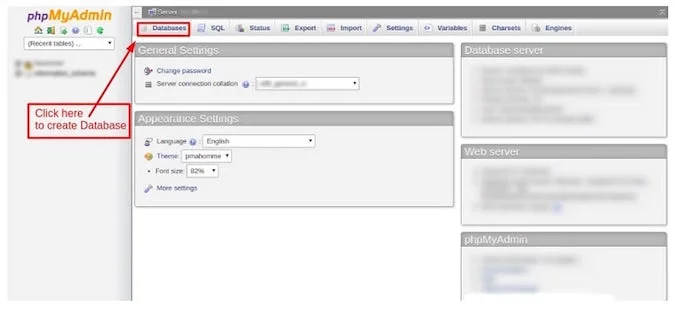
1. Create DB and set up user:
Go back to phpmyadmin web page (browse "http://<<YourRpiIPAddress>>/phpmyadmin/") and login:
User: phpmyadmin
Password: the one set up in phpmyadmin installation step
Click on database tab:
Create a database and take note of the database name, as you will be required to enter it later in the installation process.
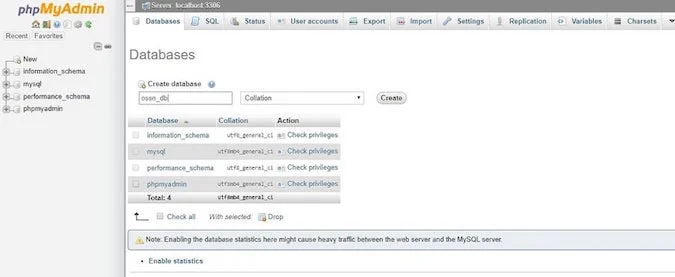
It's time to create a database user for OSSN. In this example, I'll use the following credentials:
User: ossn_db_user
Password: ossn_db_password
So, terminal commands will be (root password is still empty, if not changed by you before):
sudo mysql -uroot -p
CREATE USER 'ossn_db_user'@'localhost' IDENTIFIED BY 'ossn_db_password';
GRANT ALL PRIVILEGES ON ossn_db.* TO 'ossn_db_user'@'localhost';
flush privileges;
quit
Download the OSSN installation zip file from the OSSN download page on your local PC. At the time of this writing, this file is named "ossn-v5.2-1577836800.zip."
Using your favorite SFTP software, transfer the entire zip file via SFTP to a new folder in the path "/home/pi/download" on your Raspberry Pi. Common (default) SFP connection parameters are:
- Host: your Raspberry Pi IP address
- User: pi
- Password: raspberry (if you didn't change the pi default password)
- Port: 22
Back to terminal:
cd /home/pi/download/ #Enter directory where OSSN installation files have been transferred
unzip ossn-v5.2-1577836800.zip #Extracts all files from zip
cd /var/www/html/ #Enter Apache web directory
sudo rm index.html #Removes Apache default page - we'll use OSSN one
sudo cp -R /home/pi/download/ossn-v5.2-1577836800/* ./ #Copy installation files to web directory
sudo chown -R www-data:www-data ./
sudo mkdir /opt/ossn_data
sudo chown -R www-data:www-data /opt/ossn_data/
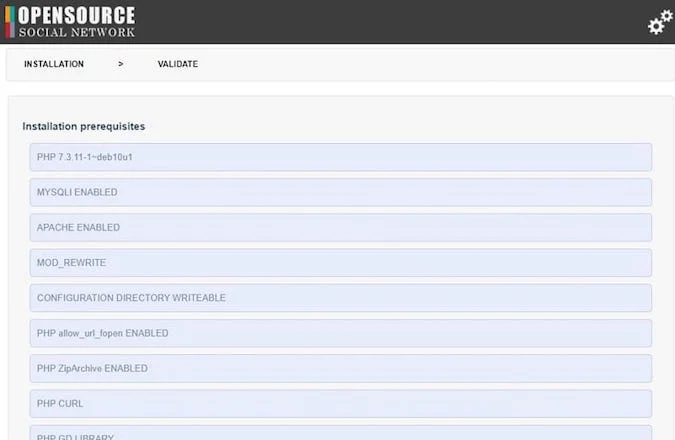
All checks should be fine. Click the Next button at the end of the page.
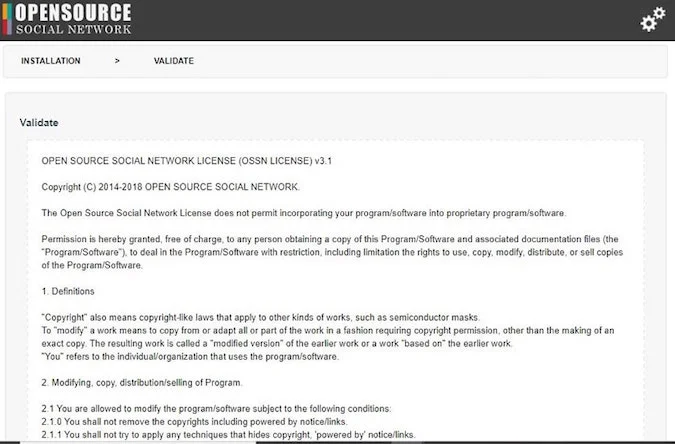
Read the license validation and click the Next button at the end of the page to accept.
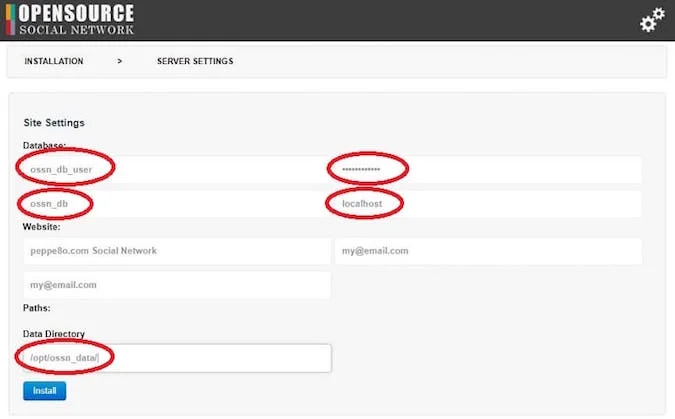
Enter the database user, password, and the DB name you chose. Remember also to enter the OSSN data folder. Press Install.
Enter your admin account information and press the Create button.
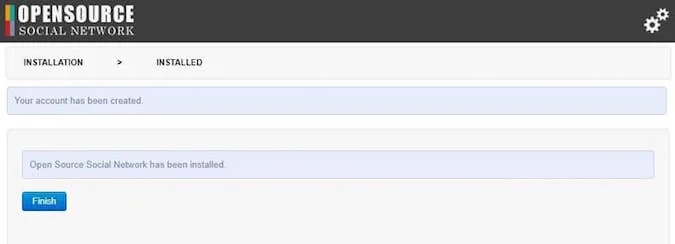
Everything should be fine now. Press Finish to access the administration dashboard.
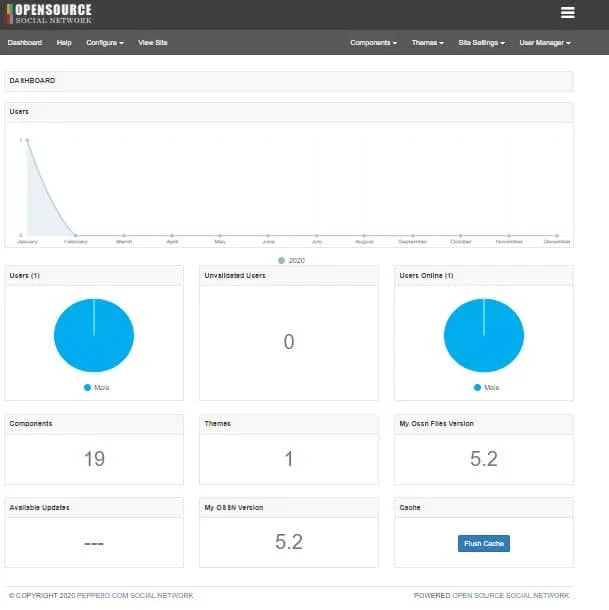
So, administration panel can be reached with URL "http://<<YourRpiIPAddress>>/administrator" while user link will be "http://<<YourRpiIPAddress>>".
This article was originally published at peppe8o.com. Reposted with permission.
25 Comments, Register or Log in to post a comment.
It is much easier by using Docker :
https://gist.github.com/Tyranwyn/8762f168861991ed8b51bca3db3115b1
Install Docker on Raspberry, checkout the Repo and start the environment :)
Hi MF,
I'm a Docker lover too! But tyranwyn/ossn image is based on linux/amd64, while Raspberry PI is an arm based architecture. You can try, but hardly will work on PI... If you want to make it running in Docker on Raspberry PI you should create a custom image from apache injecting ossn package and linking it to a MariaDB image (both arm based).
That "Opensource Social Network License"... Is it an OSI approved license? Why a new license?
Despite its title, "OpenSource Social Network" is not clearly "Open Source" as most of us define it. In short this is because they have crafted a unique license and have not submitted it to the OSI for assessment.
Judging by their remarks when this was pointed out, I doubt they are inclined to change that situation. See https://github.com/opensource-socialnetwork/opensource-socialnetwork/iss...
As it stands I'm disappointed to see an article on opensource.com about this software without at least a disclaimer about the license.
Ideally that project could be encouraged to find an OSI approved license that it finds suitable.
@Gerald Waters
We are small team and focused on development. We are not lawyers so its bit hard for us to decide which license to use, we were using GPL in the past but change to our custom license. The code is for open source purpose but we wanted to preserve our credits
1. We wanted to preserve copyrights
2. We wanted to preserver powered by notice
That is the goal we created our custom license, if any license suited this please let us know, we are open for discussion and happy to change to OSI approved license.
We are reviewing Attribution Assurance License and it sounds promising that suits 1,2 points above.
We have finally decided to switch the license to Cryptographic Autonomy License version 1.0 OSI approved recently.
Excellent job, thanks for sharing. Personally I think do this for this summer to practice and have fun with my family and friends.
Thank you Edgar!
@Gerald Waters
We are the small team focused on the development and are not the lawyers, its really difficult to find out which license is best. The only thing we wanted is:
1. Preserve the copyright notice
2. Preserve the powered by notice
So now you suggest which license is suitable ? we shall look into it.
Thanks for the very comprehensive write up.
I progressed with the installation up to logging onto the OSS web setup page, but when I entered the details I had the error:
"Access denied for user 'ossn_db_user'@'localhost' (using password: YES)"
It seems to be a database privileged issue, but I'm extremely rusty with MSQL (and was never very good with it anyway!)
I'd be very grateful for any assistance you can give me, please.
Jim
OK Jim. I suspect that following part is missing to your setup (from RPI terminal). Used your OSSN DB name, DB user and DB password instead of default ones, if modified in your installation:
sudo mysql -uroot -p
CREATE USER 'ossn_db_user'@'localhost' IDENTIFIED BY 'ossn_db_password';
GRANT ALL PRIVILEGES ON ossn_db.* TO 'ossn_db_user'@'localhost';
flush privileges;
quit
- First line connect you to mysql terminal console. Default password is empty (so, simply press ENTER key).
- Second line create the user for OSSN (setted up only for local connection and with the defined password)
- Third line gives all permissions to your DB user only inside the created database
- Fourth line make these changes running (if you don't flush priviledges these will not be running/committed)
- Fifth line closes mysql terminal console
Let me know if this solves your issue
Hi Giuseppe.
I'm sorry I haven't replied to your helpful comment until now. I had forgotten that I'd posted my query here and thought that I'd posted it on the forum where the original installation instructions were posted, and was waiting a reply from there!
I ended up by reinstalling the system and it then went all OK. However on testing the Open Source Social Network site I'd created, I find that I can't invite people to join by email. The problem is that there is no mail server installed on the Pi, so it looks like that I've got to install one - which appears to be a non-trivial task.
Did you install a mail server on your Pi and if so, do you have any advice, please?
Best wishes, Jim
Hi Jim,
maybe following article could be what you need:https://peppe8o.com/mailserver-on-raspberry-pi-zero-w-with-postfix-dovec...
MTA agent (Postfix) part should be enought if you want only send e-mails. A different approach is using public SMTP services
Hi Giuseppe.
I'm sorry I haven't replied to your helpful comment until now. I had forgotten that I'd posted my query here and thought that I'd posted it on the forum where the original installation instructions were posted, and was waiting a reply from there!
I ended up by reinstalling the system and it then went all OK. However on testing the Open Source Social Network site I'd created, I find that I can't invite people to join by email. The problem is that there is no mail server installed on the Pi, so it looks like that I've got to install one - which appears to be a non-trivial task.
Did you install a mail server on your Pi and if so, do you have any advice, please?
Best wishes, Jim
Leaving the root password in MariaDB is a hole large enough to drive a train through. Even a weak password is orders of magnitude better than no password.
Why not skip the SFTP part in the instruction/article (and the need of an extra PC to transfer the OSSN zip file). Use wget instead directly from the Raspberry Pi.
Hi jokre07,
your note is correct. Anymore, you must use a Windows PC to flash Raspberry PI OS and to remotely control a headless installation like the one I used (Raspberry PI has poor hardware, so avoiding Desktop environment help performances).
I prefer using windows because I don't know if OSSN has a directory for latest build, so downloading it from web page should assure having latest version
Nice article but the software doesn't work it is full of problems and doesn't install cleanly.
I sort it out the not being able to detect the existence of mod rewrite on an Amazon instance then the next step I filled in all the required fields and clicked install only to get "All fields are required!"
I'd advise people not to waste their time.
Hi Anthony. This guide is about a local installation in Raspberry PI. It is correctly working with Raspberry PI 3 Model B+.
If you tried an AWS installation, maybe you should look for proper guide. I can only suggest to ask OSSN for AWS installation guide.
If you don't respect requirements identified by this guide, of course it could be not working...
Hi Giuseppe.
I've installed the system, but I can only access it from the LAN, not WAN. I port forwarded port 80 to the LAN address of the Pi and I see that the Apache access log shows that the request gets through - but that as far as it gets.
(I tried registering with this site last week, but have not yet received a confirmation email.)
Jim
If you installed it from a local address and you want then use it from external domain, please remember to update accordingly to it /var/www/html/configurations/ossn.config.site.php file ($Ossn->url parameter).
Regarding activation email, according to https://www.opensource-socialnetwork.org/wiki/view/891/account-you should:
- Install php-mail (sudo apt install php-mail)
- Install MTA (sudo apt install postfix) -> use Internet site and your domain address
This way also validation email should work.
Many thanks Giuseppe.
I changed the PHP config file to my external IP address and it now works fine.
I also installed EXIM using this excelent guide:
https://www.sbprojects.net/projects/raspberrypi/exim4.php
and that works fine and was easy to configure.
Thanks for your help.
Jim
What i´m i doing wrong?
Warning in ./libraries/sql.lib.php#613
count(): Parameter must be an array or an object that implements Countable
Backtrace
./libraries/sql.lib.php#2128: PMA_isRememberSortingOrder(array)
./libraries/sql.lib.php#2062: PMA_executeQueryAndGetQueryResponse(
array,
boolean true,
string 'ossn_db',
string 'ossn_users',
NULL,
NULL,
NULL,
NULL,
NULL,
NULL,
string '',
string './themes/pmahomme/img/',
NULL,
NULL,
NULL,
string 'SELECT * FROM `ossn_users`',
NULL,
NULL,
)
./sql.php#221: PMA_executeQueryAndSendQueryResponse(
array,
boolean true,
string 'ossn_db',
string 'ossn_users',
NULL,
NULL,
NULL,
NULL,
NULL,
NULL,
string '',
string './themes/pmahomme/img/',
NULL,
NULL,
NULL,
string 'SELECT * FROM `ossn_users`',
NULL,
NULL,
)
Googling your error, it appears to be a compatibiliy issue from older phpmyadmin versions.
Please try to upgrade it (iI've found this guide: https://devanswers.co/manually-upgrade-phpmyadmin/)