Most know that using Git's push --force command is strongly discouraged and is considered destructive.
However, to me, it seemed very strange to put all my trust in Git with my projects and at the same time completely avoid using one of its popular commands.
This led me to research why folks consider this command so harmful.
Why does it even exist in the first place? And what happens under the hood?
In this article, I share my discoveries so you, too, can understand the usage and impact of this command on your project, learn new safer alternatives, and grasp the skills of restoring a broken branch. You might get surprised how the force is actually with you.
The git push command
To understand how Git works, we need to take a step back and examine how Git stores its data. For Git everything is about commits. A commit is an object that includes several keys such as a unique ID, a pointer to the snapshot of the staged content, and pointers to the commits that came directly before that commit.
A branch, for that matter, is nothing but a pointer to a single commit.
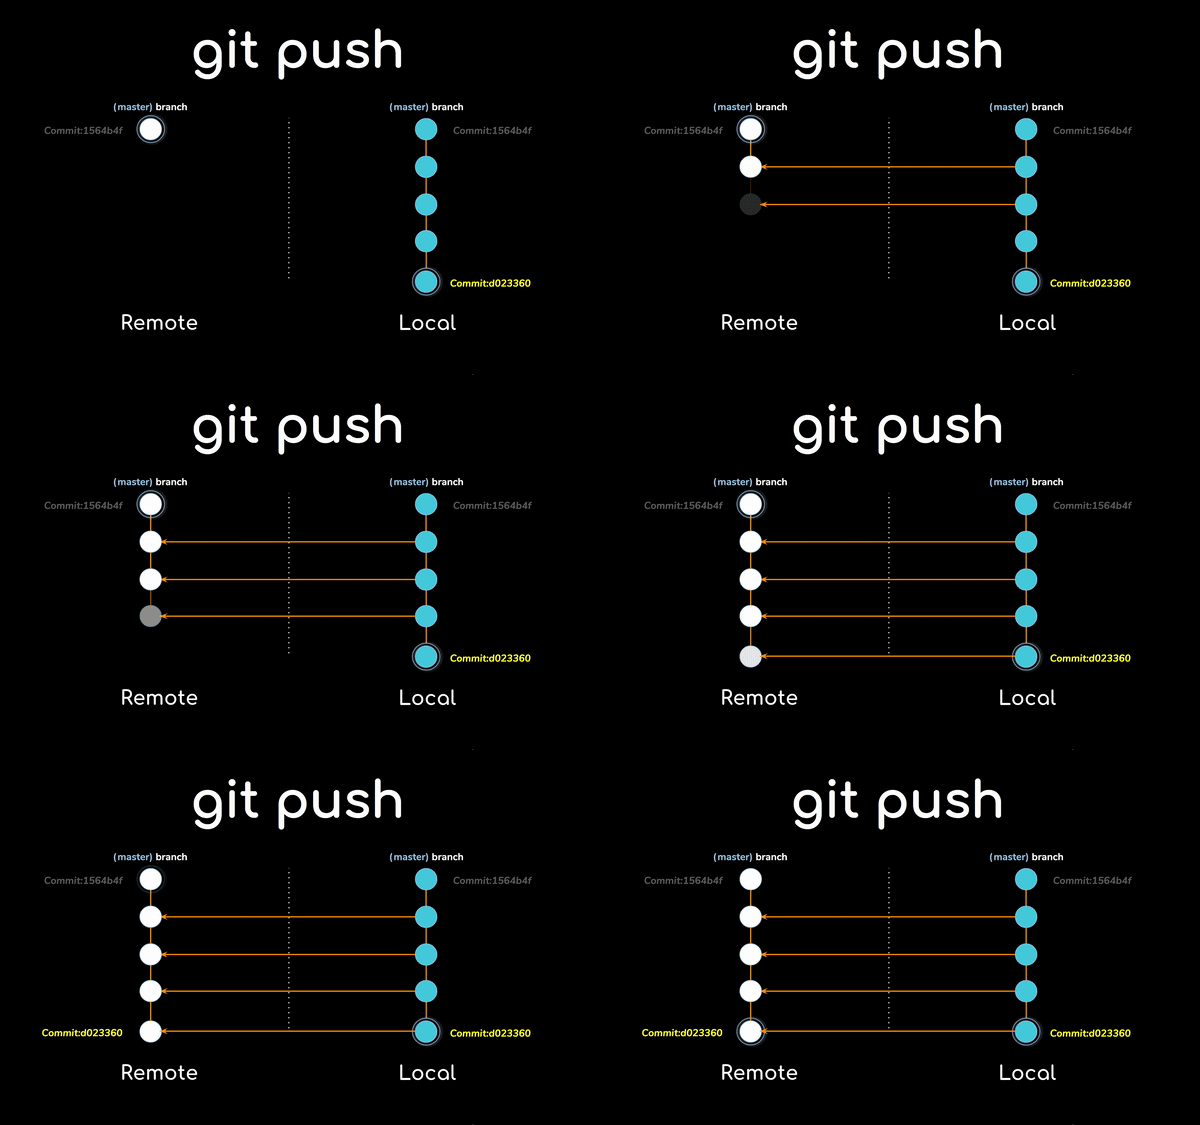
What git push does is basically:
1. Copies all the commits that exist in the local branch.
2. Integrates the histories by forwarding the remote branch to reference the new commit, also called Fast forward ref.
Fast forward ref
Fast forward is simply forwarding the current commit ref of the branch. Git automatically searches for a linear path from the current ref to the target commit ref when you push your changes.
If an ancestor commit exists in the remote and not in local (someone updated the remote, and things have yet to update locally), Git won't find a linear path between the commits, and git push fails.

(Noaa Barki, CC BY-SA 4.0)
When to use the --force
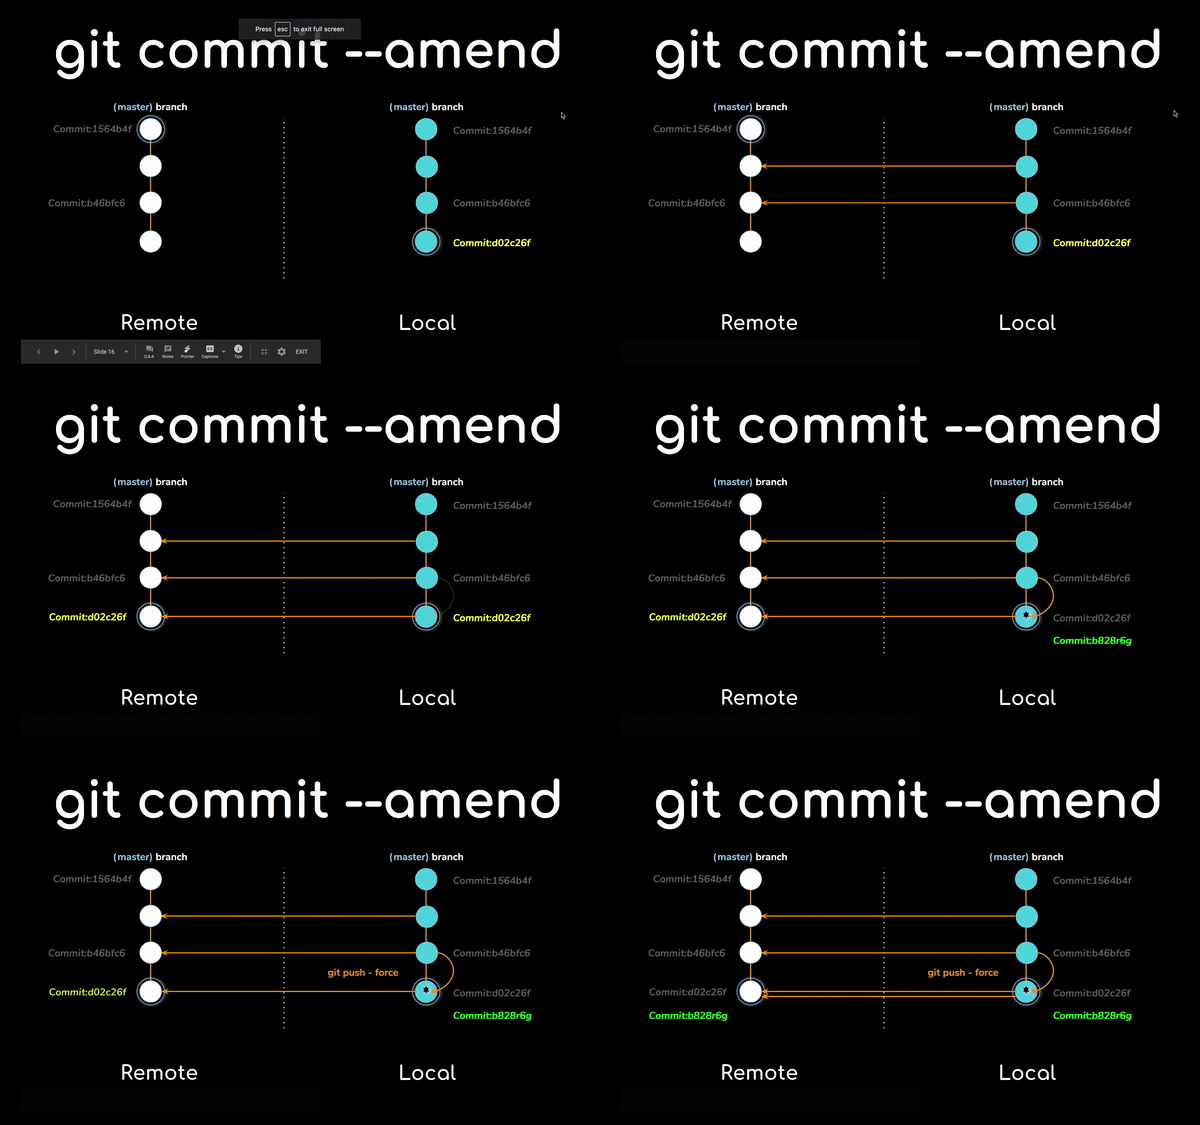
You can use git rebase, git squash, and git commit --amend to alter commit history and rewrite previously pushed commits. But be warned, my friends, that these mighty commands don't just alter the commits—they replace all commits, creating new ones entirely.
A simple git push fails, and you must bypass the "fast forward" rule.
Enter --force.
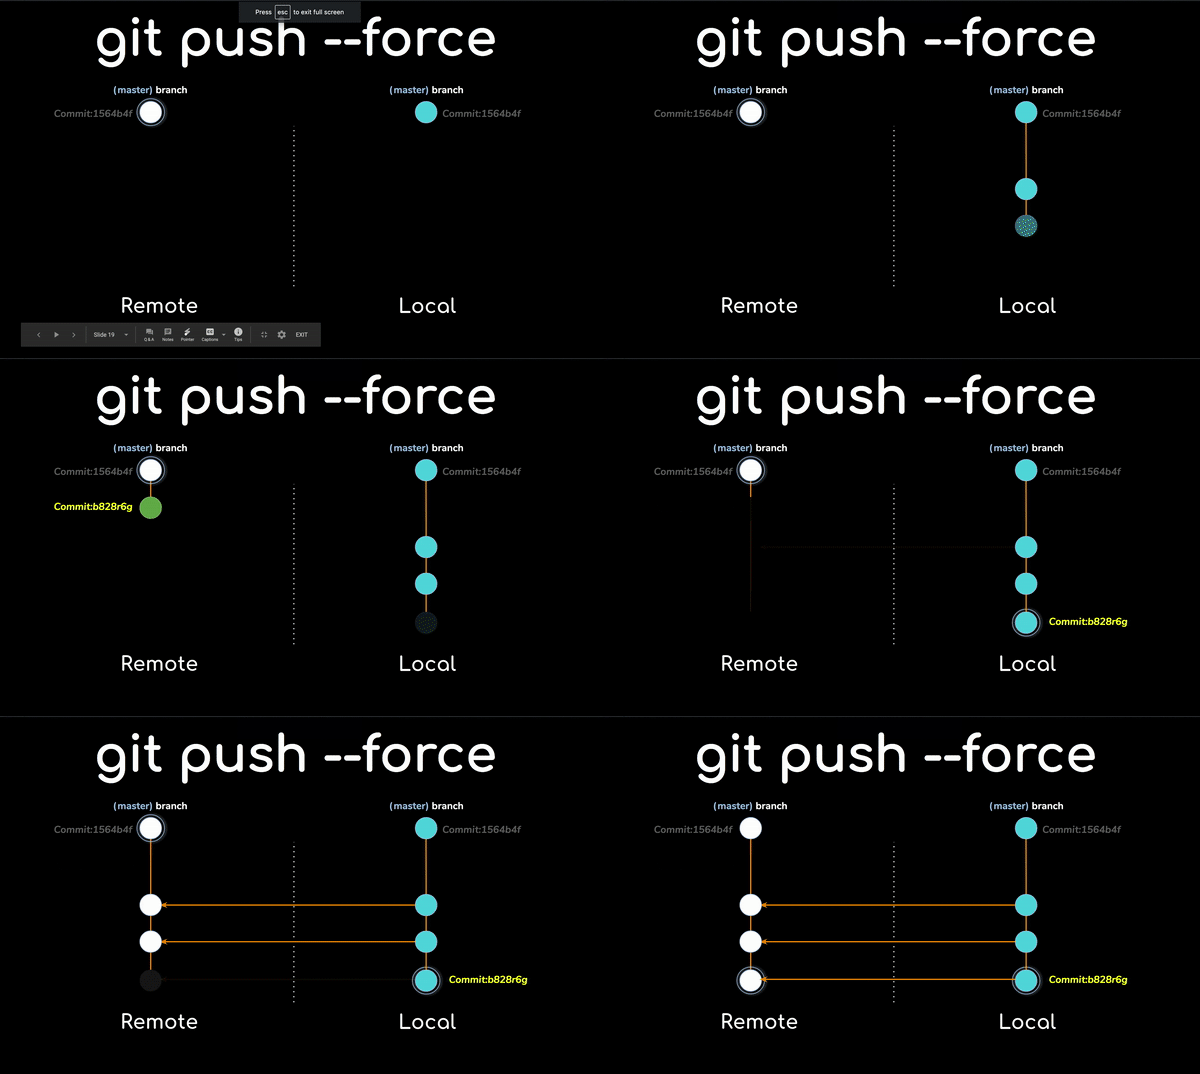
This option overrides the "fast forward" restriction and matches our local branch to the remote branch. The --force flag allows you to order Git to do it anyway.
When you change history, or when you want to push changes that are inconsistent with the remote branch, you can use push --force.

(Noaa Barki, CC BY-SA 4.0)
Simple scenario
Imagine that Lilly and Bob are developers working on the same feature branch. Lilly completed her tasks and pushed her changes. After a while, Bob also finished his work, but before pushing his changes, he noticed some added changes. He performed a rebase to keep the tree clean and then used push --force to get his changes onto the remote. Unfortunately, not being updated to the remote branch, Bob accidentally erased all the records of Lilly's changes.

(Noaa Barki, CC BY-SA 4.0)
Bob has made a common mistake when using the --force option. Bob forgot to update (git pull) his local tracked branch. With a branch that a user has yet to update, using --force caused Git to push Bob's changes with no regard to the state of the remote tracked branch, so commits get lost. Of course, you haven't lost everything, and the team can take steps to recover, but left uncaught, this mistake could cause quite a lot of trouble.
Alternative: push --force-with-lease
The --force option has a not-so-famous relative called --force-with-lease, which enables you to push --force your changes with a guarantee that you won't overwrite somebody else's changes. By default, --force-with-lease refuses to update the branch unless the remote-tracking branch and the remote branch points to the same commit ref. Pretty great, right? It gets better.
You can specify --force-with-lease exactly which commit, branch, or ref to compare to. The --force-with-lease option gives you the flexibility to override new commits on your remote branch while protecting your old commit history. It's the same force but with a life vest.
Guide: How to deal with destructive `--force`
You are, without a doubt, a responsible developer, but I bet it happened to you at least once that you or one of your teammates accidentally ran git push --force into an important branch that nobody should ever mess with. In the blink of an eye, everybody's latest work gets lost.
No need to panic! If you are very lucky, someone else working on the same code pulled a recent version of the branch just before you broke it. If so, all you have to do is ask them to --force push their recent changes!
But even if you are not that lucky, you are still lucky enough to find this article.
1. You were the last person to push before the mistake?
First, DO NOT close your terminal.
Second, go to your teammates and confess your sins.
Finally, make sure no one messes with the repo for the next couple of minutes because you have some work to do.
Go back to your station. In the output of the git push --force command in your terminal, look for the line that resembles this one:
+ d02c26f…f00f00ba [branchName] -> [branchName] (forced update)The first group of symbols (which look like a commit SHA prefix) is the key to fixing this.
Suppose your last good commit to the branch before you inflicted damages was d02c26f. Your only option is to fight fire with fire and push --force this commit back to the branch on top of the bad one:
$ git push — force origin deadbeef:[branchName]Congratulations! You saved the day!
2. I accidentally used `--force push` to my repo, and I want to go back to the previous version. What do I do?
Imagine working on a feature branch. You pulled some changes, created a few commits, completed your part of the feature, and pushed your changes up to the main repository. Then you squashed the commits into one, using git rebase -i and pushed again using push --force. But something bad happened, and you want to restore your branch to the way it was before the rebase -i. The great thing about Git is that it is the very best at never losing data, so the repository version before the rebase is still available.
In this case, you can use the git reflog command, which outputs a detailed history of the repository.
For every "update" you do in your local repository, Git creates a reference log entry. The git reflog command outputs these reflogs, stored in your local Git repository. The output of git reflog contains all actions that have changed the tips of branches and other references in the local repository, including switching branches and rebases. The tip of the branch (called HEAD) is a symbolic reference to the currently active branch. It's only a symbolic reference since a branch is a pointer to a commit.
Here is a simple reflog that shows the scenario I described above:
1b46bfc65e (HEAD -> test-branch) HEAD @ {0} : rebase -i (finish): returning to refs/heads/test-branch
b46bfc65e (HEAD -> test-branch) HEAD @ {1}: rebase -i (squash): a
dd7906a87 HEAD @ {2} : rebase -i (squash): # This is a combination of 2 commits.
a3030290a HEADC {3}: rebase -i (start): checkout refs/heads/master
Oc2d866ab HEAD@{4}: commit: c
6cab968c7 HEAD@ {5} : commit: b
a3030290a HEAD @ {6}: commit: a
c9c495792 (origin/master, origin/HEAD, master) HEAD@ {7}: checkout: moving from master to test-branch
c9c495792 (origin/master, origin/HEAD, master) HEAD@ {8} : pull: Fast-forward
The notation HEAD@{number} is the position of HEAD at number of changes ago. So HEAD@{0} is the HEAD where HEAD is now and HEAD@{4} is HEAD four steps ago. You can see from the reflog above that HEAD@{4} is where you need to go to restore the branch to where it was before the rebase, and 0c2d866ab is the commit ID for that commit.
So to restore the test branch to the state you want, you reset the branch:
$ git reset — hard HEAD@{4}Then you can force push again to restore the repository to where it was before.
General recovery
Anytime you want to restore your branch to the previous version after you push --force, follow this general recovery solution template:
1. Get the previous commit using the terminal.
2. Create a branch or reset to the previous commit.
3. Use push --force.
If you created a new branch, don't forget to reset the branch, so it's synced with the remote by running the following command:
$ git reset --hard origin/[new-branch-name]3. Restore push --force deleted branch with git fsck
Suppose you own a repository.
You had a developer who wrote the project for you.
The developer decided to delete all the branches and push --force a commit with the message "The project was here."
The developer left the country with no way to contact or find them. You've got no code, and you've never cloned the repo.
First thing first—you need to find a previous commit.
Sadly, in this case, using git log won't help because the only commit the branch points to is "The project was here" without any related commits. In this case, you have to find deleted commits that no child commit, branch, tag, or other reference had linked to. Fortunately, the Git database stores these orphan commits, and you can find them using the powerful git fsck command.
git fsck --lost-foundThey call these commits "dangling commits." According to the docs, simple git gc removes dangling commits two weeks old. In this case, all you have are dangling commits, and all you have left to do is find the one previous commit from before the damages and follow the general recovery steps above.
Protected branches and code reviews
As the old saying goes:
"The difference between a smart person and a clever person is that a smart person knows how to get out of trouble that a clever person wouldn't have gotten into in the first place."
If you wish to completely avoid push --force, both GitHub and GitLab offer a very cool feature called Protected Branches, which allows you to mark any branch as protected so no one can push --force to it.
You can also set admin preferences to restrict permissions.
Alternatively, you can institute Git hooks to require code reviews or approval before anyone can push code to an important branch.
Summary
Hopefully, you now understand when you need to add the --force option and the risks involved when using it. Remember, the --force is there for you. It's only a bypass, and like every bypass, you should use it with care.
May the --force be with you.
This article is adapted from the author's Medium article and is republished with permission.


Comments are closed.