In Part 1 of my series on getting started with 3D printing in Blender, I covered basic preliminary steps for getting your Blender environment set up for creating your own 3D models, ready to be 3D printed. In Part 2, I'll examine the process for actually creating those models that you want to print. Before getting started, I should emphasize that Blender is not a CAD (Computer-Aided Design) tool. Rather, its primary purpose is to serve as an artist's tool. Blender simply doesn't have a lot of the precision features that CAD operators expect to see. That said, a lot of consumer-level 3D printers don't have that level of precision, either. In the context of 3D printing and rapid prototyping, Blender is best suited for quickly getting your ideas in a format that can be printed so you can get a sense of how the "real thing" might look and feel. If more precise tooling is necessary after that, you'll at least have a physical object you can reference when building it with CAD.
Modeling tools
Blender's standard mesh modeling tools in Edit mode are powerful in their own right. Incredible models are created every day by pushing around vertices and using simple operations such as Extrude (E), Knife (K), and Loop Cut (Ctrl + R). However, once you crack the seal on some of Blender's more advanced tools, a whole world of possibilities opens in front of you.
Of course, being comfortable with the base set of modeling tools is still valuable. Despite the power of the advanced tools, a few standard modeling techniques are still necessary to prepare your model for print. For now, though, let's get into those advanced tools.
Sculpting
In the past 10 years, the process of 3D modeling has evolved from a structural approach to techniques that are far more intuitive. We used to have to care about the location of each vertex in a mesh and how those vertices connect to form edges and faces (also known as the mesh's topology). That's not so much the case anymore, at least not while creating our models for 3D printing. All of this is because of a technique known as 3D sculpting, and Blender has it built-in.
As a quick example, take Blender's default scene, the one with the lonely little cube sitting in empty space. With the cube selected, use the mode selection menu in the 3D View's header to switch into Sculpt mode. You should see a red circle around your mouse cursor. This is your sculpting brush.
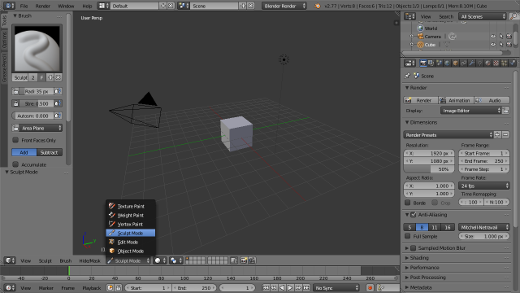
Switching to Sculpt mode in Blender
On the 3D View's Tool Shelf (T), the Tools tab gives you the ability to switch between the different types of sculpting brushes that Blender offers and tweak the settings for each one as you work. For this example, make sure you're using the SculptDraw brush. That should be the brush that Blender gives you by default.
You could try to sculpt on your cube now (left-click and drag your sculpt brush over the cube in the 3D View), but the results are going to be pretty lackluster. That's because the default behavior for sculpting in Blender is that brushes manipulate the existing vertices in your mesh that are already there. That certainly has its uses, but on a basic cube, it's not particularly interesting. We can fix that, though. Back in the Tool Shelf, scroll down to a panel that's labeled Dyntopo (short for "dynamic topology"). Expand that panel to see a big button at the top labeled Enable Dyntopo. Click that button and make with the enabling.
Next, left-click and drag your sculpt brush over the cube. This is a lot more interesting. With Dyntopo enabled, all of the sculpting brushes (except for the Grab and Rotate brushes) will add, remove, or otherwise dynamically reconfigure the topology of your mesh as you work.
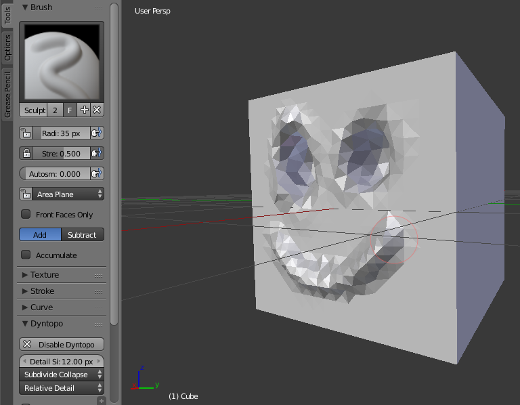
Dyntopo is enabled!
Sculpting is a more comfortable method of working with 3D models, especially for any models that are organic or have intricate details. It's even more comfortable if you're working with a drawing tablet, like those from Wacom. And the little bit covered in this article barely scratches the surface. I recommend that you play around with the sculpt brushes a bit to get a feel for how they work before you go seeking additional instruction. That said, there are a number of great references and tutorials on the web to help you get started after that.
Also remember that sculpting is like most arts—you get better the more you do it. One way that you can really accelerate your sculpting skill level is with daily challenges. You can even find groups of people who challenge themselves in these daily challenges and share their work on the web. In the Blender community, the Sculpt January event has gotten pretty popular; they do a sculpting challenge every day for the month of January. Likewise, I started a similar daily challenge last year for the month of September (we called it Sculptember). Whichever way you do it, there's a great community of 3D artists out there who can give you support, feedback, and inspiration as you get better with the sculpting tools in Blender.
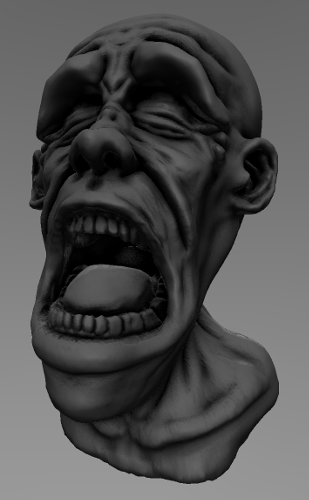
An example sculpt I made for Sculptember
Booleans
Sculpting is great on its own, but it can be challenging if you're trying to create models that are more mechanical in nature, sometimes called hard surface models. To do hard surface modeling with sculpting tools is possible, but the process is inherently less precise, and getting nice, clean edges is difficult without some manner of help. In the CAD world, a lot of this kind of modeling is done with parametric objects referred to as solids. Complex objects with a lot of precision can be created by taking simple, primitive objects (e.g., spheres, cubes, cylinders) and merging them together, or by subtracting the form of one from the other. These operations are called Booleans, referring to these combinations of objects as being 3D equivalents of the logical AND (add), OR (subtract), and XOR (intersection) operations.
Blender is not a parametric modeler. Primarily Blender is a mesh modeler; however, it still has the ability to perform Boolean operations between meshes. Of course, doing these kinds of Boolean operations on mesh objects with distinct vertices, edges, and faces can be challenging and easily can produce really nasty geometry when it comes to 3D printing your model. There are three primary ways that modelers work with Booleans in Blender:
1. Boolean modifier: This is is the most basic approach to working with Booleans in Blender, but it's also the most likely to cause hair loss from stress. The method is pretty simple. You start with two separate objects in the 3D View. With one of those objects selected—we'll call that one the main object—go to the Modifiers section of the Properties Editor and add a Boolean modifier by left-clicking the Add Modifier drop-down button and choosing Boolean from the second column.
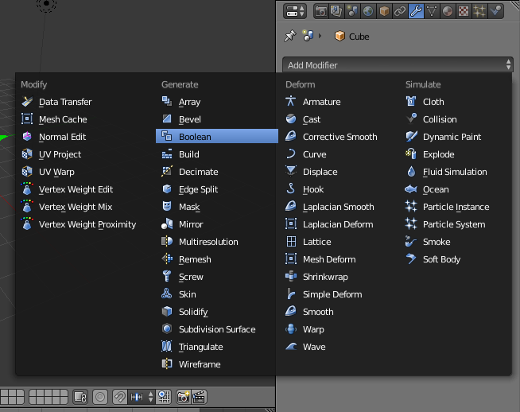
Adding a Boolean modifier
In your object's newly added Boolean modifier, you should notice that there's an empty field labeled Object. You want the name of the other object in this field. You can put it there by typing, choosing from the list of available objects, or using the eyedropper and left-clicking that other object in the 3D View. By default, the Boolean modifier is set to do an Intersect operation, but you can easily change that to be an Add or Subtract if that's what you require.
When you have the Boolean modifier added to your mesh, nothing may seem to have changed, particularly if you're using the subtract operation. This is because the modifier doesn't affect the other object; it only uses that object's geometry to add or remove geometry from your main object. Also, modifiers are non-destructive; if you remove the modifier, you're back to your original mesh. Unfortunately, modifiers are not a recognized part of any file format that 3D printers understand. So ultimately, you must apply the Boolean operator and make the changes to your mesh permanent. Then after you apply, you can delete (or hide) the non-main object.
There's another caveat. Nearly all 3D printers only support triangulated data. That is, all of the vertices must connect to form triangles. Unless you take some precautions, the Boolean operator will almost always create faces with more than three sides (often many more sides). Tessellating the resulting geometry from that into triangles often can give you pretty ugly results, such as long, thin triangles, which can be problematic for 3D printers. You can get around this to some extent by subdividing your starting meshes or by using the Remesh modifier, but that can be a manual affair. In fact, working with the Boolean modifier is a pretty manual affair in general. For all but the most simple of cases, using one of the other two options for working with Booleans in Blender is best.
2. BoolTool: The BoolTool add-on for Blender really does a lot to optimize the workflow of using Booleans on your mesh objects. Under the hood, it's still using Blender's Boolean modifier, but the add-on has overhauled the interface with respect to how you interact with Booleans. Rather than dealing with the Boolean modifier directly, BoolTool uses the concept of geometry "brushes" that you apply to your main mesh object.
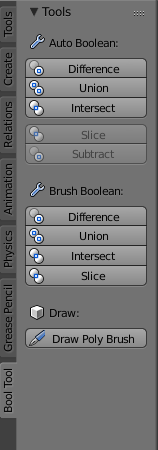
The Tool Shelf with the BoolTool add-on enabled
Additionally, all of the controls for BoolTool are conveniently nested in the Tool Shelf, so you can work with the 3D View maximized and you never have to go to the Properties Editor. BoolTool also has a number of additional goodies that are difficult—or at least time-consuming—to set up, with just Blender's Boolean modifer. Some of these goodies include more complex Boolean operations, direct (destructive) Boolean operations, convenient hotkeys, and the ability to draw custom Boolean polygons using Blender's Grease Pencil feature. Although BoolTool is available in nightly builds of the development versions of Blender, it doesn't ship with the release by default. You'll need to download it and install it yourself, which is a pretty painless process.
3. HardOps: HardOps is a commercial add-on for Blender, but it also does much more than deal with Booleans. HardOps is a full suite of modeling tools to help you complete your hard body models in Blender. Like most add-ons, HardOps is using Blender's base features and operations under the hood, but your interactions are optimized for this specific type of modeling. There's a lot more to the add-on than I can detail in this article, but I highly recommend you go through the release notes and get an idea of what it brings to the table. HardOps really is an impressive set of tools.
Next week in Part 3, I'll look at advanced tips, including metaball objects, joining objects with the fluid simulator, prepping for print, and the 3D Printing Toolbox add-on.



Comments are closed.