PerlMagick is a Perl module that allows users to create scripts using various ImageMagick commands. Most users might do this for batch processing, maybe even some serial batch processing. In this article, I’ll show a project I did for my own purposes while I was working as a neurologist.
These days, much of the practice of neurology involves reviewing various images of the brain. Hospitals and physicians' offices are set up to directly connect to imaging software that allows practitioners to view these images online. One MRI study might include hundreds of images as the head is examined and re-examined, changing various parameters to highlight different chemical components in the brain or to show where there is movement, like blood in the blood vessels, compared to areas with no movement.
These images can be saved to a CD, which I (or a patient) might bring to my office for viewing later. I don’t have access to all the places where a scan might have been done, so this is essential.
Medical images are saved in a DICOM format, a proprietary format used by all the makers of X-ray and scanning equipment, such as CT or MRI scanners. Each disk also contains software to read these images, which, as you might expect, is Windows-compatible only. If you click on a file, Linux by itself won't know how to open it, but
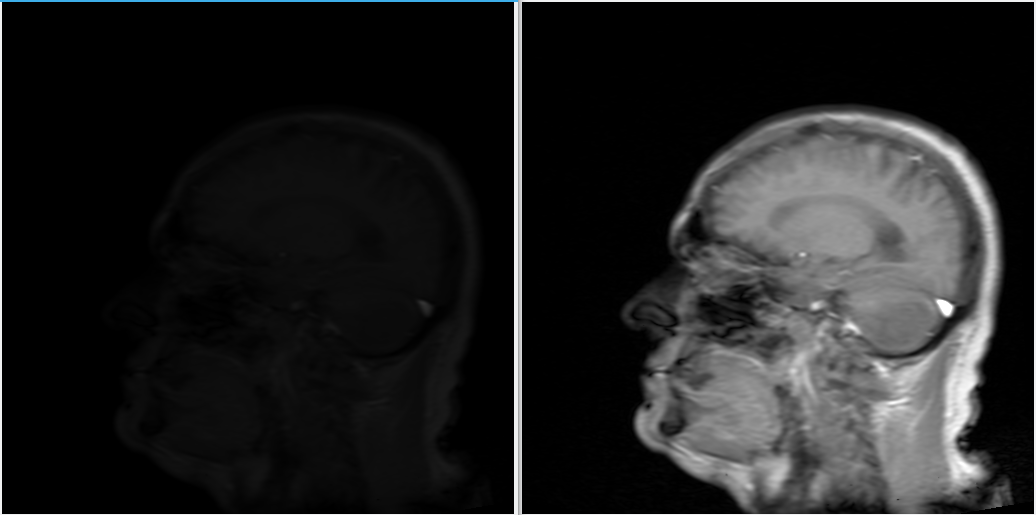
ImageMagick does, so when the dialog pops up asking what to open the file with, you might just enter display and see your image. I quickly discovered that I needed to add -normalize to the command, since the scale of these gray images is quite large, even though all the pixels may be on the low end of the scale. The example below shows the same image before and after applying -normalize.

The same image, before and after applying the 'normalize' command
You could cd to a directory where a series of images are, type in the command line display -normalize *, and then view these one by one, but that isn’t how we review scans. You need to be able to see several images at once, since they are in effect imaging slices of the head and brain a few millimeters apart. This will give you a much better idea of which brain structures are affected by some abnormality, and you'll be better able to determine what the abnormality is—is the normal brain altered, or some non-brain tissue like a tumor? Seeing multiple images at once is why, before the digitalization of image-viewing, scans were printed on large film for viewing with a lighted box.
One reason I wanted to manipulate images was to illustrate some abnormal imaging for discussions of diagnostic or treatment challenges when I present lectures. It’s time-consuming to use CDs, or even online software, when you want to show examples from several different patients or scans from different points in time.
In previous articles, I have shown how you can easily manipulate images and montages on the command line. But here, we’re talking about hundreds of images split up between multiple directories on a CD. At any rate, the beginning of this project involved manual manipulation and assessment of the directory structure.
In this example, the actual image data is all under a directory on the CD called dicom. Under that is a directory with a number, 5771, and under 5771 are a series of subdirectories: 5772, 5773, and up to 57717. Inside each of these subdirectories are the actual image files, and each directory corresponds to a particular sequence of settings for the scanner when the images were made. In past cases, I had seen image files with .dcm for a suffix, but on this CD they were all just numbers. At least all the images were at the same level of the directory structure.
On to Perl
The first thing Perl needs is to find all the directories. I decided to hard-code this particular CD into the script:
$initdir = "/run/media/gregp/DCS/dicom/5771";

opendir (DIR, $initdir) || die "Do you have cdrom mounted?";

@dicomdir = grep { !/^\./} readdir(DIR);

@dicomdir = grep { !/[a-zA-Z]/ } @dicomdir;

closedir (DIR);
We open this top directory, then load the subdirectories into the array @dicomdir, sifting out dot files and anything with letters. Next we build an array out of the filenames in each directory:
foreach $dicomdir (@dicomdir) {

    opendir (DIR, "$initdir/$dicomdir") || die "no can do";

    @files = grep { !/^\./} readdir(DIR);

    $number = scalar(@files);

    if ($number > 80) {

        print "\nSorry, there were too many files in $dicomdir to process\n";

    }
In my previous article on montages, I explained how your computer may choke if your montage is too big, so here I have set a cutoff of 80 images—if there are more than that in a directory, it will just be skipped.
Once we get past that obstacle, we can get down to ImageMagick business:
else {

mkdir "$workdir/$dicomdir";

foreach $file (@files) {

@args = ("cp", "$initdir/$dicomdir/$file", "$workdir/$dicomdir/$file");

system @args;

}

chdir "$workdir/$dicomdir";

$images=Image::Magick->new();

$x=$images->ReadImage("$workdir/$dicomdir/*");

$images->Normalize();

$montage=$images->Montage(geometry=>'300x300',tile=>'4x',label=>'%f',title=>$dicomdir);

$montage->Write("\.\./$dicomdir\.jpg");

   }
I decided to first copy all the files to my hard drive, then do the image manipulations from there; therefore, each file is copied over to a directory created with the same name as that on the CD. Keep in mind that we’re looping through the image-containing directories one by one. After this copying, I then changed the working directory to that hard drive location, where we can begin to see the object-oriented lingo of PerlMagick. When I first wrote this, I tried to create the JPG montage from the DICOM images, thinking I could normalize when I viewed the montages, but it turns out that doesn’t work well. Therefore, the first thing I do is to run a Normalize() operation on each image, then go on to the montage command, which is similar to the elements you use on the command line. It's also worth pointing out that when I write the montage to the hard drive, I put it a level above the directory with the images—those backslashes are there for Perl to get all the dots correctly. This way, all the montages are in one directory.
The final step is to clear out the working arrays and close this CD directory, since we’ll be moving to the next one in @dicomdir.
$images=();

closedir(DIR);

@files = ()

}
And now the results. With all these montages being at the same level, I can simply type in the command line:
display *.jpg
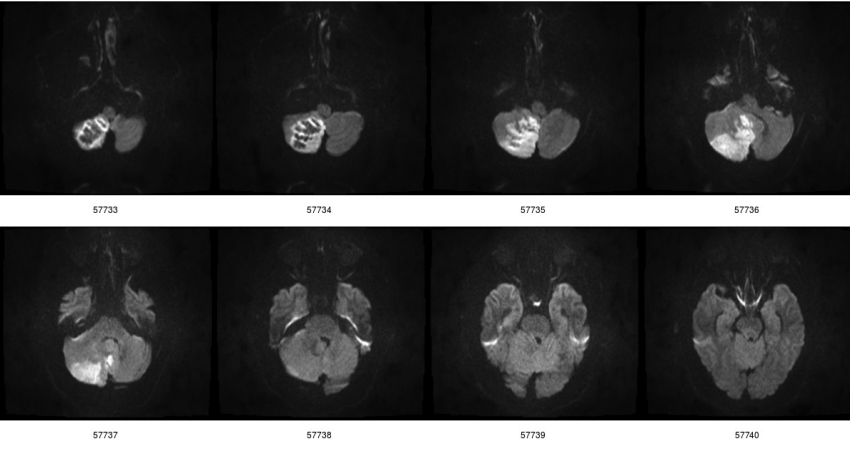
Here is an interesting part of one montage:

Diffusion-weighted images. Lighter areas show where normal fluid movement is slower than the rest of the brain.
This shows 8 of 30 images in this series. These are called diffusion-weighted images, which means that the lighter areas in the brain show where the normal fluid movement in and out of cells is slower than the rest of the brain. This scan was done on a patient who had had a stroke in the right cerebellar hemisphere (seen on the left side of the image; that is how scan images are made). My assessment is that these images are of equal quality with those on the CD.
Another advantage of these montages is that they eliminate privacy concerns. Each DICOM image file contains facility and patient information, but by processing each one to a JPG this data is absent, so I can freely share and save the images. Once I've made sure that everything came out all right, I can delete the original image copies on my hard drive.
Here is the script in its entirety:
#!/usr/bin/perl -w

use Image::Magick;

my($images, $x);

print "Enter the name of the folder for the first case:\t";

chomp ($folder =<STDIN>);

$workdir = "/home/gregp/dicom/$folder";

mkdir $workdir || die "Could not make $folder: $!";

$initdir = "/run/media/gregp/DCS/dicom/5771";

opendir (DIR, $initdir) || die "Do you have cdrom mounted?";

@dicomdir = grep { !/^\./} readdir(DIR);

@dicomdir = grep { !/[a-zA-Z]/ } @dicomdir;

closedir (DIR);

foreach $dicomdir(@dicomdir) {

print "$dicomdir\t";

}

foreach $dicomdir (@dicomdir) {

opendir (DIR, "$initdir/$dicomdir") || die "no can do";

@files = grep { !/^\./} readdir(DIR);

$number = scalar(@files);

if ($number > 80) {

print "\nSorry, there were too many files in $dicomdir to process\n";

}

else {

mkdir "$workdir/$dicomdir";

foreach $file (@files) {

@args = ("cp", "$initdir/$dicomdir/$file", "$workdir/$dicomdir/$file");

system @args;

}

chdir "$workdir/$dicomdir";

$images=Image::Magick->new();

$x=$images->ReadImage("$workdir/$dicomdir/*");

$images->Normalize();

$montage=$images->Montage(geometry=>'300x300',tile=>'4x',label=>'%f',title=>$dicomdir);

$montage->Write("\.\./$dicomdir\.jpg");

}

$images=();

closedir(DIR);

@files = ()

}
One element I did not show previously is that initially this asks for a name for the directory where the montages will go; another is a message showing the directories to be examined.


2 Comments