Whether you're an aspiring or accomplished musician, a volunteer roadie, or an experienced audio engineer, you'll be glad to hear that there are many options for making music with open source. This month, I want to introduce you to the sequencer that I use for my audio work, whether it's mixing soundtracks for short films or making music with my band or for myself: Qtractor.
Qtractor is a digital audio workstation, a term that's a little fuzzy, but generally implies a model based around music tracks in the tradition of a multitrack recorder with an allowance for plugins and effects. In other words, Qtractor isn't a waveform editor like Audacity, and it isn't a DJ mixer like Mixxx. It's a big, all-in-one, one-stop-shop audio studio.
The question is, how do you get from an empty Qtractor window to something that sounds vaguely like music? The short answer is practice. Like playing any instrument, recording and sequencing with Qtractor is part craft and part performance. Expect lots of repetition and several iterations. The more you do it, the better you get.
Installing Qtractor
The first thing you need to do is install Qtractor and a handful of synths and effects. This is a topic all its own, because there are so many great open source tools out there to choose from. To keep things simple, here are a few of the most popular ones that also are the easiest to get started with:
-
Qtractor: the sequencer itself.
-
QjackCtl: a GUI control panel for JACK, a kind of system-wide patchbay used to route sounds from one audio app to another.
-
Patchage: a GUI audio router. This one isn't necessary, and in fact it's redundant if you install QjackCtl, but I find it's a great tool to visualize the connections between devices. You might not depend on this, but it's nice to have around.
-
ZynAddSubFX: a software synthesizer worth several thousand dollars. Its maintainer requests $60 for a download of the latest release, called ZynFusion, and it's well worth the money. If you can't pay, an older version is available for free.
-
Calf Studio Gear: plugins for amazing audio effects.
With those applications installed, you've got an audio software setup that would set you back thousands of dollars in the pro audio world. Enjoy.
Untangling cables
Next, you need to understand how the imaginary audio cables inside your computer connect to all the imaginary synths and recorders and effects inside your computer.
It's all handled through JACK. Launch QjackCtl and click the Start button to start JACK.
Once JACK is running, start Qtractor.
Qtractor, being the workstation that it is, is the center of your audio production work, so you'll want most connections to eventually get routed to it. You can route your software "cables" with either the Connection button in QjackCtl or with Patchage.
Everyone's setup is unique, but the general idea is to capture audio and other devices (like a USB MIDI controller) into Qtractor. In turn, Qtractor's Master Output channel gets routed to your computer's speakers.
Audio connections are handled in the Audio tab of QjackCtl's Connect window, and MIDI connections are handled either in the MIDI or the ALSA tabs, depending on how you have your system configured. ALSA's MIDI driver is often the default.
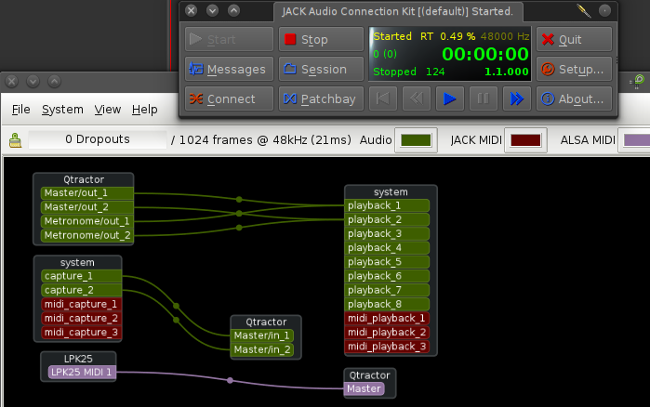
Connections as visualized by Patchage
My typical Qtractor configuration is pretty simple. Qtractor gets input from everything, including my MIDI controller, and sends its master channels out to my computer. All other connections are handled by Qtractor's internal plugin framework.
Workflow
Just as everyone's studio setup is unique, everyone's artistic process is too. The way I usually work is: I lay down the basic structure of a musical piece using MIDI synths; then refine the tracks to be in the right rhythm and key, sometimes swapping out synth tracks for acoustic renditions of a part; next I work on the mix; and finally create the file. That might not be how you work, but I'll use that workflow as a guide for this tour of Qtractor.
The first thing to do after opening Qtractor is to save your project. Yes, you should save your project even though it's empty. Qtractor doesn't force you to establish a project folder, which is great if you have a system of organization all your own, but to protect yourself from scattering files all over your hard drive, save your empty project file into a new folder, and let that folder serve as your default save location. You'll find that Qtractor can generate a lot of data, depending on the kind of project you're running, so save early as a favor to yourself.
I use a template utility called Planter to create project file systems.
After you've saved your project, create an empty track.
To create an empty track in Qtractor, right-click in the far-left column of the Qtractor window and select Add Track. In the Track dialog box that appears, give your track a name and set it to MIDI.
In the Plugins tab of the Track dialog box, click the Add button and find a software synth to load as a plugin. If you installed ZynAddSubFx, as I recommended, choose that from the All category.
With a track defined and a synthesizer loaded, you can start playing notes into Qtractor, if only to audition what you have loaded. If your MIDI controller is not rendering any sound, don't panic; you may just need to set the MIDI channel.
Synth plugins
Access your synth plugins through the Mixer window, available in the View > Windows menu. The Mixer window is a mixing-desk view of Qtractor. It's a live view of what tracks you have in your project, the plugins attached to each track, and the volume settings.
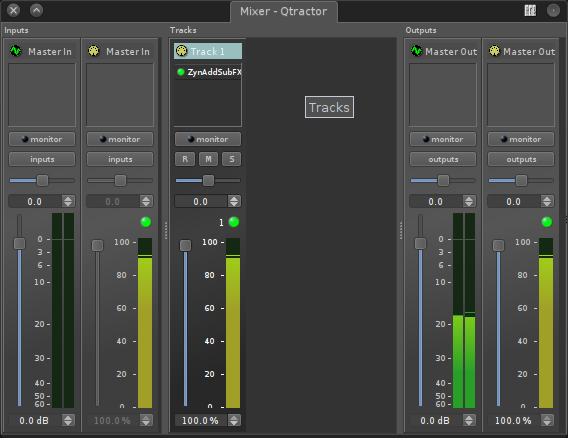
Qtractor mixer
Currently, you have only one track created, plus the Master Input and Master Output channels. To interact with the ZynAddSubFx synth, double-click the ZynAddSubFx plugin label at the very top of your track.
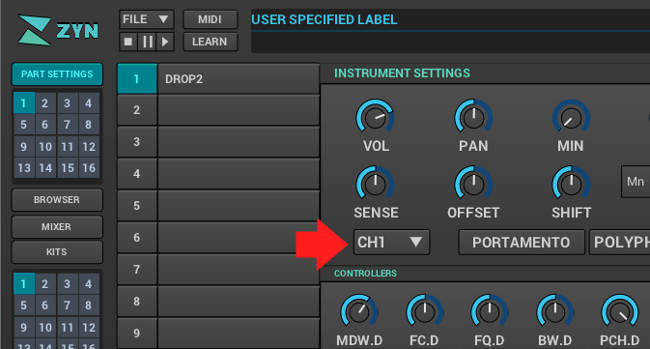
ZynAddSubFX channel
The ZynAddSubFX synth is staggeringly powerful, but it's also surprisingly easy to get started with due to its wealth of free patches. Click the Browser button on the far left of the window to view all available patches. The first and last columns of the patch browser are all you really need; select the bank and then the preset. The middle columns act as filters.
If you're an old hand at synthesis, click the Part Settings button, and check out the Pad and Sub panels.
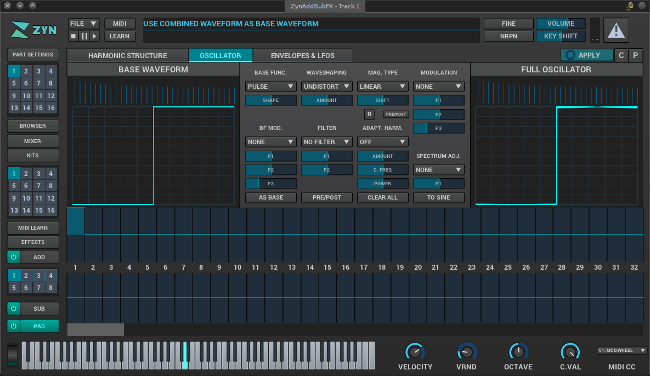
Knobs and switches galore
To ensure that your MIDI controller is controlling your synth, you must set the MIDI channel. Set the MIDI channel in ZynAddSubFX in the Part Settings panel. If you create a second track and use a second instance of ZynAddSubFX, set that instance's channel to 2. As long as you have the appropriate track selected, signals from your MIDI controller are passed on to the corresponding synth part.
Recording synths with MIDI
Once you've found or created a sound you're happy with, it's time to record.
To start recording, click the R icon (for record) in the track handle. This arms the track for recording, meaning that this track is the destination for any incoming audio or MIDI.

Armed for recording
Next, click the Record icon in the top tool panel. The first time you click this, you are prompted to choose a location to save your incoming audio or MIDI data. Choose either your project directory or a subdirectory within it.
Click the Play icon to the left of the Record button, and you're recording. Anything you play on your MIDI controller is recorded as MIDI data in Qtractor.
Audio data
Eventually you'll want to record audio into Qtractor or work with an existing audio track. To record audio, the steps are nearly identical to MIDI recording, except that instead of using MIDI input as your source, you use audio input.
Create a new track and set its type to Audio. Its input and output are Master, because you want it to accept sound from the Master Input, which you routed from your computer's audio input to Qtractor using JACK, and you want it to be played back through the Master Output, which you routed to your computer's speakers with JACK.

Audio track creation
Arm the track for recording, click the Record button and then the Play button. Whatever you play into your microphone or line-in port is recorded as an audio file in Qtractor.
JACK and Qtractor may only be aware of general system input, so if you haven't told your computer to activate your microphone or the line-in port, then you might find yourself recording silence. Fix that by opening Pulse Audio's pavucontrol utility and selecting your input device from the drop-down menu in the Input Configuration tab.
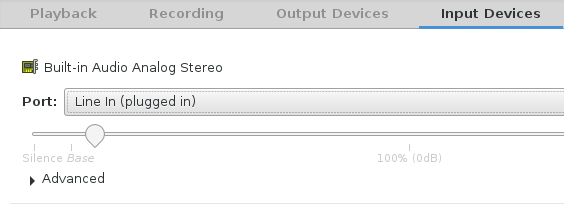
Pulse Audio volume control
You don't have to record audio to start working on a song. If you already have an audio file you want to use, you can import it by adding it to Qtractor's Files panel. To open the Files panel in Qtractor, select it from the View > Windows menu.
The Files panel has two tabs located at its base: Audio and MIDI. Right-click in the panel to add files, and then select whatever you need. You might find it useful to first copy your audio files into your Qtractor project directory so that when you archive your work, everything your music needs to play is sure to be contained in its own directory.

The Files panel
Effect plugins
Both MIDI and audio tracks can have effects applied to them. Since Qtractor treats its assets as the tracks on a mixing desk, all tracks are discreet. So, just as you can have several instances of ZynAddSubFX playing different parts, you can also have different effects applied to each track in a different way.
Effects are plugins, just like synths. To add an effect, go to the Mixer window and right-click the plugin area of the track you want to pipe through an effect.

Adding effects
There are several kinds of plugins available for Linux, including VST, LADSPA, DSSI, and LV2. If you installed the Calf plugins, you can find those in the LV2 category.
Once an effect has been added to a track, double-click the effect to open it.

Calf reverb
The effects are dynamically applied in real time, just like a physical effect unit or a guitar pedal, so all of your changes are non-destructive.
Export your track
When you've finished your masterpiece, export your work by selecting Track > Export Tracks > Audio. Your song is exported as a self-contained file in whatever format you have set in your Qtractor preferences. Slap a Creative Commons license on it, and unleash your genius into the world.
More cowbell
This has been a brief introduction to Qtractor. It can do a lot more than just record, effect, and export audio. Its mixer is very good, and it has full automation for not just basic mixing tasks, but often even the embedded functions of its plugins. It has a piano roll editor in case you don't have a physical MIDI controller. It can quantize and swing, its playhead can be used to control video playback so you can score films, it can do it all, and it's open source.
Start learning Qtractor today, and get ready to express yourself through sound.



Comments are closed.