

I recently got my hands on a SparkFun micro:arcade kit and micro:bit single-board computer. It's a great combination of hardware for adults and kids who want to build and program their own arcade console and games.
The micro:bit's specs are pretty good: Bluetooth Low Energy (BLE), compass, and accelerator on board, all driven by a 32-bit ARM Cortex-M0 CPU. Even so, I was a bit disappointed compared with the MAKERbuino game console I'd recently built. The MAKERbuino's LCD display made the micro:bit's 5x5 LED matrix feel a bit underwhelming for displaying the arcade games that can be created with SparkFun's hardware. And the massive buttons and joystick in the micro:arcade kit reminds me of the huge arcade cabinets of my youth.

opensource.com
The micro:arcade kit includes a gamer:bit, an adapter that makes it easy to connect the micro:bit to the game-control buttons and joystick. Using the gamer:bit alone feels a little like using a handheld device, such as the MAKERbuino, except for the sub-par LED display.
I set up my game console by attaching the joystick and a game button to an inexpensive laptop stand. (See below for a photo of the final setup.) I found out the hard way that the buttons are built pretty deep and need quite a lot of space behind the front plate.
Still, connecting the buttons and joystick to the micro:bit is very easy with the connectors on the back of the gamer:bit; you just press a little latch with the end of a pen and insert the cable. (Don't use a sharp tool like the tip of a voltmeter; I killed one latch's plastic cover that way.) Then attach the other end of the cable to the buttons and the joystick. And, of course, insert the micro:bit into the gamer:bit.
Programming the micro:bit via MakeCode
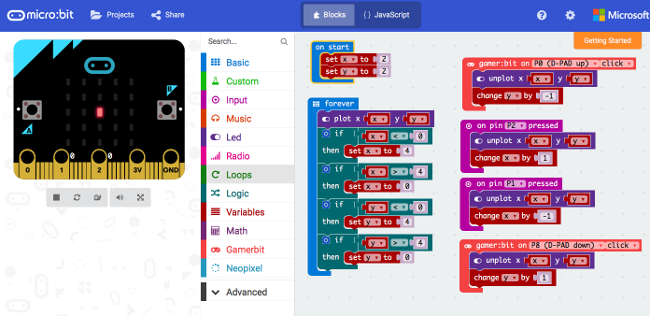
Programming is where the micro:bit shines over the MAKERbuino, especially for kids. Its JavaScript-powered online editor, Microsoft's MakeCode, allows users to program games in a graphical, Scratch-like way. The code is compiled online in the browser when programming is finished. The micro:bit shows up as a USB drive when it's connected to the computer, so the compiled code just needs to be copied onto that drive, and the micro:bit will start executing the code.
What is even nicer is that MakeCode allows users to simulate some interactions directly in the browser. You can press the virtual buttons, and when you attach something to a pin on the connector, it shows a little breadboard with the item connected.
opensource.com
MakeCode also flags errors in the code (as well as it can) with a little triangle.
opensource.com
I made a little program, which my daughter showcases in this video here (and attached to this article).
Improving the display
Because I don't think the 5x5 pixel display is a good fit for the game hardware, I started investigating other options for an external screen. Unfortunately, I didn't find anything readily available.
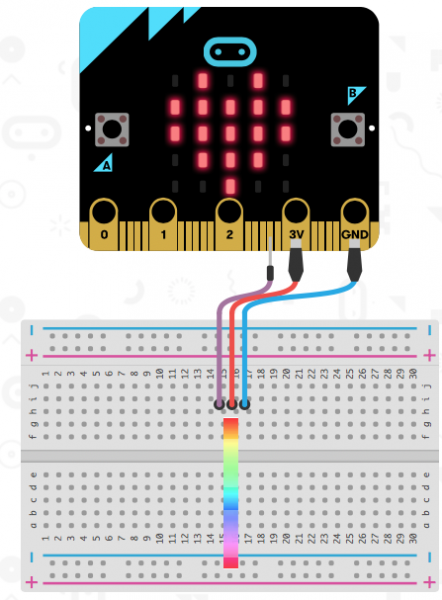
Luckily, I had previously built a 15x10 NeoPixel board, which I reused as the display for the micro:bit. (As you can see in the picture below, I still have not fully finished it.) MakeCode has a section to load extensions, so I loaded the Adafruit NeoPixel extension and got a whole new menu to manipulate the NeoPixel. (You can see it in the MakeCode screenshot above.)
Trying to create more complex code brought me to the limits of MakeCode's block-oriented IDE. Fortunately, it is possible to create custom code in TypeScript (which is what the blocks translate to), which can then be called from the blocks' code.
More hardware rigging
The micro:bit has a limited number of pins, and some of them can't be used when using the 5x5 display. I decided to not use the button P16 of the gamer:bit, but instead I used that pin as output. I connected the Neopixel's data line to the connector on the back of the gamer:bit, but the NeoPixels did not show anything. At first, I suspected that I had fried them (as I had done in the past), but checking a sketch on an Arduino showed that they were ok. Probing the port with a voltmeter also showed it had power.
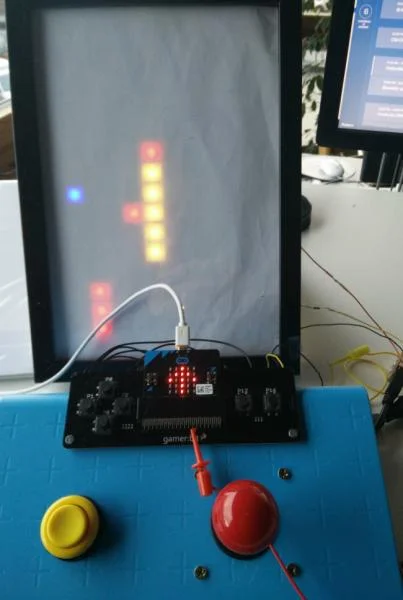
Thankfully, SparkFun has documented the gamer:bit in a schematic, where I saw that they put a 2.2k resistor in front of the port. This may be cool for normal use, but it did not work in my setup. I took a mini-crocodile clamp, attached it to the micro:bit connector, and finally got my game console up and running.
opensource.com
In the image, you can see the red crocodile clamp to connect the display. You can also see that I am using the 5x5 display for additional output. In a game like Tetris, it could display the next block falling.
I hit a problem once when the online editor ate all my code. I found out that the HEX files that are uploaded to the micro:bit contain a copy of the entire source code. So, I was able to import an earlier version of the code and continue working. This also implies it is easy to pass code around via the HEX file.
Other programming languages
There are more programming languages and environments that support the micro:bit, with Python and C being two of the more prominent options.
In this trial, I focused on the MakeCode editor, as it is what the micro:bit's target audience—kids—would use to get going. The environment is localized into 12 languages, which is a huge win for users who do not speak English. (My daughter, for example, speaks German as her native language, with French as her first foreign language.)
Mixed bag
The hardware of the arcade:kit (buttons and joystick) is pretty awesome and really makes you want to build a game. The gamer:bit connector is, in my opinion, ok, even if I would have liked better access to the pins on the micro:bit. The buttons on it are a bit loud and hard to press for my taste, but that is no show stopper.
You can look at my project on MakeCode's site.
Bonus points
There are other systems, like an IoT Octopus variant from Guido Burger, that can connect to the gamer:bit via the edge connector and use the hardware. The Octopus hosts an ESP32, a successor of the very powerful and versatile ESP8266 WiFi enabled micro-controller.
If you are interested in the micro:bit but want more pixels, look at the sino:bit by Naomi Wu, a Chinese maker who took the basic design but enhanced it with a 12x12-pixel matrix that can display entire Chinese, Japanese, Hindi, Arabic, and other non-8-bit characters. (It also displays Western ASCII or ISO-8859-1 characters better than the 5x5 matrix.) Unfortunately, it does not have the 23-pin edge connector and is thus not compatible with the gamer:bit.


Comments are closed.