

After one-hundred years of evolution in typewriting capability, our keyboard layout remains essentially the same: A rectangular board with apparently random clustered keys. Why is this, and how can we do better?
Keyboard origins
After the first mechanical typewriters appeared in the early 1900s, the entire typing effort was human-powered via rather complex mechanical systems. One example is the Continental typewriter commercialized in 1904, seen below. The orthogonal clustering of keys―where each row is side shifted with respect to the following―resulted from the need to avoid collisions between the various cantilever beams that connect each button, via a complex mechanism, to the relief that strikes the sheet, thus creating the letter. This design of the keys of one row appearing in the space between the keys of the preceding row still exists on today's keyboards.
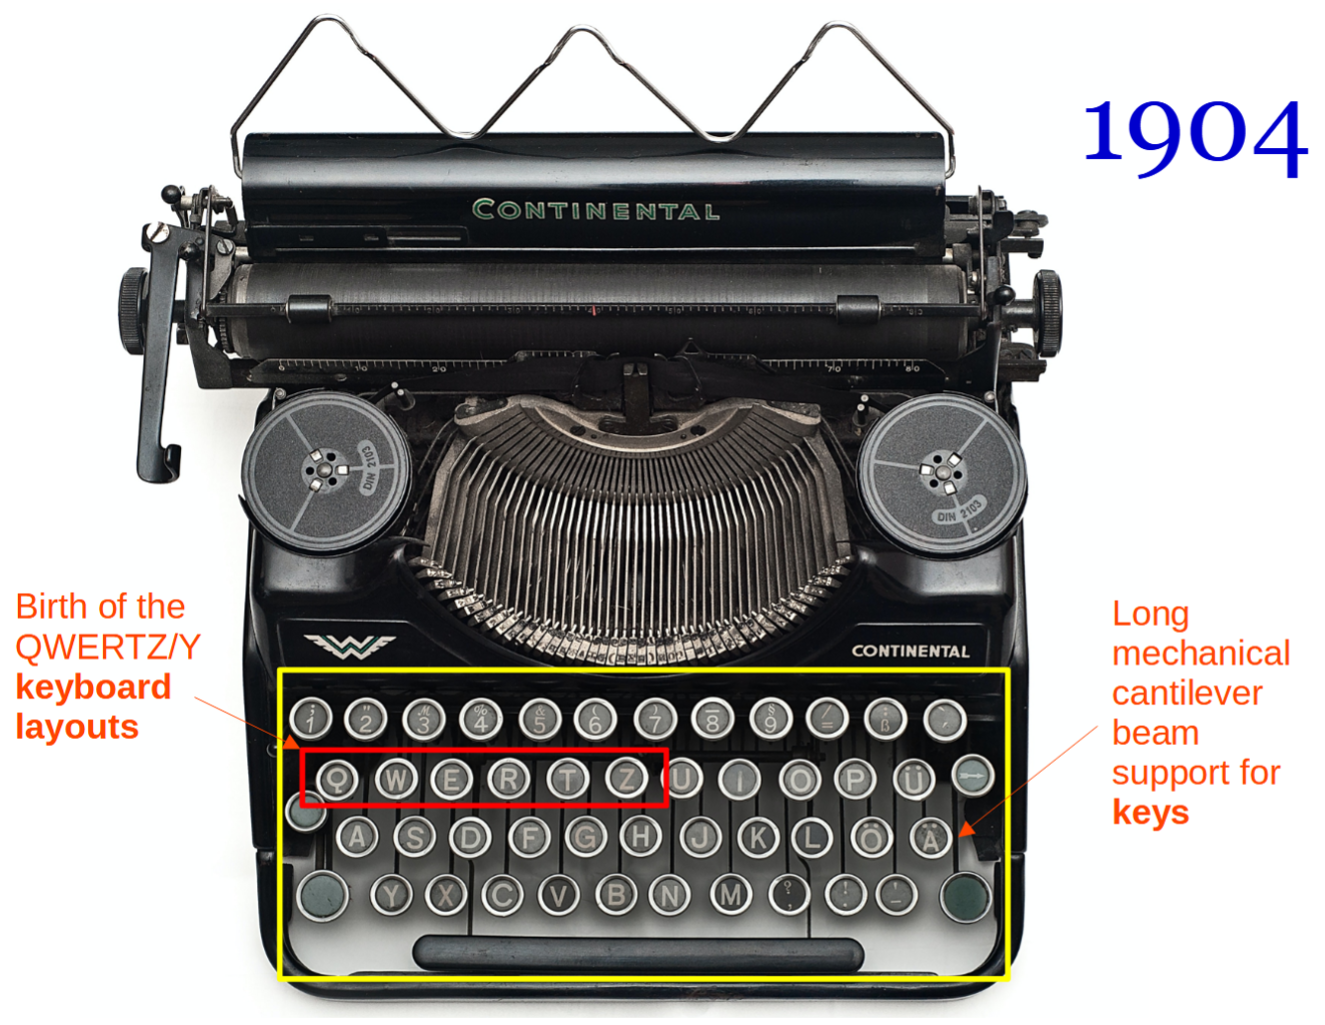
(Original photo by Mali Maeder. Modified by Luis Teia. CC BY-SA 2.0)
With passing years, more compact and robust electrical motors and actuators gradually replaced the cantilever part of this complex mechanism (for example, see the IBM Selectric commercialized in 1961). With the advent of computers, the ability to transform typing action into visible text relies on three main parts: The screen, the computer, and the keyboard (in a laptop, these three subsystems exist in one portable block). Overall, the physical mechanism was almost entirely replaced by electronics (i.e., wiring, electrically powered, and governed by programming), as seen with any of the current keyboards for sale on Amazon. Once again, the orthogonal disposition of keys remained essentially unchanged.
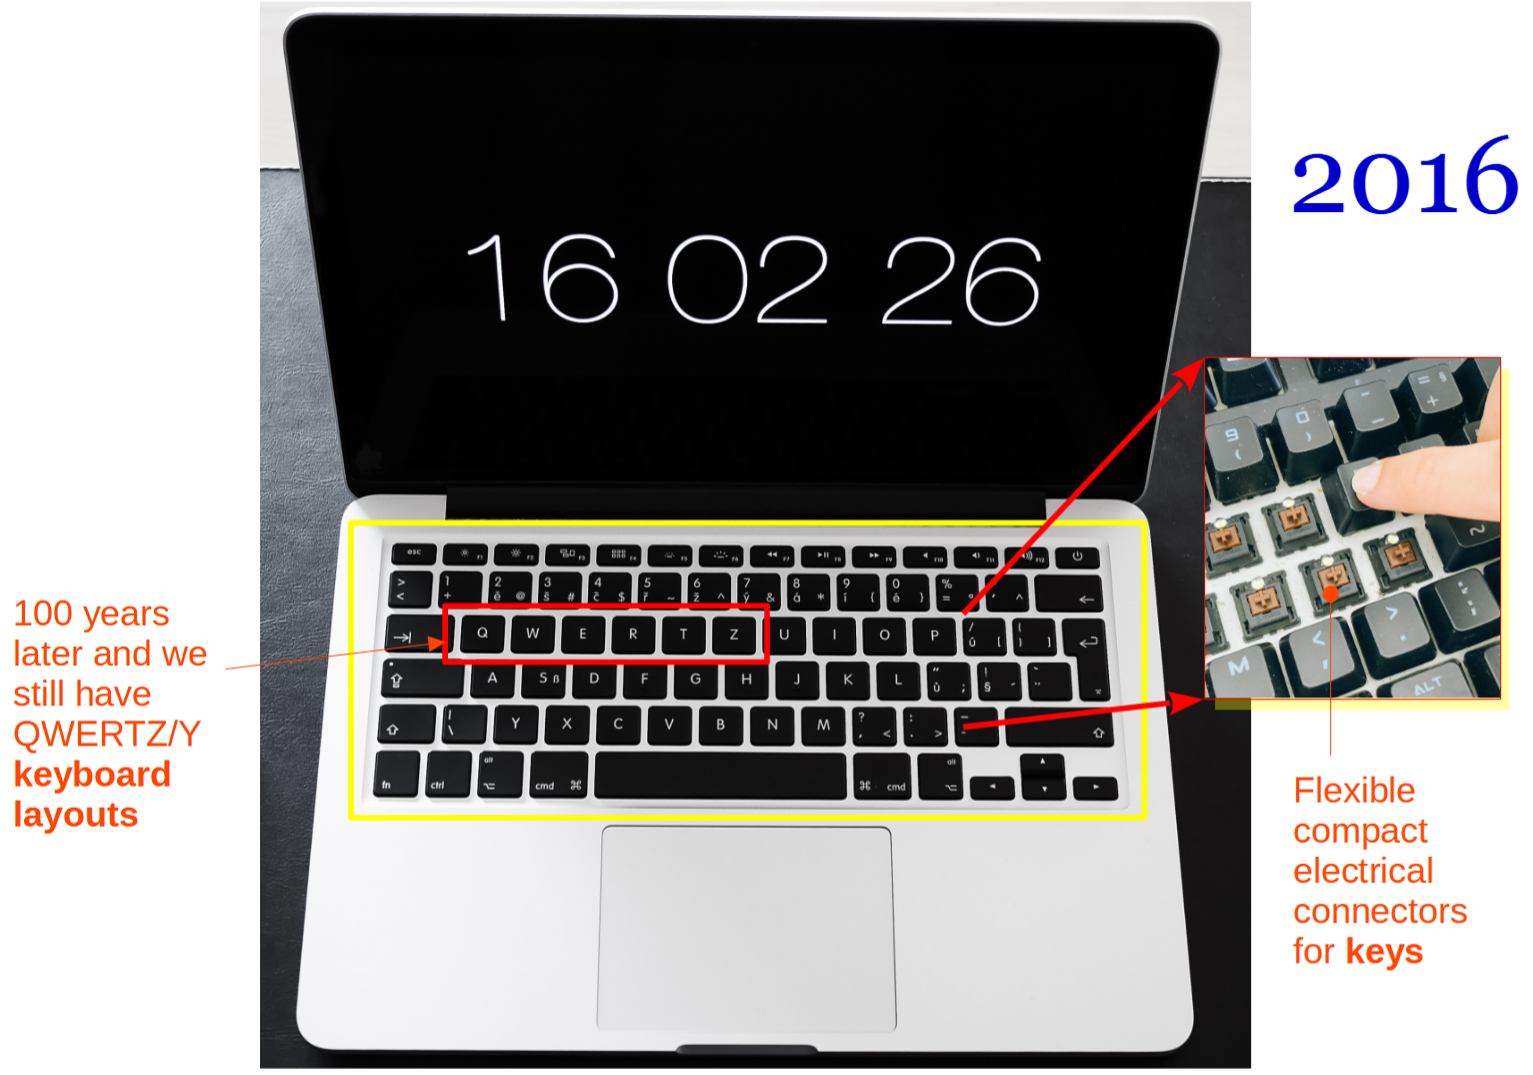
(Original photo by Viktor Hanacek and Athena. Modified by Luis Teia. CC BY-SA 2.0)
Overall, this translates into more than 100 years of monumental evolution in how we transform typing action into printed or screen-perceived text (from human-powered to electrical-powered with advanced computing), but with little to no development of the human-to-machine interface (both in terms of its logic arrangement and ergonomic features).
The missing link
I believe that during the electrification of typewriters over the past century, the link between human physiology and the arrangement of the keys in a keyboard, as an interface between human and machine, has been mostly overlooked. A critical question that still has no answer is, Is the current arrangement of keys on my keyboard the most efficient and intuitive solution, effortwise and timewise? This article hopes to kick off an exchange of ideas on fundamental out-of-the-box approaches to create novel and radical open source keyboard constructions that address this question. The idea presented here is just one possibility out of many.
[ Related read 17 open source technologists share their favorite keyboards ]
Considering the potential benefits in terms of effort and time saved from a more efficient typing activity, multiplied by millions or even billions of users that type every day, the overall effect can yield a potentially colossal reward with a global impact on both social and professional activities.
Ergonomic reflection
Any design starts with an adequate understanding of the system's dynamic with which the device interfaces. For example, a jet engine interfaces with an aircraft. In turn, a keyboard interfaces with a person, making the following questions pertinent during its design:
- What is the easiest and most effortless way to place a word on a screen?
- How does the mind construct any given word, and how do I type the letters to do so?
- What are the words that I most often use?
- How do typing the words and recurrence affect the key layout?
- Do I want to move my fingers, hands, arms, or a combination of all?
- What is the effort impact on a full day of typing?
The natural geometry of a hand and fingers comprises a center at the palm with a combination of fanning-out fingers, which can be radially extended. The hand (including fingers) can be rotated about the wrist, and the arm, in turn, can translate (including the hand and fingers) from front to back and side to side. The amount of effort required to exercise these degrees of freedom increases as one moves from the fingers to the arm simply because of the increased mass that is displaced. Moving our arms instead of our fingers makes us slower and tire more quickly.

(Original photo by Anna Shvets. Modified by Luis Teia. CC BY-SA 2.0)
The oscillatory flow within words
The English language (for example) has more than 200,000 words, with a minimum of 3,000 words required for effective communication. The basis of such language starts with pronouns (I, you, he, she, it, we, and they), followed by the primary verbs (be, do, and have). This small group of words is probably the most used in everyday typing activity, comprising English-speaking sentences worldwide. A foundation can be constructed for an efficient keyboard arrangement with this information. A similar approach could be undertaken to match other languages. No one way suits all languages and/or user preferences.
Words are typed in a natural alternating way moving between vowels and consonants. This back-and-forth oscillation between vowels and consonants perpetuates in sentences. Vibration theory tells us that all oscillations occur around a center; hence, it is natural to assume (as an ergonomic reflection) that a center exists in our future keyboard. From a physics perspective, particle or single-point entity oscillatory systems (not distributed)―such as those found in planetary orbits and quantum resonators―tell us that oscillations of a point about a center (in our case, the point is our finger focus controlled by our linear mind) incur the presence of circular or arc type motion. Finally, the impact of these analogies in our keyboard design suggests the presence of a center and an arc distribution of information. Indeed, the ancient Greek theatres (and, as a legacy, modern ones) embody such architecture―i.e., a center surrounded by circular arcs for effective sound migration or information transfer.
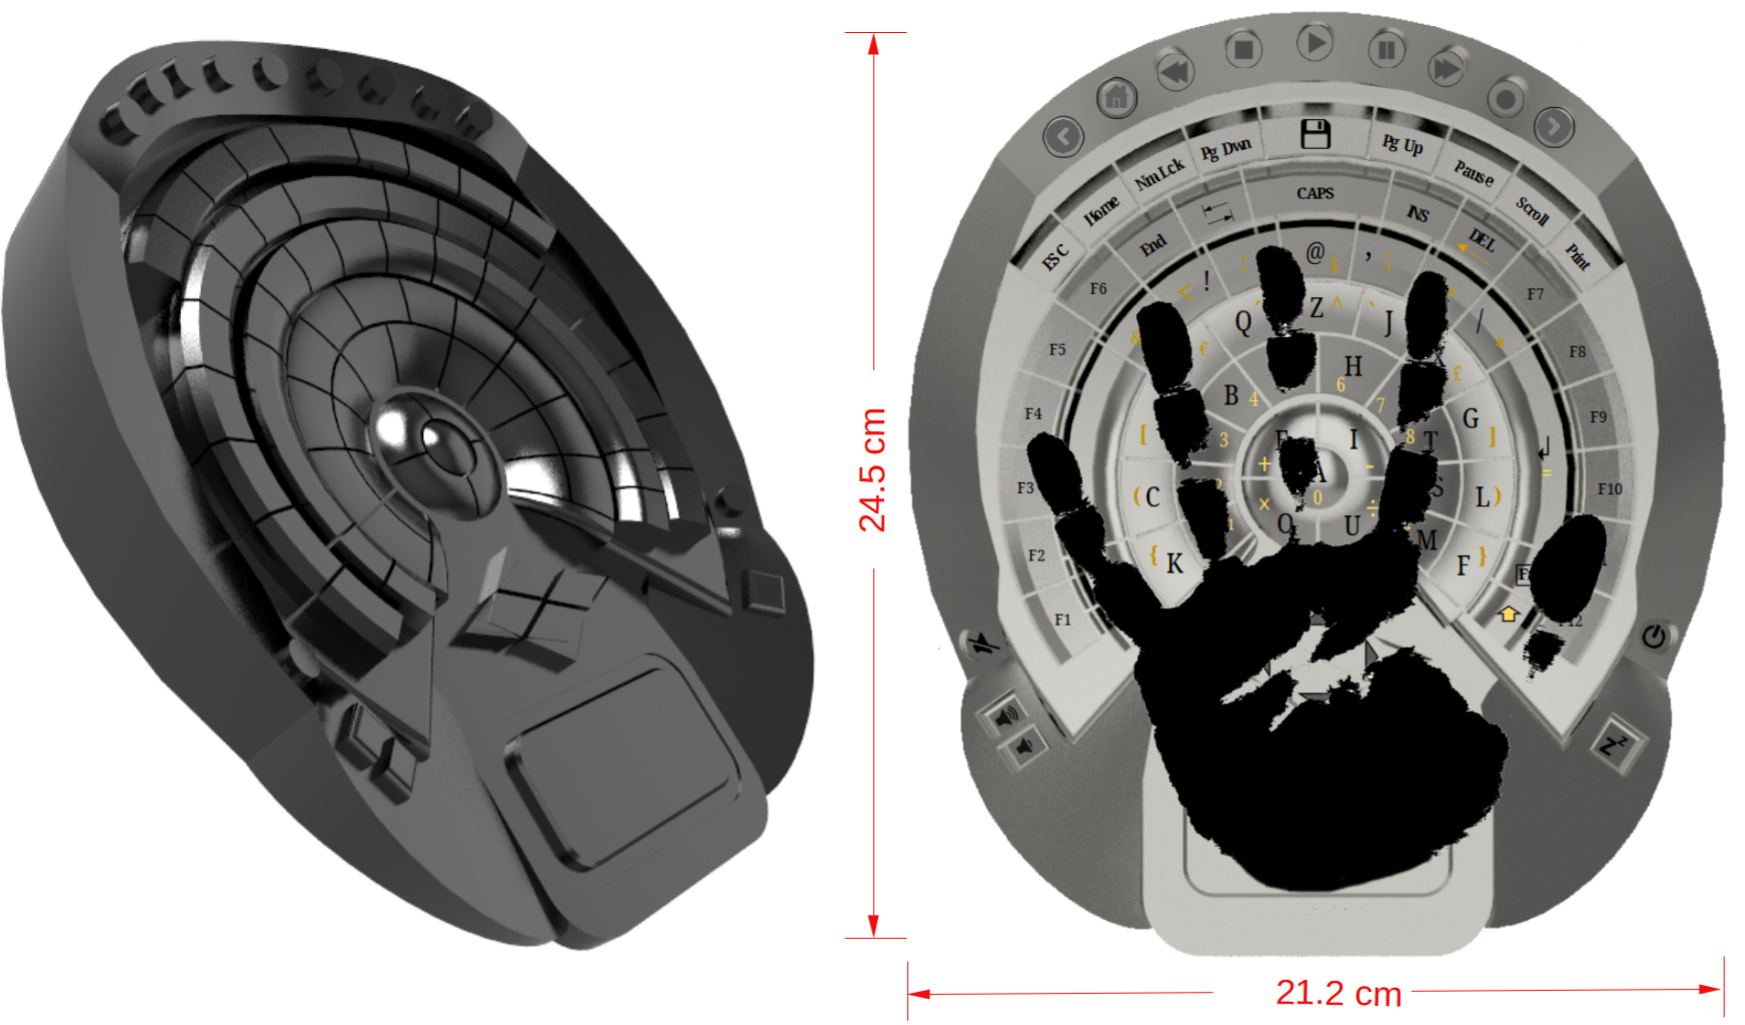
Consider the case where the vowels are clustered at the center of the keyboard (as shown below), in a vowel core, so to speak. It is a plausible assumption that of all the vowels, A―the first letter of the alphabet―is the most suitable to be at the center (of both the vowel core and the keyboard). The other four vowels, E, I, O, and U, form four quadrants surrounding the letter A, placed in a second circular track of higher radius. In this disposition, it is logical to distribute the consonants in layers around this core. In turn, the arrangement of the consonants should be such that the keywords mentioned above can be written easily and intuitively (and preferably horizontally from left to right, just as the mind writes when using pen and paper). Such a circular layout reflects and favors the natural word-forming movement that transits from vowels to consonants and vice versa. Below are a few examples of how a word is typed in such a keyboard architecture.
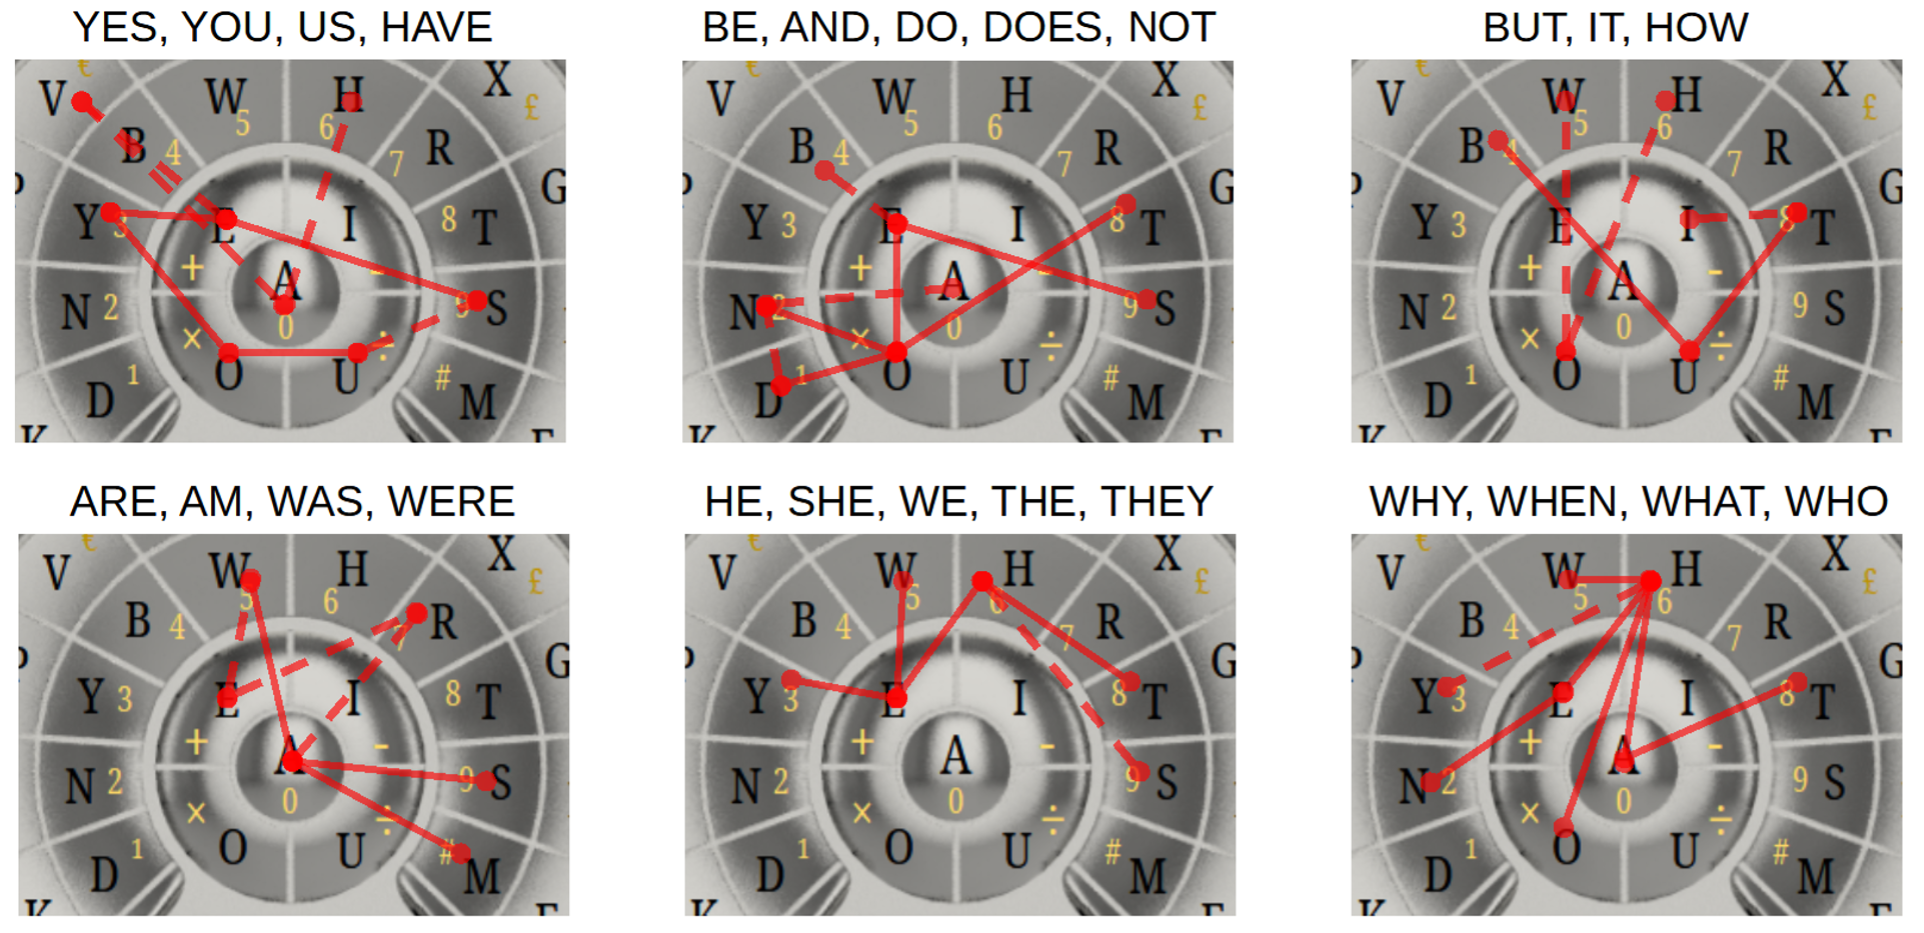
(Luis Teia CC BY-SA 4.0)
The typing path or sequence is superimposed (highlighted in red) for some of the keywords above. The inward and outward motion of the digitizing finger is visible (for example, see the word Have in the top left corner). It does not really matter if one or multiple fingers type the word because our linear mind can only focus on one letter at a time. That is, the path shown follows the typing sequence of the mind as it constructs the word on a keyboard.
After forming the inner vowel circular core surrounded by an inner and outer arc of consonants, several tracks are gradually added with increasing radius. The resulting keyboard layout is shown below and is briefly explained as follows. First is the track possessing signs and larger keys such as Space and Enter―the most used and largest keys on a keyboard―followed by a track with function keys and, finally, a smaller track at the top for higher functions. The keys surrounding the enclosure are attributed to hotkeys, such as volume control, play, stop, and internet browser control. Keys with opposites, such as < > and ( ), are placed on either side of the vertical symmetry axis. A higher-level keyboard containing the numerals and algebra operators (as well as additional characters) is available by continuously pressing the Shift key (at the bottom left) or by pressing the CAPS key once (at the top center). One of the most used functions in all programs is SAVE; hence, a key is placed at the top for easy access. My previous open source publication with The Journal of Open Engineering (TJOE) has shown that the number distribution around the operators substantially reduces computational time and effort. For further details, take a look at the TJOE publication New Calculator Design for Efficient Interface based on the Circular Group Approach. I will explain in-depth how the one-handed keyboard was created and its advantages in a more lengthy future publication (possibly in The Journal of Open Engineering).
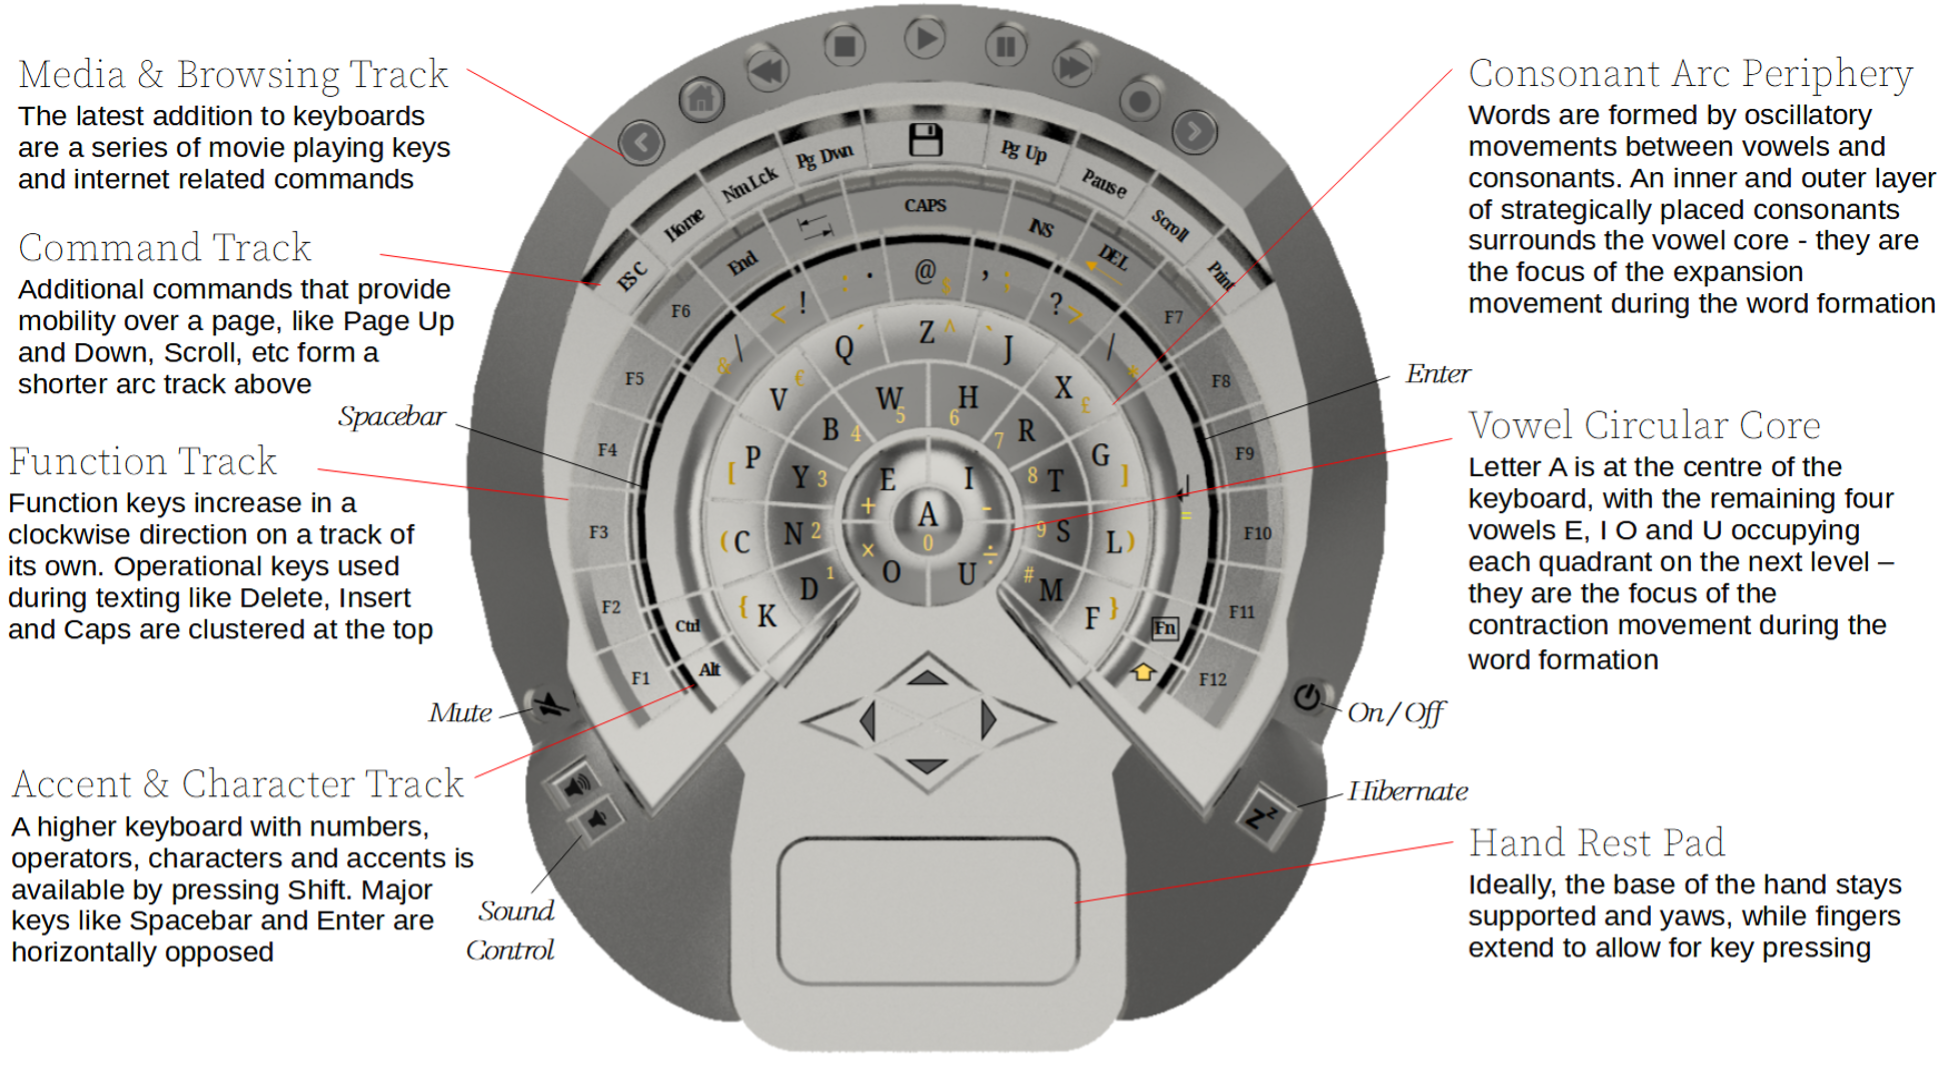
(Luis Teia, CC BY-SA 4.0)
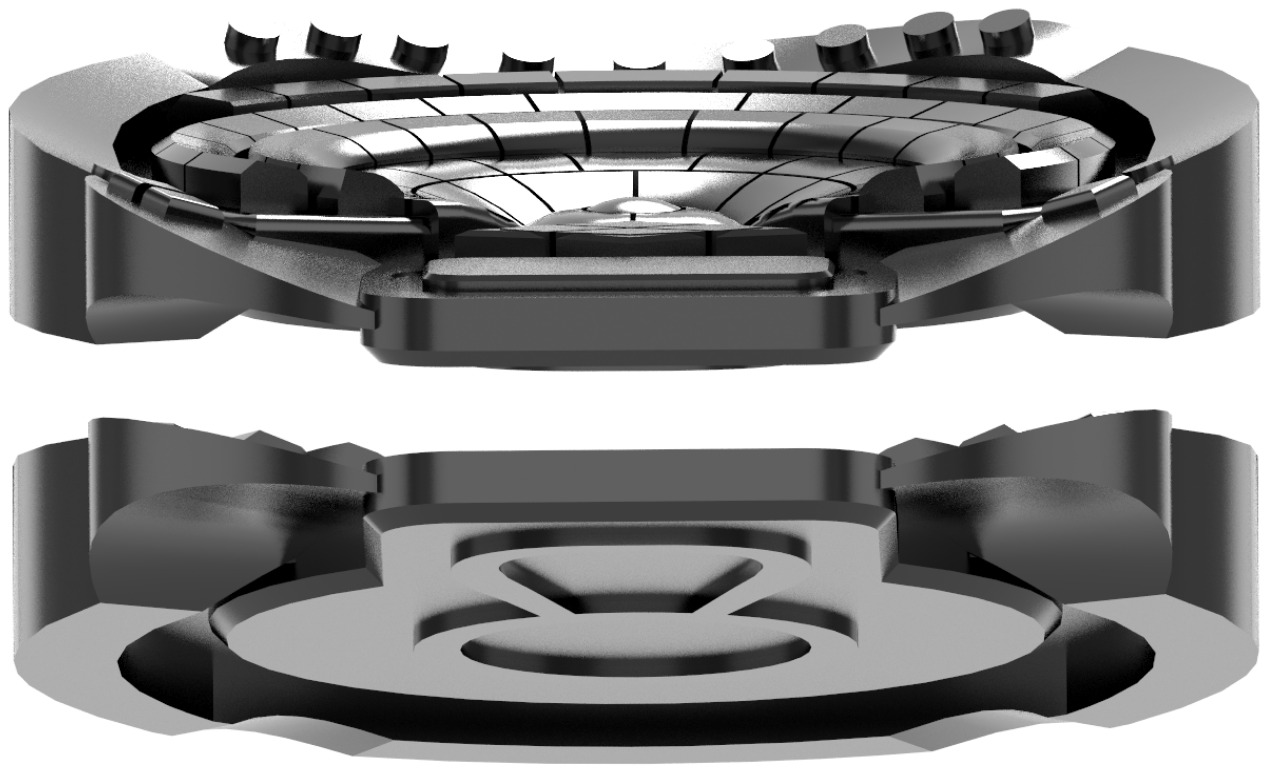
The resulting circular one-handed keyboard is around 24.5cm long, 21.2cm wide, and 4cm thick. The vertical symmetry makes it suitable for right- and left-handers. The most significant change between the two usages is the location of the Spacebar and Enter keys, but one can easily train the mind to swap these (i.e., for a person using their left hand, the thumb presses the Enter and the little finger, the Spacebar, and vice versa). Regarding its general design, the streamlined arc outboard enclosure was inspired by the bridge of the starship Enterprise from the TV series Star Trek: The Next Generation. Have you ever noticed how highway curves incline to push and keep the cars on track naturally? Similarly, the inward curvature of the surface of the consonant (and outer) tracks generates a radial reactive force component after each pressed key that helps guide the finger back to the center. It assists with the contraction part of the oscillatory movement of writing a word. Conversely, the convex curvature of the vowel core does the opposite. It helps with the expansion part of the oscillatory movement of writing a word.
(Luis Teia, CC BY-SA 4.0)
Computer experts know that data swapping (RAM data transfer to and from a hard drive) during information exchange slows the system down significantly. Likewise, swapping one's hand and attention between the keyboard and mouse generates a similar detrimental effect. The one-handed keyboard is designed to commit one hand solely to writing while the other hand is fully available to operate the mouse, thus removing the inefficiency caused by keyboard-mouse hand swapping. To envision the ultimate use of this keyboard, consider the analogy of the skilled accountant that can quickly enter large calculations on a keypad without looking. The ultimate goal is extrapolating this skill to the one-handed keyboard. This is the great expectation of its creator―to provide the ability for a person to write whole texts with less effort and more speed than with regular rectangular keyboards. Of course, the mind needs to map the new keyboard first, but its largely intuitive arrangement should facilitate this process.
Computer-aided design construction
The ability to successfully sell a product directly depends on how good and realistic it looks. In turn, computer simulation software is the cheapest way to drive a product through its design and maturing cycle. The alternative―building models and testing―is expensive and time-consuming. Open source Computer-Aided Design (CAD) software offers an even greater advantage, as there is no need to pay usage licenses. The current drawback is that they still lag behind the capability of commercially available alternates. There are several front runner open source software solutions for CAD. Having worked for over a decade with commercial CAD software, I believe FreeCAD is one of the most complete free counterparts, presenting the closest capabilities to those offered by commercial packages. Indeed, designing highly complex machines with multiple moving parts is now possible using this software. There are still bugs to solve, and the voyage may not be as smooth as in commercial software, but it is possible to do it at zero cost. You can create a jet engine in FreeCAD—it is already that advanced!
(Luis Teia, CC BY-SA 4.0)
FreeCAD has all the fundamental (and even more advanced) features required to create complex parts and assemblies. It has all the essential features and functions of commercial software, the most important being:
- Left side: A tree listing the operations done (showing labels and attributes) and their sequence.
- Top: With Part Design mode selected from the drop-down menu, from left to right the control over the type of model presented, the orientation of the camera, creation of sketches, planes and finally the options that add/remove material (namely extrusion, revolutions, lofting, etc.).
- Boolean operations: Adding or subtracting two volumes and the possibility of chamber and fillet edges.
The FreeCAD file containing the final version of the keyboard is freely available at Figshare. It remains unlocked, allowing anyone to alter its design. In reality, I expect to see mutations of this design or its inherent features in a future generation of one-handed keyboards or other devices requiring an efficient and intuitive single-handed interface. Download the latest version of the open source FreeCAD software (version 0.20.2) from freecadweb.org to load the model.

(Luis Teia, CC BY-SA 4.0)
Some lessons learned from using FreeCAD during this project:
- Save often and in new files, especially after major modifications, as the ability to update dependencies often lacks robustness (especially for complex models with many sketches, planes, and extrusions/revolutions/lofts). Making changes uptree may be difficult.
- Build your planes and sketches first (when there are many, these are tasks that FreeCAD is robust in executing), then add material by extrusion/lofting from those sketches. Experience showed me FreeCAD could generate unstable results in a component with many complex features, especially when using additive lofting with more than four sketches.
- Use the spacebar to quickly show or hide an item, such as a plane, sketch, or volume. Make your life easier, and hide what you don't need to see.
- Leave Chamfering and Filleting to the end, and remember to always overlap material (or at least make it adjacent) in every newly added material operation (e.g., a revolving sweep) with respect to the existing body (e.g., an existing extruded block); otherwise no volume is generated, and you are left wondering what happened (no error window appears). FreeCAD does not generate two separate volumes within the same body.
While commercial CAD software is already fairly advanced in realistically rendering models, FreeCAD is still evolving. However, various free and open source rendering options are available, including the animation software Blender and CADRays from OpenCascade (Windows only), LuxCoreRender, and POV-Ray.
CADRays offers a simpler interface than Blender, but it is still a robust option to make CAD models realistically photo-rendered. It's open source, and you can download and use the program with free registration.
On Linux, download the source code. You need both the occt.git and the cadrays.git repositories. Both use cmake, so the compilation process is the usual Cmake incantation:
$ mkdir build
$ cd build
$ cmake ..
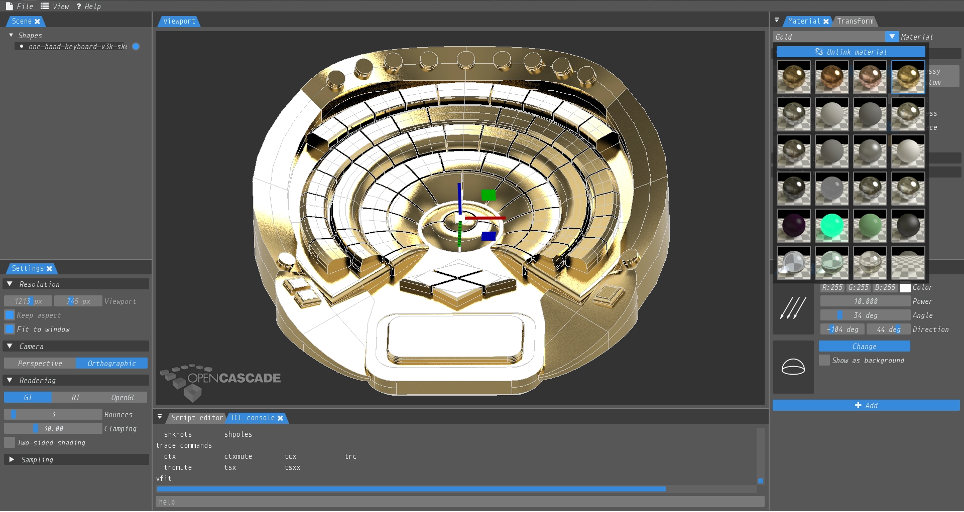
$ makeA simple GUI exists, allowing for the most basic operations. On the left side, the Scene tab shows a tree of the part or assembly. Below it are the settings to control resolution, rendering, and camera type. To the right, one can select the type of material (there are built-in options, such as metal and plastic), or one can program custom material. Superimposed is a Transformation tab that allows control of the attitude of the part/assembly. Below it are the controls for lighting, alteration of ascension or azimuth attitude, and changes in the color of the illumination and background modification. At the center is a window showing how the model looks based on the present settings (and, thus, how the image export will look). Below that is a command interface, which allows one to call for and use a more in-depth and greater variety of functions. This is evoked by typing help.
(Luis Teia, CC BY-SA 4.0)
Some lessons learned from using CADRays during this project:
- Before loading your complex part, press OpenGL (bottom left corner in the Rendering tab). The reason is that the Monte Carlo calculations (immediately done after loading the step file) can significantly slow down the computer because the Rendering setting is on GI. With OpenGL, the model is simplified, making handling easier.
- Orientate your CAD part (translate, rotate, and fit) before switching back the Rendering from OpenGL to GI to avoid getting frustrated with lags during part movement.
- White background is created by writing the command
vsetcolorbg 255 255 255 - More accurate orientation (rotation, translation, and fit to window) can be achieved by using the command line at the bottom (type
helpfor options) instead of using a mouse or tabs that do not provide full control. - CADRays does not save a file that stores your work done with the model and saves your settings, so be sure to get the image you want before exiting. Otherwise, you must repeat your work the next time you open the program.
Future work
The present model only defines the exterior dimensions and shape resulting from the novel design approach. The next steps are defining the internal assembly (comprising of how the keys are attached to the butterfly spring support) and designing the internal electronics, etc. Those tasks are slated for future follow-up work. Ultimately, anyone with access to 3D printing and an electronics lab should be able to create and test a working prototype. Alternatively, if you are just an enthusiast wanting to get a feel for what the one-handed keyboard would look like, then you can 3D print it as is, permitting you to experiment with how easily you can type sentences. Nowadays, this service is reasonably accessible via online manufacturing stores. For those that want to be even more involved, the fact that the one-handed keyboard design is open source provides the opportunity for it to be commercially developed as a product of a company producing computer-related equipment.


Comments are closed.