One of the key ideas of DevOps is infrastructure-as-code—having the infrastructure for your delivery/deployment pipeline expressed in code—just as the products that flow it.
The Jenkins workflow tool is one of the primary applications that has been used to create many Continuous Delivery/Deployment pipelines. This was most commonly done via defining a series of individual jobs for the various pipeline tasks. Each job was configured via web forms—filling in text boxes, selecting entries from drop-down lists, etc. And then the series of jobs were strung together, each triggering the next, into a pipeline.
Although widely used, this way of creating and connecting Jenkins jobs to form a pipeline was challenging. It did not meet the definition of infrastructure-as-code. Job configurations were stored only as XML files within the Jenkins configuration area. This meant that the files were not easily readable or directly modifiable. And the Jenkins application itself provided the user's primary view and access to them.
The growth of DevOps has led to more tooling that can implement the infrastructure-as-code paradigm to a larger degree. Jenkins has somewhat lagged in this area until the release of Jenkins 2. (Here Jenkins 2 is the name we are generally applying to newer versions that support the pipeline-as-code functionality, as well as other features.) In this article, we'll learn how we can create pipelines as code in Jenkins 2. We'll do this using two different styles of pipeline syntax—scripted and declarative. We'll also touch on how we can store our pipeline code outside of Jenkins, but still have Jenkins run it when it changes, to meet one of the goals for implementing DevOps.
Let's start by talking about the foundations. Jenkins and its plugins make the building blocks available for your pipeline tasks via its own programming steps—the Jenkins domain-specific language (DSL).
DSL steps
When Jenkins started evolving toward the pipeline-as-code model, some of the earliest changes came in the form of a plugin—the workflow plugin. This included the creation of a set of initial DSL steps that allowed for coding up simple jobs in Jenkins and, by extension, simple pipelines.
These days, the different DSL steps available in Jenkins are provided by many different plugins. For example, we have a git step provided via the Git plugin to retrieve source code from the source control system. An example of its use is shown in Listing 1:
node ('worker_node1') {
     stage('Source') {
         // Get some code from our Git repository
         git 'https://github.com/brentlaster/roarv2'
      }
}
Listing 1: Example pipeline code line using the Git step.
In fact, to be compatible with Jenkins 2, current plugins are expected to supply DSL steps for use in pipelines. Pipelines incorporate DSL steps to do the actions traditionally done through the web forms. But, to make up a full pipeline, there are still other supporting pieces and structure needed. Jenkins 2 allows two styles of structure and syntax for building out pipelines. These are referred to as scripted and declarative.
Scripted Pipelines
The original approach for creating pipelines in Jenkins 2 is now referred to as scripted. At the highest level, Scripted Pipelines are wrapped in a node block. Here a node refers to a system that contains the Jenkins agent pieces and can run jobs (formerly referred to as a slave instance). The node gets mapped to a system by using a label. A label is simply an identifier that has been added when configuring one or more nodes in Jenkins (done via the global Manage Nodes section). An example is shown in Figure 1.

Figure 1. Node configuration with labels
The node block is a construct from the Groovy programming language called a closure (denoted by the opening and closing braces). In fact, Scripted Pipelines can include and make use of any valid Groovy code. As an example, Listing 2 shows Scripted Pipeline code that does several things:
- retrieves source code (via the
gitpipeline step); - gets the value of a globally defined Gradle installation (via the
toolpipeline step) and puts it into a Groovy variable; and - calls the shell to execute it (via the
shpipeline step):
// Scripted Pipeline
node ('worker_node1') {
  // get code from our Git repository
  git 'https://github.com/brentlaster/roarv2'
   // get Gradle HOME value
  def gradleHome = tool 'gradle4'
   // run Gradle to execute compile and unit testing
  sh "'${gradleHome}/bin/gradle' clean compileJava test"
}
Listing 2: Scripted syntax for using the tool and sh steps.
Here gradleHome is a Groovy variable used to support the DSL steps. Such a pipeline can be defined via Jenkins by creating a new Pipeline project and typing the code in the Pipeline Editor section at the bottom of the page for the new project, as shown in Figure 2:

Figure 2: Defining a new Pipeline project
Although this simple node block is technically valid syntax, Jenkins pipelines generally have a further level of granularity—stages. A stage is a way to divide up the pipeline into logical functional units. It also serves to group DSL steps and Groovy code together to do targeted functionality. Listing 3 shows our Scripted Pipeline with a stage definition for the build pieces and one for the source management piece:
// Scripted Pipeline with stages
node ('worker_node1') {
  stage('Source') { // Get code
    // get code from our Git repository
    git 'https://github.com/brentlaster/roarv2'
  }
  stage('Compile') { // Compile and do unit testing
    // get Gradle HOME value
    def gradleHome = tool 'gradle4'
    // run Gradle to execute compile and unit testing
    sh "'${gradleHome}/bin/gradle' clean compileJava test"
  }
}
Listing 3: Scripted syntax with stages
Each stage in a pipeline also gets its own output area in the new default Jenkins output screen—the Stage View. As shown in Figure 3, the Stage View output is organized as a matrix, with each row representing a run of the job, and each column mapped to a defined stage in the pipeline:
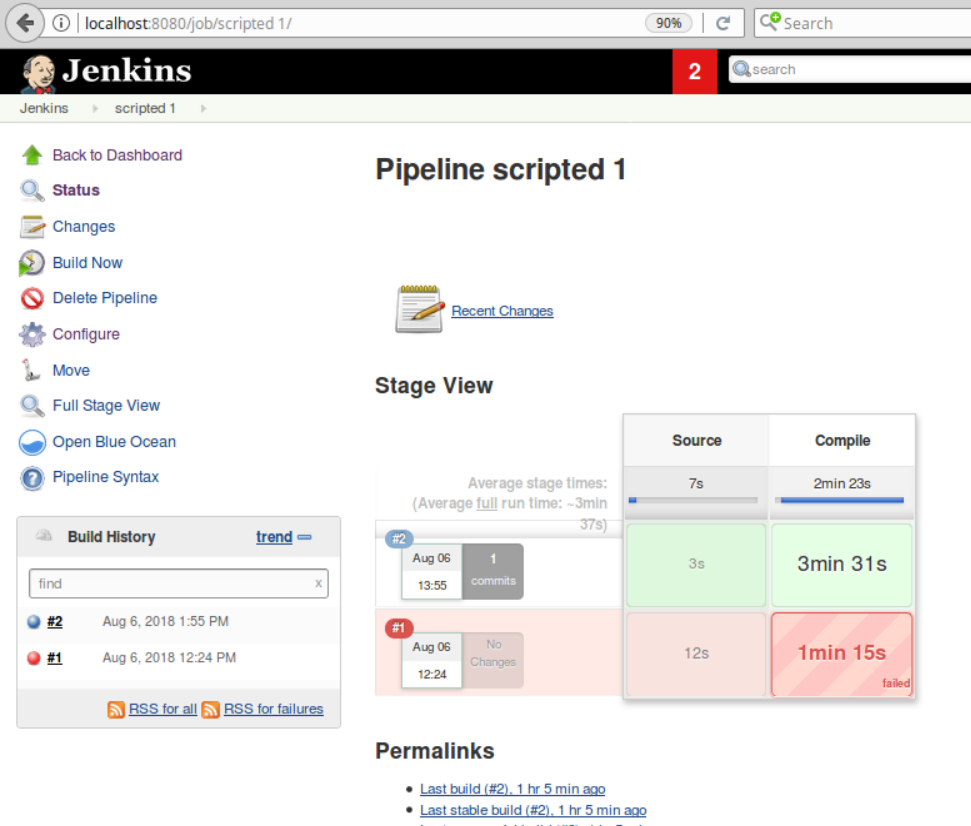
Figure 3: Defined stages and Stage View output
Each cell in this matrix (intersection of a row and column) also shows timing information and uses colors as an indication of success or failure. The key to each color is shown in Table 1:
|
Color |
Meaning |
| White | Stage has not been run yet |
| Blue stripes | Processing in progress |
| Green | Stage succeeded |
| Red | Stage succeeded, but downstream stage failed |
| Red stripes | Stage failed |
Additionally, by hovering over the cell, pop-ups will provide more information about the execution of that stage with links to logs, as shown in Figure 4:
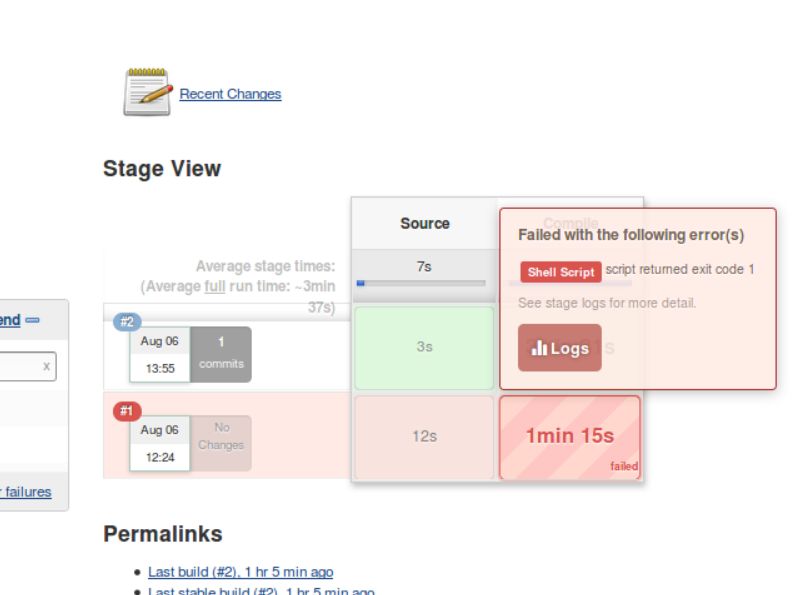
Figure 4: Drilling down into the logs in stage output
Although Scripted Pipelines provide a great deal of flexibility, and can be comfortable and familiar for programmers, they do have their drawbacks for some users. In particular:
- It can feel like you need to know Groovy to create and modify them.
- They can be challenging to learn to use for traditional Jenkins users.
- They provide Java-style tracebacks to show errors.
- There is no built-in post-build processing.
The last item in the list above can be a big one if you're used to being able to do tasks such as sending email notifications or archiving results via the post-build processing in Freestyle jobs. If your Scripted Pipeline code fails and throws an exception, then the end of your pipeline may never be reached; however, you can handle this with a Java-style try-catch block around your main Scripted Pipeline code as shown in Figure 5:
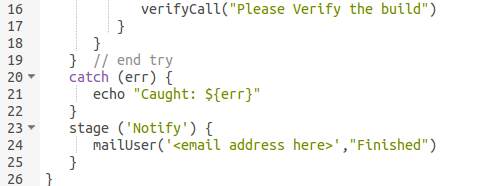
Figure 5: try-catch block to emulate post-build notifications
Here we have a final stage called Notify. This stage will always be executed whether the earlier parts of our pipeline succeed or fail. This is because the try-catch structure will catch any exception caused by a failure and allow control to continue afterwards. (Jenkins 2 also has a catchError block that is a simplified, limited version of the try-catch construct.)
This kind of workaround adds to the impression that you need to know some programming to do things in Scripted Pipelines that you previously got for free with Freestyle. In an effort to simplify things for those coming from traditional Jenkins and take some of the Java/Groovy-isms out of the mix, CloudBees and the Jenkins Community created a second style of syntax for writing pipelines—declarative.
Declarative Pipelines
As the name suggests, declarative syntax is more about declaring what you want in your pipeline and less about coding the logic to do it. It still uses the DSL steps as its base, but includes a well-defined structure around the steps. This structure includes many directives and sections that specify the items you want in your pipeline. An example Declarative Pipeline is shown in Listing 4:
pipeline {
  agent { label 'worker_node1' }
  stages {
    stage('Source') { // Get code
      steps {
        // get code from our Git repository
        git 'https://github.com/brentlaster/roarv2'
      }
    }
    stage('Compile') { // Compile and do unit testing
      tools {
        gradle 'gradle4'
      }
      steps {
        // run Gradle to execute compile and unit testing
        sh 'gradle clean compileJava test'
      }
    }
  }
}
Listing 4: Example Declarative Pipeline
One of the first things you may notice here is that we have an agent block surrounding our code instead of a node block. You can think of agents and nodes as being the same thing—specifying a system on which to run. (However, agent also includes additional ways to create systems, such as via Dockerfiles.)
Beyond that, we have other directive blocks in our pipeline, such as the tools one, where we declare our Gradle installation to use (rather than assigning it to a variable as we did in the scripted syntax). In the declarative syntax, you cannot use Groovy code such as assignments or loops. You are restricted to the structured sections/blocks and the DSL steps.
Additionally, in a Declarative Pipeline, the DSL steps within a stage must be enclosed in a steps directive. This is because you can also declare other things besides steps in a stage.
Figure 6 shows a diagram from the Jenkins 2: Up and Running book of all the sections you can have in a Declarative Pipeline. The way to read this chart is that items with solid line borders are required, and items with dotted line borders are optional:
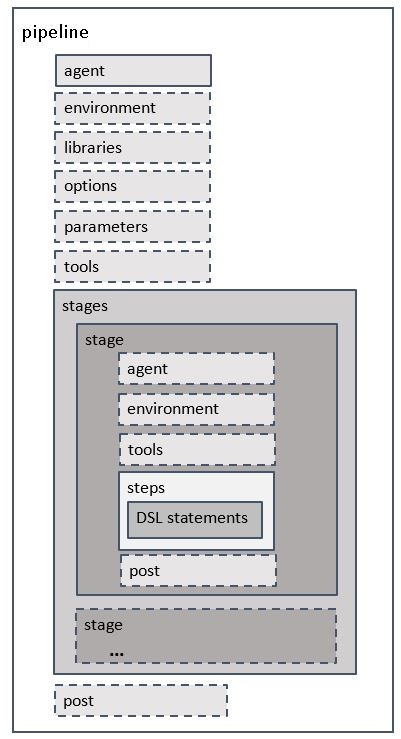
Figure 6: Diagram of Declarative Pipeline sections
You can probably get an idea of what the different sections do from their names. For example, environment sets environment variables and tools declares the tooling applications we want to use. We won't go into all the details on each one here, but the book has an entire chapter on Declarative Pipelines.
Note that there is a post section here. This emulates the functionality of the post-build processing from the Freestyle jobs and also replaces the need for syntax like the try-catch construct we used in the Scripted Pipeline. Also notice that the post block can occur at the end of a stage as well.
This kind of well-defined structure provides several advantages for working with Declarative Pipelines in Jenkins. They include:
- easier transition from Freestyle to pipelines-as-code because you are declaring what you need (similar to how you fill in forms in traditional Jenkins);
- tighter and clearer syntax/requirements checking; and
- tighter integration with the new Blue Ocean graphical interface (well-structured sections in a pipeline map easier to individual graphical objects).
You may be wondering what the disadvantages of Declarative Pipelines are. If you need to go beyond the scope of what the declarative syntax allows, you have to employ other means. For example, if you wanted to assign a variable to a value and use it in your pipeline, you can't do that in declarative syntax. Some plugins can also require that sort of thing to use them in a pipeline. So, they aren't directly compatible with the declarative syntax.
What do you do in those cases? You can add a script block around small amounts of non-declarative code in a stage. Code within a script block in a Declarative Pipeline can be any valid scripted syntax.
For more substantial non-declarative code, the recommended approach is to put it into an external library (called shared pipeline libraries in Jenkins 2). There are a few other methods as well, which are less sanctioned—meaning they may not be supported in the future. (The Jenkins 2: Up and Running book goes into much more detail on shared libraries and other alternative approaches if you are interested in finding out more.)
Hopefully this gives you a good idea of the differences between Scripted Pipelines and Declarative Pipelines in Jenkins 2. One last dimension to consider here is that, with Jenkins 2, you don't need to have your pipeline code stored in the Jenkins application itself. You can create it as (or copy it into) an external text file with the special name Jenkinsfile. Then that file can be stored with the source code in the same repository in the desired branch.
Jenkinsfiles
Although the Jenkins application is the main environment for developing and running our pipelines, the pipeline code itself can also be placed into an external file named Jenkinsfile. Doing this then allows us to treat our pipeline code as any other text file—meaning it can be stored and tracked in source control and go through regular processes, such as code reviews.
Moreover, the pipeline code can be stored with the product source and live along side it, getting us to that desired point of our pipeline being infrastructure-as-code.
Figure 7 shows a Jenkinsfile stored in a source control repository:
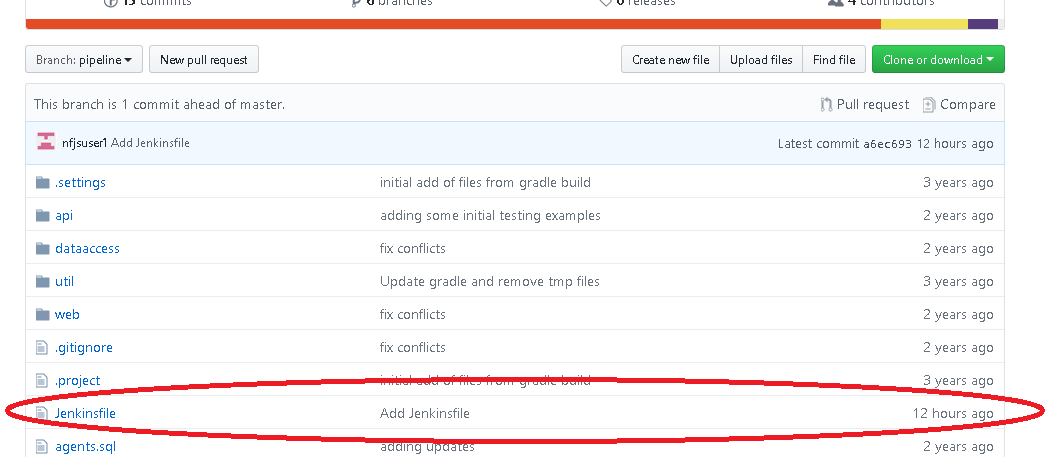
Figure 7: Jenkinsfile in source control
The contents of the Jenkinsfile in source control are shown in Figure 8:

Figure 8: An example Jenkinsfile
You may think this is an exact copy of our pipeline from earlier, but there are a couple of subtle differences. For one, we've added the groovy designator at the top. More importantly though, notice the step that gets code from the source control system. Instead of the git step that we used previously, we have an scm checkout step. This is a shortcut that you can take in your Jenkinsfile. Because the Jenkinsfile lives in the same repository (and branch) as the code on which it will be operating, it already assumes that this is where it should get the source code from. This means that we don't need to tell it that information explicitly.
The advantage of using a Jenkinsfile is that your pipeline definition lives with the source for the product going through the pipeline. Within Jenkins, you can then create a project of type Multibranch Pipeline and point it to the source repository with the Jenkinsfile, via the Branch Sources section of the job configuration. Figure 9 shows the two steps:

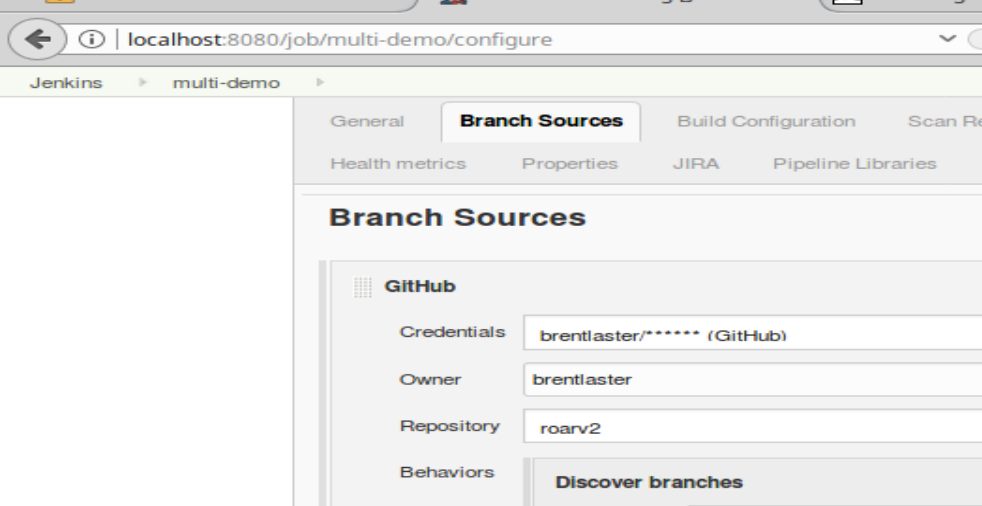
Figure 9: Creating and configuring a Multibranch Pipeline
Jenkins will then scan through each branch in the repository and check to see whether the branch has a Jenkinsfile. If it does, it will automatically create and configure a sub-project within the Multibranch Pipeline project to run the pipeline for that branch. Figure 10 shows an example of the scanning running and looking for Jenkinsfiles to create the jobs in a Multibranch Pipeline:
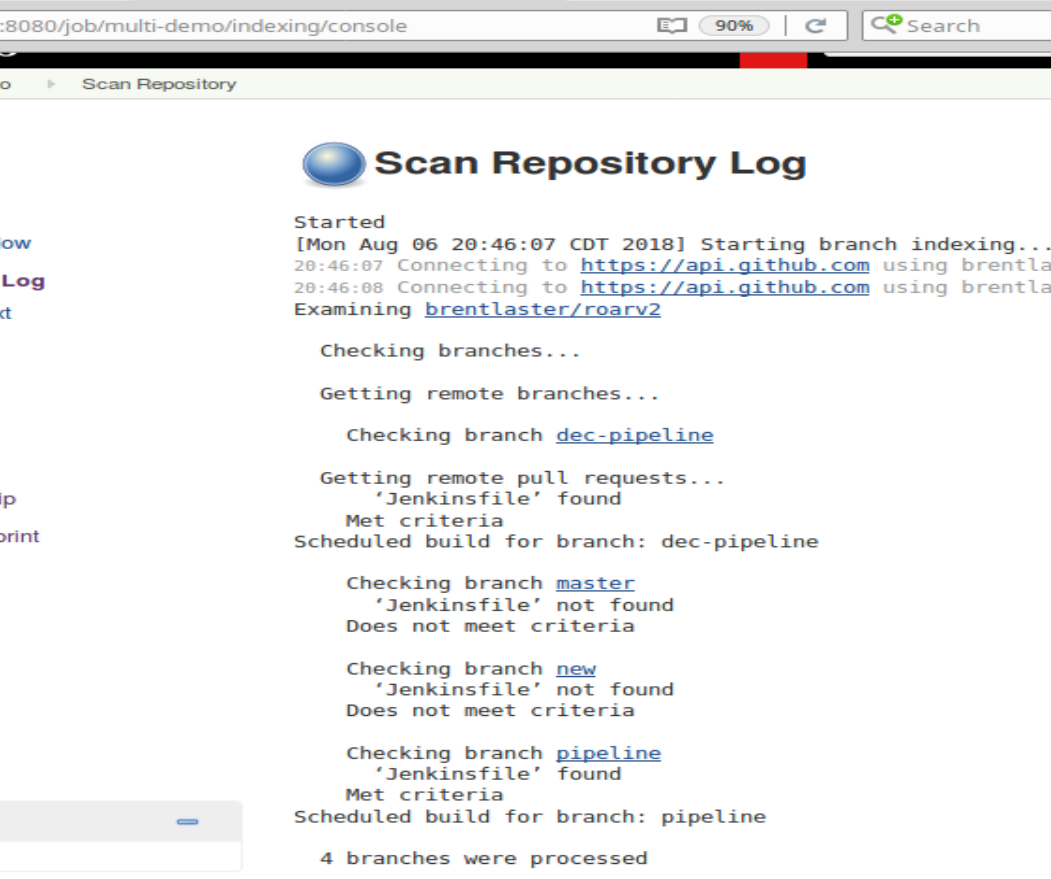
Figure 10: Jenkins checking for Jenkinsfiles to automatically setup jobs in a Multibranch Pipeline
And Figure 11 shows the jobs in a Multibranch Pipeline after executing against the Jenkinsfiles and source repositories:
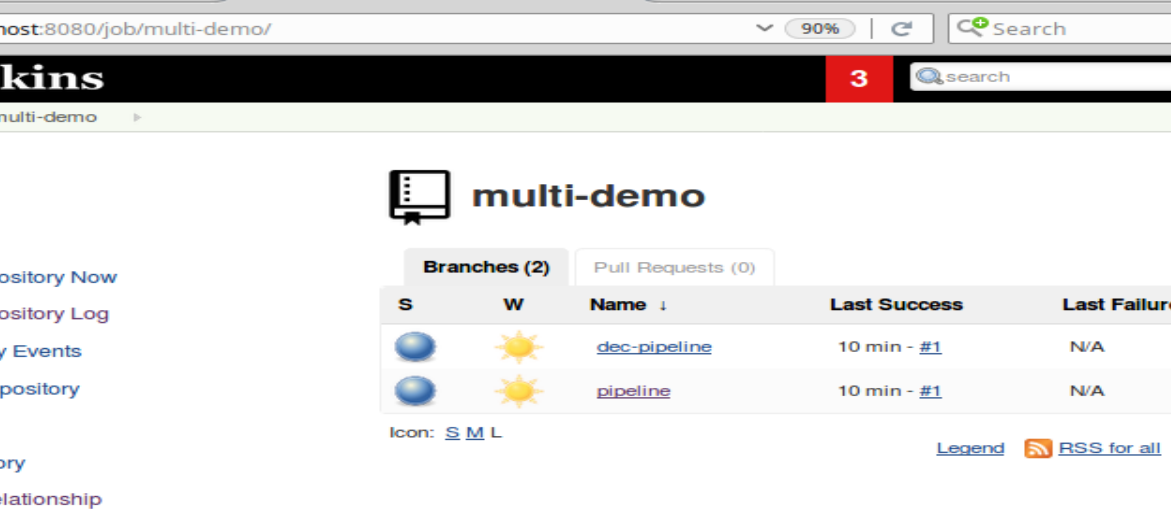
Figure 11: Automatically created Multibranch Pipeline jobs based on Jenkinsfiles in source code branches
With Jenkinsfiles, we can accomplish the DevOps goal of our infrastructure (or at least the pipeline definition) being treated as code. If the pipeline needs to change, we can pull, edit, and push the Jenkinsfile within source control, just as we would for any other file. We can also do things like code reviews on the pipeline script.
There is one potential downside to using Jenkinsfiles: Discovering problems up front when you are working in the external file and not in the environment of the Jenkins application can be more challenging. One approach to dealing with this is developing the code within the Jenkins application as a Pipeline project first. Then, you can convert it to a Jenkinsfile afterward. Also, there is a Declarative Pipeline linter application that you can run against Jenkinsfiles, outside of Jenkins, to detect problems early.
Conclusion
Hopefully this article has given you a good idea of the differences and use of both Scripted and Declarative Pipelines as well as how they can be included with the source as Jenkinsfiles. If you'd like to find out more about any of these topics or related topics in Jenkins 2, you can search the web or check out the Jenkins 2: Up and Running book for lots more examples and explanations on using this technology to empower DevOps in your organization.


Comments are closed.