Do you have an old Raspberry Pi lying around gathering dust, maybe after a recent Pi upgrade? Are you curious about BSD Unix? If you answered "yes" to both of these questions, you'll be pleased to know that the first is the solution to the second, because you can run NetBSD, as far back as the very first release, on a Raspberry Pi.
BSD is the Berkley Software Distribution of Unix. In fact, it's the only open source Unix with direct lineage back to the original source code written by Dennis Ritchie and Ken Thompson at Bell Labs. Other modern versions are either proprietary (such as AIX and Solaris) or clever re-implementations (such as Minix and GNU/Linux). If you're used to Linux, you'll feel mostly right at home with BSD, but there are plenty of new commands and conventions to discover. If you're still relatively new to open source, trying BSD is a good way to experience a traditional Unix.
Admittedly, NetBSD isn't an operating system that's perfectly suited for the Pi. It's a minimal install compared to many Linux distributions designed specifically for the Pi, and not all components of recent Pi models are functional under NetBSD yet. However, it's arguably an ideal OS for the older Pi models, since it's lightweight and lovingly maintained. And if nothing else, it's a lot of fun for any die-hard Unix geek to experience another side of the POSIX world.
Download NetBSD
There are different versions of BSD. NetBSD has cultivated a reputation for being lightweight and versatile (its website features the tagline "Of course it runs NetBSD"). It offers an image of the latest version of the OS for every version of the Raspberry Pi since the original. To download a version for your Pi, you must first determine what variant of the ARM architecture your Pi uses. Some information about this is available on the NetBSD site, but for a comprehensive overview, you can also refer to RPi Hardware History.
The Pi I used for this article is, as far as I can tell, a Raspberry Pi Model B Rev 2.0 (with two USB ports and no mounting holes). According to the Raspberry Pi FAQ, this means the architecture is ARMv6, which translates to earmv6hf in NetBSD's architecture notation.

If you're not sure what kind of Pi you have, the good news is that there are only two Pi images, so try earmv7hf first; if it doesn't work, fall back to earmv6hf.
For the easiest and quickest install, use the binary image instead of an installer. Using the image is the most common method of getting an OS onto your Pi: you copy the image to your SD card and boot it up. There's no install necessary, because the image is a generic installation of the OS, and you've just copied it, bit for bit, onto the media that the Pi uses as its boot drive.
The image files are found in the binary > gzimg directories of the NetBSD installation media server, which you can reach from the front page of NetBSD.org. The image is rpi.img.gz, a compressed .img file. Download it to your hard drive.
Once you have downloaded the entire image, extract it. If you're running Linux, BSD, or MacOS, you can use the gunzip command:
$ gunzip ~/Downloads/rpi.img.gzIf you're working on Windows, you can install the open source 7-Zip archive utility.
Copy the image to your SD card
Once the image file is uncompressed, you must copy it to your Pi's SD card. There are two ways to do this, so use the one that works best for you.
Option 1: Using Etcher
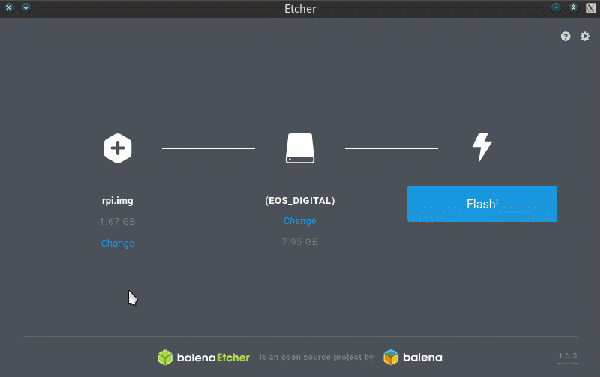
Etcher is a cross-platform application specifically designed to copy OS images to USB drives and SD cards. Download it from Etcher.io and launch it.
In the Etcher interface, select the image file on your hard drive and the SD card you want to flash, then click the Flash button.

That's it.
Option 2: Using the dd command
On Linux, BSD, or MacOS, you can use the dd command to copy the image to your SD card.
- First, insert your SD card into a card reader. Don't mount the card to your system because dd needs the device to be disengaged to copy data onto it.
- Run dmesg | tail to find out where the card is located without it being mounted. On MacOS, use diskutil list.
- Copy the image file to the SD card:
$ sudo dd if=~/Downloads/rpi.img of=/dev/mmcblk0 bs=2M status=progressBefore doing this, you must be sure you have the correct location of the SD card. If you copy the image file to the incorrect device, you could lose data. If you are at all unsure about this, use Etcher instead!
When either dd or Etcher has written the image to the SD card, place the card in your Pi and power it on.
First boot
The first time it's booted, NetBSD detects that the SD card's filesystem does not occupy all the free space available and resizes the filesystem accordingly.

Once that's finished, the Pi reboots and presents a login prompt. Log into your NetBSD system using root as the user name. No password is required.
Set up a user account
First, set a password for the root user:
# passwdThen create a user account for yourself with the -m option to prompt NetBSD to create a home directory, the -G users option to add yourself to the users group and to make that your primary group, and the -g wheel option to add your account to the wheel group so that you can become the administrative user (root) as needed:
# useradd -m -G users -g wheel sethUse the passwd command again to set a password for your user account:
# passwd sethLog out, and then log back in with your new credentials.
Add software to NetBSD
If you've ever used a Pi, you probably know that the way to add more software to your system is with a special command like apt or dnf (depending on whether you prefer to run Raspbian or FedBerry on your Pi). On NetBSD, use the pkg_add command. But some setup is required before the command knows where to go to get the packages you want to install.
There are ready-made (pre-compiled) packages for NetBSD on NetBSD's servers using the scheme <ftp://ftp.netbsd.org/pub/pkgsrc/packages/NetBSD/[PORT]/[VERSION]/All>. Replace PORT with the architecture you are using, either earmv6hf or earmv7hf. Replace VERSION with the NetBSD release you are using; at the time of this writing, that's 8.0.
Place this value in a file called /etc/pkg_install.conf. Since that's a system file outside your user folder, you must invoke root privileges to create it:
$ su -
<password>
# echo \
"PKG_PATH=ftp://ftp.NetBSD.org/pub/pkgsrc/packages/NetBSD/earmv6hf/8.0/All/" \
>> /etc/pkg_install.conf
Now you can install packages from the NetBSD software distribution. A good first candidate is Bash, commonly the default shell on a Linux (and Mac) system. Also, if you're not already a Vi text editor user, you may want to try something more intuitive such as Jove or Nano:
# pkg_add -v bash jove nano
# exit
$
Unlike many Linux distributions (Slackware being a notable exception), NetBSD does very little configuration on your behalf, and this is considered a feature. So, to use Bash, Jove, or Nano as your default toolset, you must set the configuration yourself.
You can set many of your preferences dynamically using environment variables, which are special variables that your whole system can access. For instance, most applications in Unix know that if there is a VISUAL or EDITOR variable set, the value of those variables should be used as the default text editor. You can set these two variables temporarily, just for your current login session:
$ export EDITOR=nano
# export VISUAL=nano
Or you can make them permanent by adding them to the default NetBSD .profile file:
$ sed -i 's/EDITOR=vi/EDITOR=nano/' ~/.profileLoad your new settings:
$ . ~/.profileTo make Bash your default shell, use the chsh (change shell) command, which now loads into your preferred editor. Before running chsh, though, make sure you know where Bash is located:
$ which bash
/usr/pkg/bin/bash
Set the value for shell in the chsh entry to /usr/pkg/bin/bash, then save the document.
Add sudo
The pkg_add command is a privileged command, which means to use it, you must become the root user with the su command. If you prefer, you can also set up the sudo command, which allows certain users to use their own password to execute administrative tasks.
First, install it:
# pkg_add -v sudoAnd then use the visudo command to edit its configuration file. You must use the visudo command to edit the sudo configuration, and it must be run as root:
$ su
# SUDO_EDITOR=nano visudo
Once you are in the editor, find the line allowing members of the wheel group to execute any command, and uncomment it (by removing # from the beginning of the line):
## Uncomment to allow members of group wheel to execute any command
%wheel ALL=(ALL) ALL
Save the document as described in Nano's bottom menu panel and exit the root shell.
Now you can use pkg_add with sudo instead of becoming root:
$ sudo pkg_add -v fluxboxNet gain
NetBSD is a full-featured Unix operating system, and now that you have it set up on your Pi, you can explore every nook and cranny. It happens to be a pretty lightweight OS, so even an old Pi with a 700mHz processor and 256MB of RAM can run it with ease. If this article has sparked your interest and you have an old Pi sitting in a drawer somewhere, try it out!


8 Comments