

Matrix is a popular open source chat application that makes it easy to chat securely with people all over the world. Similarly, Discord is a non-open source chat application that's also popular with many online communities. Discord, like Matrix, provides a chat client for all major platforms both mobile and desktop, so it's perfectly usable on Linux. However, it's not open source and so, given the choice, you might prefer to use Matrix. The good news is that when not given a choice for any reason, you can also use Matrix to interface with Discord by running a Matrix-to-Discord bridge. This article shows you how to set up and run a Python Matrix bot to bridge chat between a Matrix room and a Discord channel.
Requirements
The bot demonstrated in this article is a "non-puppeting" bridge, meaning that it just copies ingoing and outgoing messages on one platform and sends it to the other. There are more advanced modes available, but those tend to require a self-hosted Matrix instance. The procedure for setting up the bot, however, is similar in both cases, so whether you're setting up a bridge service for your self-hosted Matrix server or just a puppeting bot for public instances, I assume you have at least:
-
A Matrix account and a Matrix client such as Element.
-
A Discord account.
-
A Linux or BSD server that can run the Python3 bot. I use a Rev. 1 Raspberry Pi with just a 700mHZ processor and 256 MB RAM, running NetBSD. You can run the bot locally, if you prefer, but I find it more convenient to run it as a persistent service so I don't miss messages that happen while I'm away.
Get the bot
Download or clone matrix-discord-bridge.
Change into its bridge directory and install its dependencies using pip:
$ python3 -m pip install -r requirements.txtRun the bot to generate an empty configuration file:
$ python3 ./bridge.pyYou now have a file called config.json in your current directory. It contains six key and value pairs. The rest of this article demonstrates how to obtain these values, but first an overview:
The top three are for Matrix.
-
homeserver: The Matrix server you log in to
-
username: Your Matrix login name
-
password: Your Matrix password
Two are for Discord:
-
token: A bot developer token obtained from Discord.
-
discord_cmd_prefix: A character sequence you want to use as a shortcut for sending the bot commands through Discord.
And the final one is for both:
-
bridge: The Discord "channel" ID and the Matrix "room" ID that you're bridging. This can contain more than one channel and room pair, so you can use just one bot to bridge several rooms.
Set up Matrix
All you have to do to set up the Matrix side is open a Matrix account for your bot.
Next, you need the ID of the room you want to bridge to Discord. To get a room ID, right-click on the room icon in the left panel of Element and select Copy Link. In the URL you've just copied, there's a semicolon. The room ID is the part on left of the semicolon, and the home server of that room is to the right. For example, suppose this is the URL you just copied:
https://matrix.to/#/!DEADBEEFzzzzABCDEF:matrix.org?via=matrix.orgThe room ID is !DEADBEEFzzzzABCDEF and the home server is matrix.org.
You can now add your Matrix details to the config.json file. For example:
    "homeserver": "https://matrix.org",
    "username": "@mybot:matrix.org",
    "password": "myBadPassword1234",
    "token": "",
    "discord_cmd_prefix": "",
    "bridge": {
        "": "!DEADBEEFzzzzABCDEF:matrix.org"
    }
}
Get a Discord token
Assuming you already have an account on Discord, open a web browser and navigate to discordapp.com/developers/applications. Once you've logged in, click the New Application button in the Applications tab.
Give your bot a name. For this example, I use mybot.
After you've defined a bot, click on it and find the Bot category in the menu on the left.
In the Bot panel, click the Add Bot button. Discord adds your bot to the panel, alerting you that "A wild bot has appeared!" in a message box. Under the name of your bot, there's a link to click to reveal your bot's token. Click the link and copy the token into your config file.
"token": "07c63.fb2823cG759.b20_852f337a6551bc",Set the bot command
Choose a sequence of characters you want to use to issue commands to the bot in Discord. In the instance of a simple bridge, you may not have any commands you need to issue, so this value probably doesn't actually matter. I set it to !b but I've never used it.
"discord_cmd_prefix": "!b",Add your bot to Discord
Now you must add your bot to the channel you want it to bridge.
-
Select OAuth2 from the menu on the left, and then URL Generator.
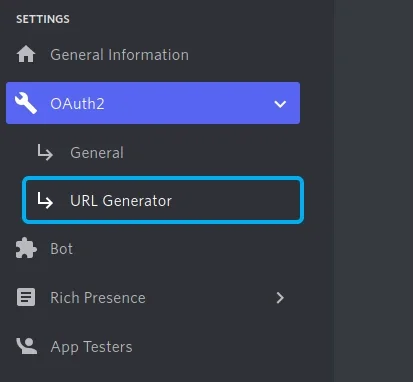
Seth Kenlon, CC BY-SA 4.0
-
In the Scopes section, select bot (and only bot). In the Bot Permissions section that appears under the Scopes section, activate all options under Text Permissions.
-
Copy the URL displayed at the bottom of the panel, in the Generated URL field.
Navigate to the URL you just copied, and add the bot to the channel.
Finally, select the Bot category in the left panel, and enable all Privileged Gateway Intents.
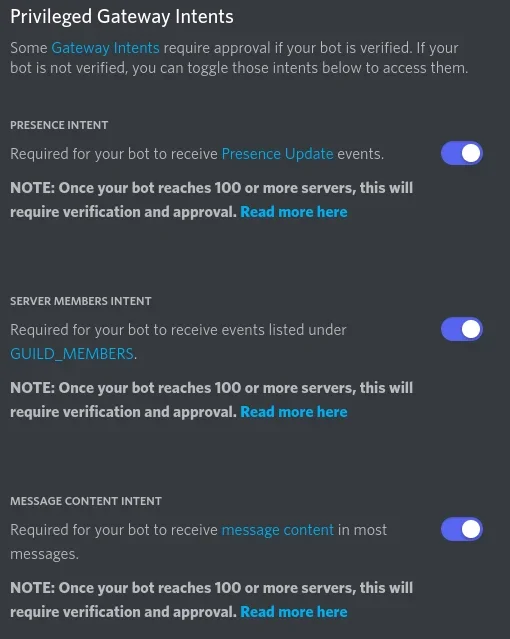
(Seth Kenlon, CC BY-SA 4.0)
You're done with the Discord web interface, but now there's one more configuration option you need from the Discord app.
Get the Discord channel ID
In User Settings of Discord (it's the gear icon next to your name on the desktop app), select Advanced. In the Advanced panel, activate Developer Mode.
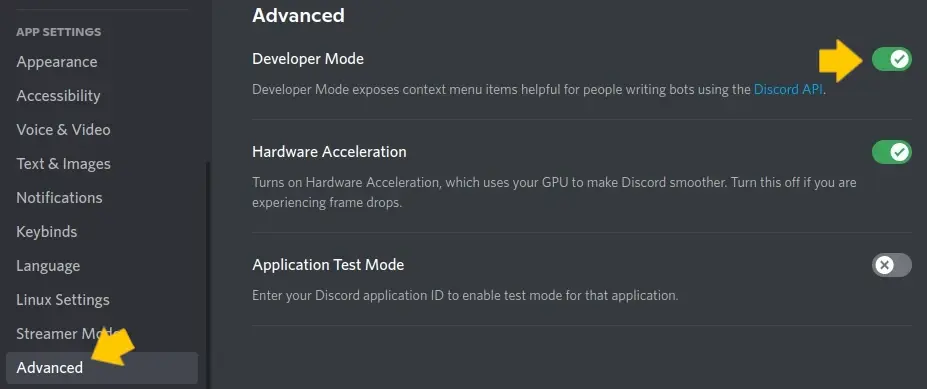
Seth Kenlon, CC BY-SA 4.0
With developer mode active, go to the channel you want to bridge. For instance, you might want to bridge Matrix to the zombie apocalypse channel on the example Discord server. First, join the example Discord server. Then right-click on text channel #zombie apocalypse, and select Copy ID.
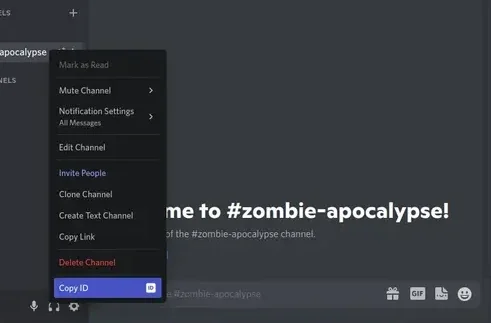
(Seth Kenlon, CC BY-SA 4.0)
Paste the channel ID into the config file as the first value for bridge. Your full config file now contains:
    "homeserver": "https://matrix.org",
    "username": "@mybot:matrix.org",
    "password": "myBadPassword1234",
    "token": "07c63.fb2823cG759.b20_852f337a6551bc",
    "discord_cmd_prefix": "!b",
    "bridge": {
        "1030287944604463185": "!DEADBEEFzzzzABCDEF:matrix.org"
    }
}
Bridge
Start your bot with Python:
$ python3 ./bridge.py &Your bot is now acting as a bridge, at least in theory. Some Discord channels start new users in a muted state, and they must be granted special permissions to interact. If the Discord channel you're bridging is strictly managed, then you may need to speak to a moderator or administrator and request special permissions for your bot.
For your first attempt at setting this up, it's easiest to bridge a Discord server to a Matrix room that you control. That way, you can confirm that it works when unrestricted. After you've confirmed functionality, try adding it to a restricted channel.
Open source bridges another gap
Open source does a lot of heavy lifting, including in the integration space. It's to the credit of both Matrix and Discord that they provide a robust bot ecosystem that's easy to learn and easy to use. It's to the credit of some resourceful open source developers that the two can be bridged.


1 Comment