

In my previous article, I explained how to install and set up EGroupware on your own server. It also introduced the modules and external applications of the open source groupware solution. This article shows you how to take care of an existing installation and manage backups.
The Admin menu
The central point of administration is the Admin menu in the left sidebar. This is where you adjust EGroupware's general settings, take care of user accounts and passwords, change the home screen, view access logs, clear the web server cache, test the push server, and more.
(Heike Jurzik, CC BY-SA 4.0)
In this area, you also configure users and groups, their access, and permissions. Right-click an entry to open a context menu with quick access to important configuration options. Please be extra careful with the User groups section. Each group has its own rights, so this is where you define access to specific data. Note that personal settings override those of the group, and the user's access rights are determined by what is set for the account and its groups.
Tip: You can limit access for users so that they only see what the resources really need—keep their workspaces clean and set sensible default settings. For example, hide those applications and functions which confuse less tech-savvy users.
Configure automatic upgrades
The whole EGroupware environment basically consists of several Docker containers working hand in hand. As a result, taking care of the installation is very convenient. Apart from delivering an optimally configured environment, the containers also make sure it's painless to upgrade single components as well as the entire system or even install additional applications.
EGroupware uses Watchtower to check for container updates. After the developers have published a new container image for EGroupware, Watchtower pulls it, gracefully shuts down the running container, and restarts the updated version with all necessary options. The check for updates runs every night at 4 a.m., but you can adjust the schedule by modifying the /etc/egroupware-docker/docker-compose.override.yml file.
Add your own mail server
Up until early 2021, EGroupware's email module was a mere mail client. These days the developers offer an additional mail server component—perfect for administrators who run EGroupware on-prem and want to run their own MTA. The manufacturer provides the package egroupware-mail for Debian and Debian-based distributions, which installs a container with Postfix and Dovecot, including an extension for push functionality in the EGroupware web client.
The entire administration of the mail server then runs via EGroupware's web interface. Every time the admin sets up a new user account, the corresponding mailboxes are generated automatically. The configuration for existing accounts happens in the Admin menu (User accounts). Right-click an entry and select Mail account to set up identities, signatures, IMAP folder structure, aliases, and forwards.
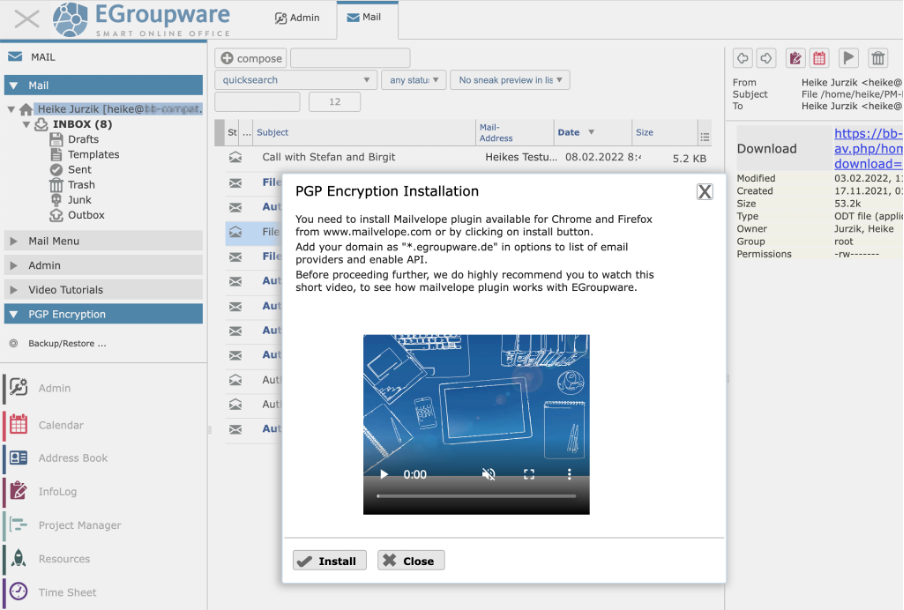
The Encryption tab allows you to upload an S/MIME certificate. Users must install the open source Mailvelope browser add-on to use PGP encryption. The private key remains with the owner (not with the EGroupware operator!), and users in the Mail module set up the public key.
(Heike Jurzik, CC BY-SA 4.0)
SSL and 2FA
As noted in the first article, setting up SSL certificates is vital. At a bare minimum, admins should take the time to set up an SSL certificate for the reverse proxy (not the EGroupware webserver!)—even if EGroupware runs only on the local network.
EGroupware supports various authentication methods. The default is the local SQL database which stores the users' credentials. Alternatively, the groupware authenticates against LDAP, Active Directory, mail servers, and SAML 2/Shibboleth (Single Sign-On). Administrators can choose the preferred authentication in the setup dialog (www.example.com/egroupware/setup) immediately after the installation. In this context, they should restrict access to the setup dialog to local IPs.
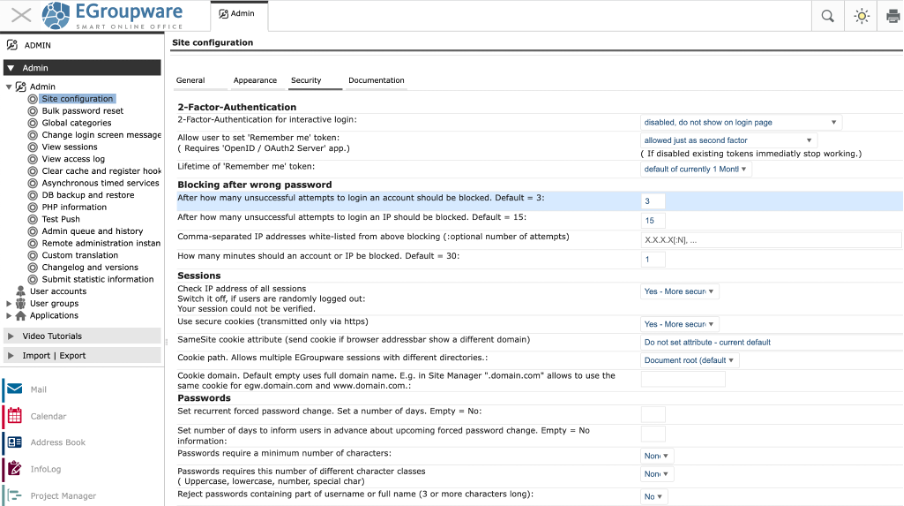
Look at the Admin menu, Site configuration, tab Security. This is where you enable two-factor authentication (2FA), define rules for blocking users after incorrect password entries, and set up password policies.
(Heike Jurzik, CC BY-SA 4.0)
Users of the Enterprise Line (EPL) version can configure a Web Application Firewall (Admin, Applications, EPL-Features, Firewall / 2FA). If only a small group of users should have access from external networks, you first define a rule that prevents access for everyone outside the local network. After that, create a new group and add all users allowed to log in from external networks. All firewall rules are processed one after the other. You can change their order with a drag-and-drop.
The firewall only handles interactive logins through the EGroupware web interface, but not synchronization with external clients, WebDAV access, or file shares. Check your firewall rules before saving them (button Test), ideally in an incognito tab or another web browser. Because the firewall only reacts to the logins, don't close the current session, so you remain logged in during testing.
Backup and restore
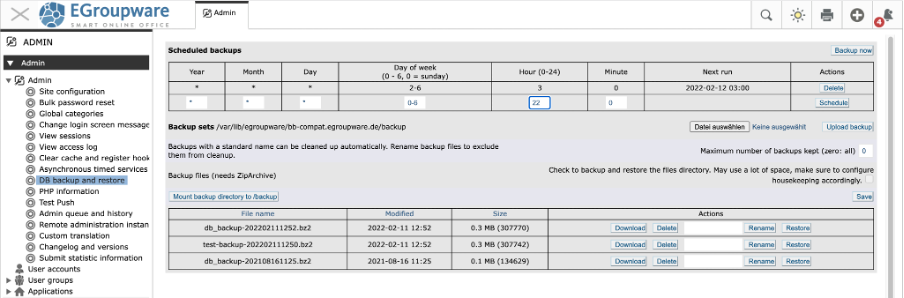
EGroupware offers help with creating backups, but you have to enable this—it's not part of the default settings. Go to Admin, DB backup and restore to adjust the configuration and access existing backups. In this section, you can define, amongst other things, a backup schedule and the number of copies you want to keep. Since this is a simple database dump (with a few extra config files), a backup doesn't need much space and time, so it's okay to keep 20 versions or more. Please note that if you rename a backup in this dialog, it no longer gets deleted during the automatic cleanup process.
You can download existing backups as Bzip2 archives to keep them safe on external storage media. Of course, you can upload the backups to another EGroupware server and restore them there. This even works on different Linux distributions.
(Heike Jurzik, CC BY-SA 4.0)
When planning your backup strategy, you might want to consider the virtual file system in which EGroupware stores the internal file manager's data. Of course, those files and folders are not recorded in the database and are therefore not backed up automatically. You can save those files if you tick the Check to backup and restore the files directory... box—this may take up a lot of disk space, though.
For a full backup, you should also take care of the /var/lib/egroupware directory on the EGroupware server with the backup software of your choice. This has one significant advantage: In addition to the file manager's data, you preserve the header file (with the database passwords), files from external applications (e.g., from Guacamole, Rocket.Chat, and Collabora Online), logs from the installation, etc.
Close collaboration
Taking care of an EGroupware installation is not particularly difficult, but it needs to be done. As an admin, you should familiarize yourself with the software and its configuration. Luckily, the developers follow the KISS principle (Keep it sweet and simple)—all modules collaborate nicely, and upgrades are thoroughly tested before they are released.
If you run into trouble, the community forum is there to help. This forum is also where you hear about upcoming changes and other news.


Comments are closed.