

I have been using databases for a lot longer than I care to admit, and a lot of that time has been spent looking at the entrails of servers, trying to determine exactly what they were doing. Thank goodness for the engineers behind the MySQL Performance Schema and Information Schema and their efforts to provide solid information. And then came the Sys schema with handy prepackaged peeks at the server. Before the advent of those schemas, there was no easy way to get granular information about a database instance.
But peering at tabulated displays at the information of one point in time does not allow for trend-spotting or a quick glance to ascertain a server's status. Being able to spot a trend on a graph or have alerts sent when a threshold is reached is vital. My friends in the PostgreSQL and MongoDB worlds had the same problem. The good news is that there is an open source solution for all three databases that is easy to install and use.
I am a fairly new employee at Percona but have been around MySQL for a long time. One of my first goals was to learn how to set up and use Percona Monitoring and Measurement (PMM). I know a whole slew of folks who use it happily, but I had only worked with it for a few moments at a trade show. My natural trepidation at installing anything that provided graphical information linked to a database was established well before open source databases were around. This hesitation is rooted in attempts to configure other monitoring software for proprietary databases.
The TL;DR is that PMM is simple to install and use. The documentation is well written, detailed, and handy. The software itself is easy to obtain and install. The overall experience is a ten out of ten.
Test case
I like to try new stuff on old laptops, so I installed a fresh copy of Ubuntu 20.04 LTS. Next, I read the PMM documentation.
I should say I read the documentation twice while muttering it can't be that simple. At the end of this article you will find the commands I entered to install the PMM server and the agents (MySQL, PostgreSQL, and Mongo). It's a cookbook showing how to recreate this test case.
Here are the Percona Database Distributions:
Prerequisite
The prerequisite for installing PMM is Docker, which proves to be the most intensive part of the entire installation. Thankfully the package management software for Ubuntu (apt) makes this very simple.
Installing the Percona Monitoring and Measurement server
Installing the PMM server is simple for anyone familiar with the APT package manager. Pay attention to the output that provides the URLs for connecting to the PMM server. In my case, the addresses were https://127.0.0.1:443/, https://192.168.1.209:443/, and https://172.17.0.1:443/.
You will have to log in to the PMM dashboard (default account and password are admin and admin).
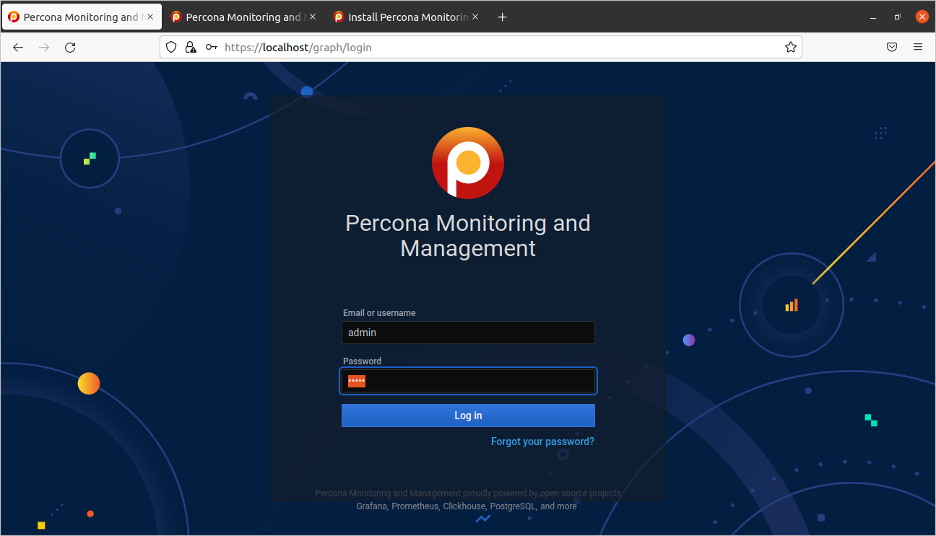
(David Stokes, CC BY-SA 4.0)
After a successful login, the PMM displays a dashboard.
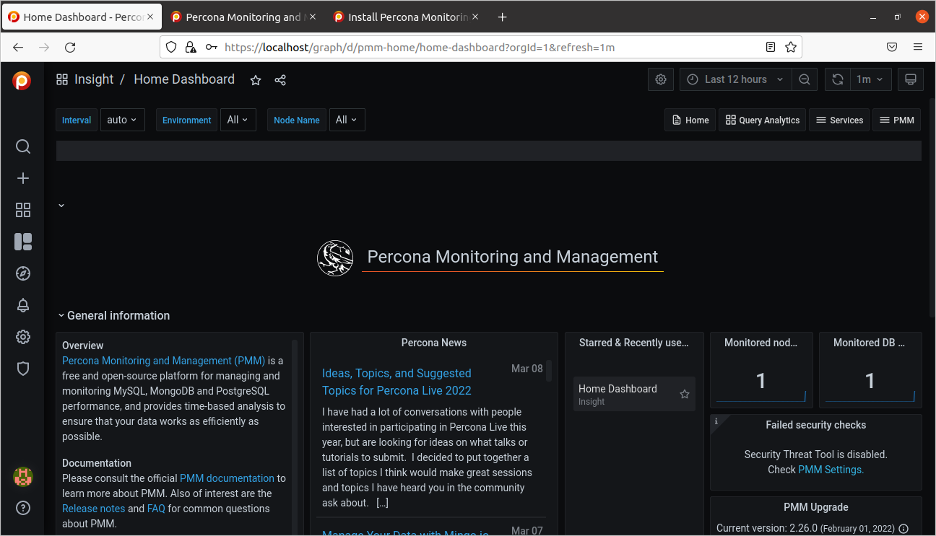
(David Stokes, CC BY-SA 4.0)
At this time, PMM is only monitoring the underlying system and the database it uses for gathering statistics—that is what the Monitored Nodes and Monitored DB counts in the above image are both displaying 1.
The database clients
The clients monitor the database instances, and again clients are simple to install with the package manager. The next step is registering the client with the server:
$ sudo pmm-admin config --server-insecure-tls --server-url=https://admin:admin@127.0.0.1The final steps are configuring the database server. In the example below, Percona's MySQL is installed, and an account is created for gathering statistics. Finally, the client collects information from the database instance:
$ sudo pmm-admin add mysql --username=pmm --password=pass --query-source=perfschemaFor PostgreSQL and MongoDB, replace the name of the database on the add option to the respective instance you desire to monitor.

(David Stokes, CC BY-SA 4.0)
You will notice that the Monitored Node count increased to 2 above.
PPM gives you access to many different views of what the server is doing. You can see the overall health of the server itself.
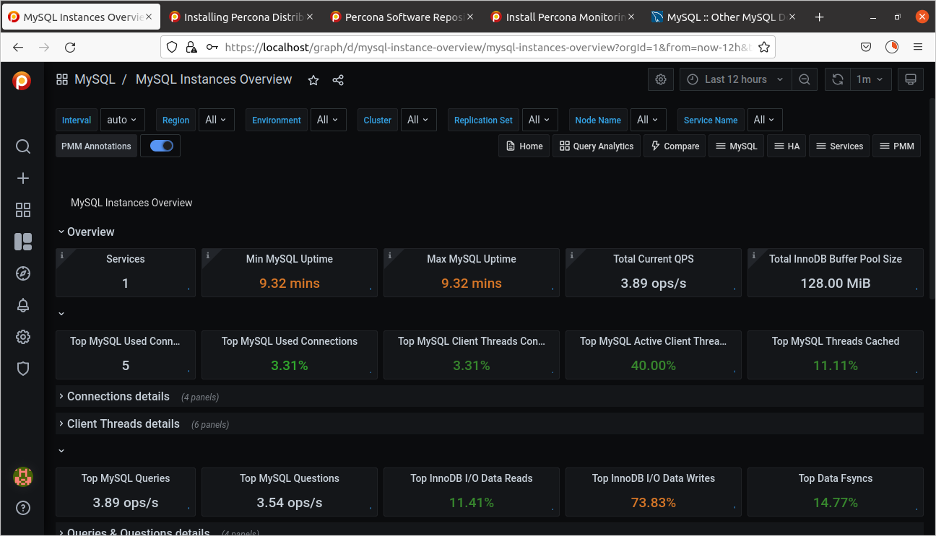
(David Stokes, CC BY-SA 4.0)
The general MySQL dashboard displays the overall health of the system.
(David Stokes, CC BY-SA 4.0)
And you can easily study the load on the system.
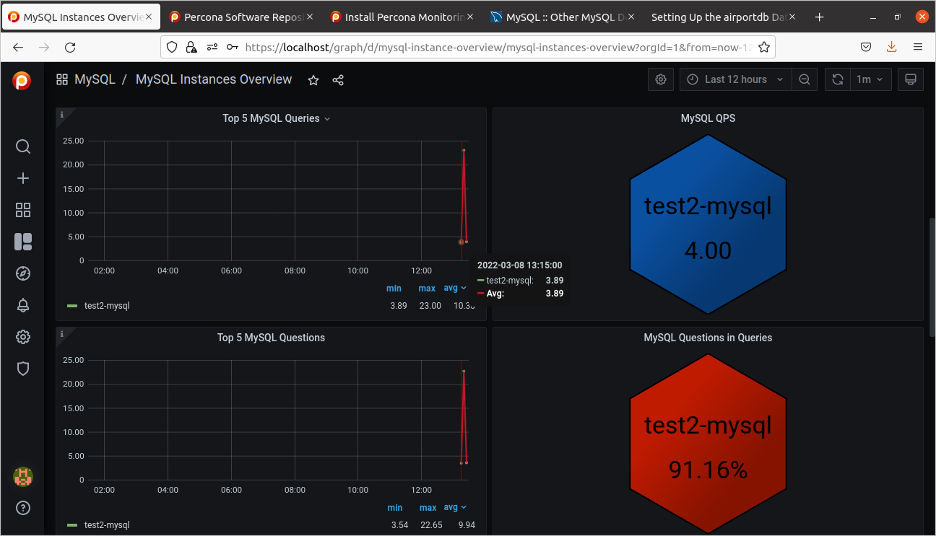
(David Stokes, CC BY-SA 4.0)
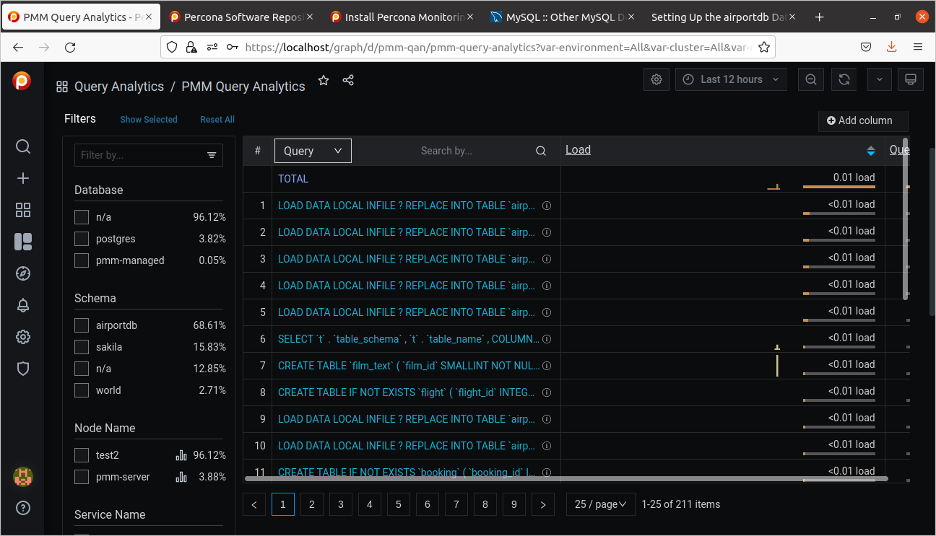
Or study individual queries.
Wrap up
Percona Monitoring and Management is an open source tool to monitor your MySQL, MongoDB, or PostgreSQL instances. It is easy to install and provides great insight into your servers.
Please let the author have any feedback or questions you have on this subject.
Cookbook
The following are the commands and responses needed to install PMM and Percona's MySQL on a fresh installation of Ubuntu 20.04 LTS.
1. Install Docker
$ sudo update-manager

$ apt-get install ca-certificates curl gnupg lsudo sb-release

$ echo "deb [arch=$(dpkg --print-architecture) signed-by=/usr/share/keyrings/docker-archive-keyring.gpg] https://download.docker.com/linux/ubuntu \
  $(lsb_release -cs) stable" | sudo tee /etc/apt/sources.list.d/docker.list > /dev/null

$ sudo apt-get update
2. Install PMM Server
$ curl -fsSL https://www.percona.com/get/pmm | sudo /bin/bash

Gathering/downloading required components, this may take a moment

Checking docker installation - installed.

Starting PMM server...
Created PMM Data Volume: pmm-data
Created PMM Server: pmm-server
    Use the following command if you ever need to update your container by hand:
    docker run -d -p 443:443 --volumes-from pmm-data --name pmm-server --restart always percona/pmm-server:2

PMM Server has been successfully setup on this system!

You can access your new server using the one of following web addresses:
    https://127.0.0.1:443/
    https://192.168.1.209:443/
    https://172.17.0.1:443/

The default username is 'admin' and the password is 'admin' :)
Note: Some browsers may not trust the default SSL certificate when you first open one of the urls above.
If this is the case, Chrome users may want to type 'thisisunsafe' to bypass the warning.

Enjoy Percona Monitoring and Management!
3. Add the Percona repo
$ wget https://repo.percona.com/apt/percona-release_latest.$(lsb_release -sc)_all.deb

$ sudo dpkg -i percona-release_latest.$(lsb_release -sc)_all.deb

$ sudo apt-get update

Get:1 https://repo.percona.com/percona/apt focal InRelease [15.8 kB]
Hit:2 https://us.archive.ubuntu.com/ubuntu focal InRelease
Hit:3 https://us.archive.ubuntu.com/ubuntu focal-updates InRelease
Hit:4 https://us.archive.ubuntu.com/ubuntu focal-backports InRelease
Hit:5 https://security.ubuntu.com/ubuntu focal-security InRelease
Get:6 https://repo.percona.com/prel/apt focal InRelease [9,779 B]
Hit:7 https://download.docker.com/linux/ubuntu focal InRelease
Get:8 https://repo.percona.com/percona/apt focal/main Sources [4,509 B]
Get:9 https://repo.percona.com/percona/apt focal/main amd64 Packages [18.1 kB]
Get:10 https://repo.percona.com/percona/apt focal/main i386 Packages [414 B]
Get:11 https://repo.percona.com/prel/apt focal/main i386 Packages [750 B]
Get:12 https://repo.percona.com/prel/apt focal/main amd64 Packages [851 B]
Fetched 50.2 kB in 2s (22.7 kB/s)
Reading package lists... Done
4. Install the agents
$ sudo apt-get install pmm2-client

Reading package lists... Done
Building dependency tree
Reading state information... Done
The following NEW packages will be installed:
  pmm2-client
0 upgraded, 1 newly installed, 0 to remove and 1 not upgraded.
Need to get 78.0 MB of archives.
After this operation, 195 MB of additional disk space will be used.
Get:1 https://repo.percona.com/percona/apt focal/main amd64 pmm2-client amd64 2.26.0-6.focal [78.0 MB]
Fetched 78.0 MB in 9s (9,078 kB/s)
Selecting previously unselected package pmm2-client.
(Reading database ... 144323 files and directories currently installed.)
Preparing to unpack .../pmm2-client_2.26.0-6.focal_amd64.deb ...
Adding system user `pmm-agent' (UID 127) ...
Adding new group `pmm-agent' (GID 134) ...
Adding new user `pmm-agent' (UID 127) with group `pmm-agent' ...
Creating home directory `/usr/local/percona' ...
Unpacking pmm2-client (2.26.0-6.focal) ...
Setting up pmm2-client (2.26.0-6.focal) ...
Created symlink /etc/systemd/system/multi-user.target.wants/pmm-agent.service → /lib/systemd/system/pmm-agent.service.

$ sudo pmm-admin config --server-insecure-tls --server-url=https://admin:admin@127.0.0.1:443

Checking local pmm-agent status...
pmm-agent is running.
Registering pmm-agent on PMM Server...
Registered.
Configuration file /usr/local/percona/pmm2/config/pmm-agent.yaml updated.
Reloading pmm-agent configuration...
Configuration reloaded.
Checking local pmm-agent status...
pmm-agent is running.
5. Install Percona MySQL
$ wget https://repo.percona.com/apt/percona-release_latest.generic_all.deb
--2022-03-08 12:57:38-- https://repo.percona.com/apt/percona-release_latest.generic_all.deb
Resolving repo.percona.com (repo.percona.com)... 149.56.23.204
Connecting to repo.percona.com (repo.percona.com)|149.56.23.204|:443... connected.
HTTP request sent, awaiting response... 200 OK
Length: 11804 (12K) [application/x-debian-package]
Saving to: ‘percona-release_latest.generic_all.deb’

percona-release_latest.generic_ 100%[======================================================>] 11.53K --.-KB/s in 0s

2022-03-08 12:57:38 (96.1 MB/s) - ‘percona-release_latest.generic_all.deb’ saved [11804/11804]


$ sudo dpkg -i percona-release_latest.generic_all.deb
(Reading database ... 144372 files and directories currently installed.)
Preparing to unpack percona-release_latest.generic_all.deb ...
Unpacking percona-release (1.0-27.generic) over (1.0-27.generic) ...
Setting up percona-release (1.0-27.generic) ...
* Enabling the Percona Original repository
<*> All done!
==> Please run "apt-get update" to apply changes
* Enabling the Percona Release repository
<*> All done!
==> Please run "apt-get update" to apply changes
The percona-release package now contains a percona-release script that can enable additional repositories for our newer products.

For example, to enable the Percona Server 8.0 repository use:

  percona-release setup ps80

Note: To avoid conflicts with older product versions, the percona-release setup command may disable our original repository for some products.

For more information, please visit:
  https://www.percona.com/doc/percona-repo-config/percona-release.html


$ sudo percona-release setup pdps-8.0
* Disabling all Percona Repositories
* Enabling the Percona Distribution for MySQL 8.0 - PS repository
Hit:1 https://security.ubuntu.com/ubuntu focal-security InRelease
Get:2 https://repo.percona.com/pdps-8.0/apt focal InRelease [9,806 B]
Hit:3 https://us.archive.ubuntu.com/ubuntu focal InRelease
Hit:4 https://repo.percona.com/prel/apt focal InRelease
Hit:5 https://us.archive.ubuntu.com/ubuntu focal-updates InRelease
Hit:6 https://download.docker.com/linux/ubuntu focal InRelease
Hit:7 https://us.archive.ubuntu.com/ubuntu focal-backports InRelease
Get:8 https://repo.percona.com/pdps-8.0/apt focal/main Sources [6,609 B]
Get:9 https://repo.percona.com/pdps-8.0/apt focal/main amd64 Packages [67.4 kB]
Fetched 83.8 kB in 1s (63.1 kB/s)
Reading package lists... Done


$ sudo apt install percona-server-server

mysql -e "CREATE FUNCTION fnv1a_64 RETURNS INTEGER SONAME 'libfnv1a_udf.so'"
    mysql -e "CREATE FUNCTION fnv_64 RETURNS INTEGER SONAME 'libfnv_udf.so'"
    mysql -e "CREATE FUNCTION murmur_hash RETURNS INTEGER SONAME 'libmurmur_udf.so'"


$ sudo apt install percona-mysl-shell

mysqlsh root@localhost
SQL MODE
CREATE USER 'pmm'@'localhost' IDENTIFIED BY 'pass' WITH MAX_USER_CONNECTIONS 10;
GRANT SELECT, PROCESS, SUPER, REPLICATION CLIENT, RELOAD, BACKUP_ADMIN ON *.* TO 'pmm'@'localhost';
6. Start the client
$ sudo pmm-admin add mysql --username=pmm --password=pass --query-source=perfschema

MySQL Service added.
Service ID : /service_id/d774faf2-fd3c-4758-9db9-3e1edb65b292
Service name: test2-mysql

Table statistics collection enabled (the limit is 1000, the actual table count is 341).


Comments are closed.