

I am teaching Python using Raspberry Pi 400 computers in a local library for the second year in a row. A couple of this year's students have not experienced success with mathematics in their school. One asked me if she needed algebra to attend our class. I told her I had failed algebra, geometry, and trigonometry in school. She was relieved. Another student rushed in the door a bit late because she was taking geometry in summer school after failing to pass the course during the school year. I shared my own story of learned helplessness and my distress at the thought of math tests. My own bad experiences impacted my high school and early college years.
I like Python, and in particular, the turtle module, because of an experience in graduate school in the early 1990s. The exercise used Apple's logo to teach students geometry, leading to an epiphany that completely changed my attitude toward mathematics. This week's class has four eighth-grade students. Two have math backgrounds, and two have math phobias. On the first day of class in the Olean Public Library, we started with a brief explanation of the RaspberryPi 400 and how to connect each of those computers to old VGA monitors that came from storage. I gave the students a brief overview and tour of the ports, peripheral mouse, and microHDMI cable we would use. We proceeded, step by step, to assemble the parts of the Raspberry Pi 400 units and connect them to the monitors. We powered up the units, and I assisted the students as they properly configured their computers for the United States and the Eastern Time Zone. We connected to the library's wireless network and were ready to begin.
I gave the students a brief overview of all the software on their computers. Then I introduced them to the Mu-Editor that comes pre-installed on their computers. We reviewed the Read-Evaluate-Print-Loop (REPL). I explained that while we could execute code in the REPL, they would find it easier to write the code in the Mu-Editor and then save their code with a .py extension to ensure that the system could execute it properly. I explained how our code needed comments and how to add and save them properly.
# first program
print("Hello World")
Then I introduced them to the turtle module. We talked about the elements of a square; that squares are made up of four equal sides and contain 90-degree angles. We wrote the following code together, saved our work, and executed it.
# First Turtle Square
import turtle
turtle.forward(200)
turtle.right(90)
turtle.forward(200)
turtle.right(90)
turtle.forward(200)
turtle.right(90)
turtle.forward(200)
turtle.right(90)
I explained how to change the code and add features like a different pen color and a different color background.
# First Turtle Square
import turtle
turtle.pencolor("blue")
turtle.bgcolor("yellow")
turtle.forward(200)
turtle.right(90)
turtle.forward(200)
turtle.right(90)
turtle.forward(200)
turtle.right(90)
turtle.forward(200)
turtle.right(90)
I introduced them to the turtle.shape to change from the default to look more like a turtle. I encouraged them to save each time and to iterate. They had fun sharing their results.
In our second session, I demonstrated how to use a for loop to draw a square and how to clean up the code by assigning the "turtle" to a specific letter. Then I ran the code.
#For Loop
import turtle as t
for x in range(4):
           t.forward(200)
           t.right(91)
One of the students who had experienced mathematics problems in the past said, "That square looks crooked."
I said, "You're right. What's wrong with it?"
She let me know that my t.right should be 90 and not 91. I corrected the error and reran the code. It looked perfect, and she was proud to have experienced some success with mathematics.
We changed our code, and I introduced them to new possibilities within the turtle module, including speed, pen color, and background color. They enjoyed it when I demonstrated how we could easily create a square spiral using the following code:
# square spiral
import turtle as t
t.speed(0)
t.bgcolor("blue")
t.pencolor("yellow")
for x in range(200):
           t.forward(x)
           t.right(91)
We changed our code again to make circle spirals. The students were leaning into the learning, and our ninety-minute class came to an end. One of the students is in summer school re-taking geometry which she failed during the school year, and each day she runs a block and a half to make it to our class, where she excels at constructing geometric shapes. She has a great eye for detail and regularly helps the other students identify errors in their code. Her watchful eye inspired me to discuss the value of open source software and the power of many eyes on the code with the group.
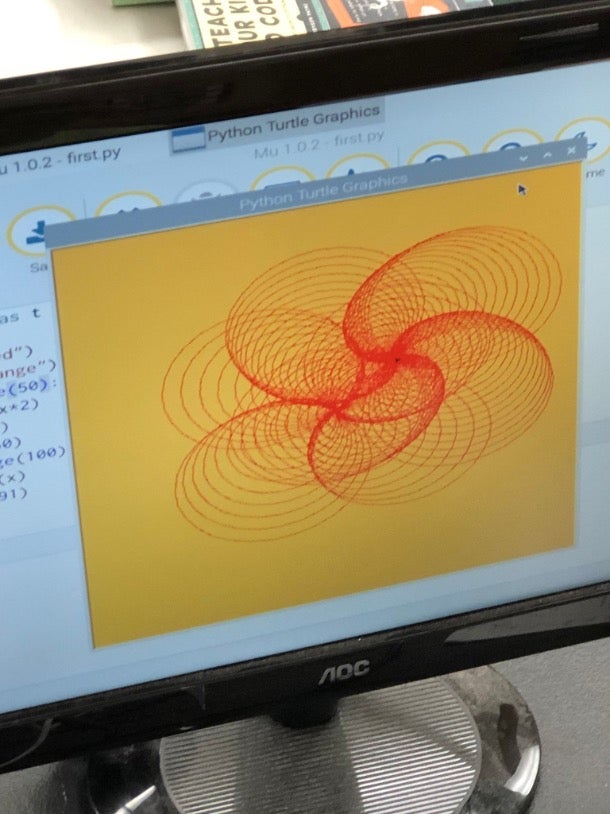
(Don Watkins, CC BY-SA 4.0)
# circle spiral
import turtle as t
t.speed(0)
t.bgcolor("blue")
t.pencolor("yellow")
for x in range(100):
           t.circle(x*2)
           t.right(91)
t.setpos(60,75)

for x in range(100):
           t.circle(x)
           t.right(91)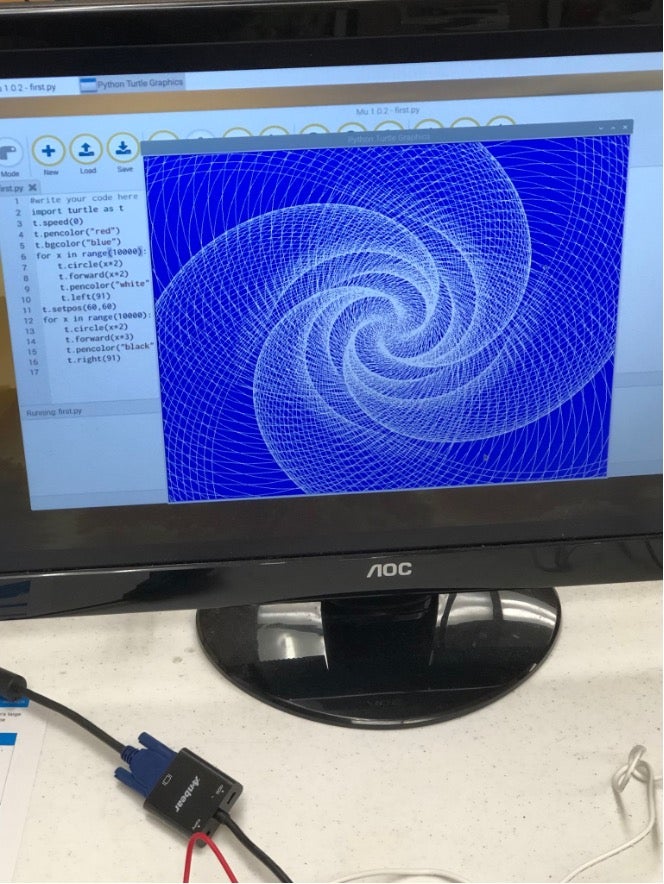
(Don Watkins, CC BY-SA 4.0)
Using Python with open source hardware and software to facilitate mathematics instruction amazes me. With a little ingenuity, it's possible to reimagine mathematics education. Each student who participated in our class will receive the Raspberry Pi 400 they worked on to take home and use. They'll have to find a display to connect to, but for a bit over one hundred dollars per unit, we are investing in their future. You can have the same effect in your community if you are willing to donate your time. Public libraries are great spaces for extracurricular activities, and some of the resources I have used as the basis for my classes come from library books. One of those books is Teach Your Kids to Code. Another is Python for Kids and A Simple Turtle Tutorial by Al Sweigart is available online. We used Raspberry PI 400 kits with VGA monitors and microHDMI to VGA adapters. You could easily adapt this instruction using refurbished Linux laptops, Windows, and/or macOS laptops.


5 Comments