

GNU/Linux has infamously been wanting for a good, solid, professional-level free video editor for years. There have been glimpses of hope here and there, but mostly the editors that have the look and feel of a professional application are prone to blockbuster-worthy crashes, and those that have been stable have mostly been stable because they don't actually do anything beyond very basic editing. Kdenlive changes all of that.
Read the other parts in this series:
Part 2: Advanced editing technique
Part 3: Effects and transitions
Part 4: Coior correction
Part 5: All about audio
Part 6: Workflow and conclusion
At the film production facility at which I work, Kdenlive is the Linux editor in production use, and it performs (and frequently out-performs) the Mac boxes in cost, upkeep, flexibility, speed, and stability. This article series seeks to illuminate for professional editors how Kdenlive can replace proprietary tools, nearly as a drop-in replacement.
A good video editor is one that is suitable for anyone wanting to edit video, with powerful features that enable the video professional to do any task required of the job, yet with the simplicity that allows a hobbyist to quickly cut together footage off of a phone or point-and-click camera. Kdenlive can be both of those things, but regardless of the scope of your video project, there are right and wrong ways of doing things. Over the course of five articles, we will review the practical usage and the common set of best practices that will ensure your projects are successful.
Installing
Kdenlive is a complex install, no question about it. It requires the MLT backend to deal with multimedia, and for maximum compatibility with all possible video codecs, it wants as many video decoding and encoding libraries that you can possibly throw at it.
The easiest fix, obviously, is to simply use the Kdenlive version provided by your repository. The watershed release for Kdenlive, in terms of stability and feature-completeness, was the 0.8 release; all major distributions currently provide 0.8 or above in their official repositories, their "official unofficial" add-on repos, or build services (like Slackbuilds, AUR, et cetera).
First launch
During the first launch, Kdenlive will perform checks to discover what video codecs and sources it has available to it. You'll be given the chance to rectify anything you may have neglected to install.
The usual advice about troubleshooting applies--last month while setting up a Fedora 15 editing workstation, there was an error with the MLT-SDL module, causing the new install of Kdenlive to not launch. A quick Internet search for the issue provided the solution, and we were up and running in no time.
You'll also be asked to create a default Kdenlive project folder. This isn't anything you'll be locked into later, and in fact it's often best to separate projects to distinct directories, but choosing a sane default ensures that you don't inadvertently dump important project files out into random folders without realizing it.
Your workspace
Kdenlive uses Qt4 for its interface, so customization is easy. It's pretty common for video editors to use a darkened theme to emphasize the video rather than distract the eye with a bright glowing interface (also, the dark theme helps during color correction). To change the theme of Kdenlive, use Settings Menu > Themes. The available themes come from the available KDE4 themes, which you'll find in your System Settings.
Since I am often editing late into the night, I use the default theme during most of the edit (I find the light from the monitor precludes me from having to turn on a desk lamp and still prevents me from blindly knocking over my coffee) but during colour correction, the bright theme is distracting. Good neutral themes for color work are Obsidian Coast or Wonton Soup. 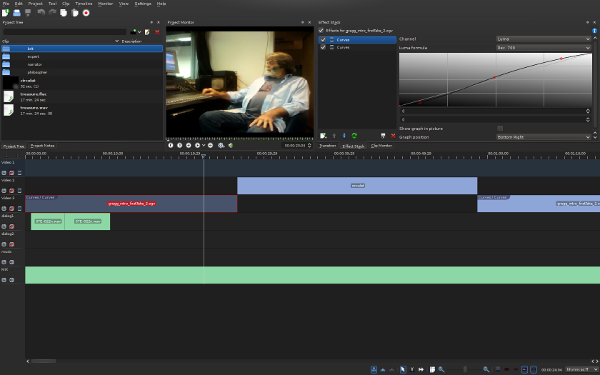
You'll probably want to use Kdenlive in full-screen mode (a near-kiosk mode is available by right-clicking on the window's title bar and selecting Fullscreen), but within its main window there are several different components. These sections can be popped out of the main window, tabbed, rearranged, and floated. All available components of Kdenlive's visual workspace can be seen via its View menu.
The layout of Kdenlive is up to you and your own work style. You may choose to emulate the default layout of whatever video editor you might be used to, or you may find a layout that works better for you. Once you've created one that you like, you can save it via View Menu > Save Layout As.
A typical layout will have at least these panels:
- The Project Tree: otherwise known as a "bin" or "clip browser" in other video editors.
- Clip Monitor: a place to preview raw footage before commiting it to the final edit.
- Project Monitor: a place to watch your edited footage.
- Timeline: the destination for all selected clips you use in your project.
We'll review what each of these panels is used for and how to use them, but first let's import some footage.
Importing footage
Before importing footage, you should save your project. This may seem strange given that your project is currently empty, but giving your workspace a name and location on your hard drive will establish the default skeletal structure for all Kdenlive projects. Kdenlive, like most professional-grade editors, generates lots of cache files and metadata. Starting your work without determining a place for all those temporary files to go simply means that you'll be dumping temp files into your default kdenlive directory and then abandoning them once you save.
Save your test project in its own subdirectory. I generally keep my Kdenlive project directories in a ~/kdenlive directory, with the default location being its own subdirectory called ~/kdenlive/default. This tends to work quite well and lends itself to being able to off-load old projects onto backup drives without worrying about whether or not that project is actually self-contained or whether I need to search through files to locate dependent media. Keeping the projects self-contained, even if it means replicating media, is quite liberating and should be used unless you are working in an infrastructure with stores of shared media that don't need to be saved along with your project data.
Creating a standard path for your projects is also helpful in the event that you need to migrate projects from one system to another. If the file paths are always ~/kdenlive/project-name, then Kdenlive losing track of media files is less likely. The path of your default Kdenlive project folder can always be changed via Project Menu > Project Settings > Project folder. 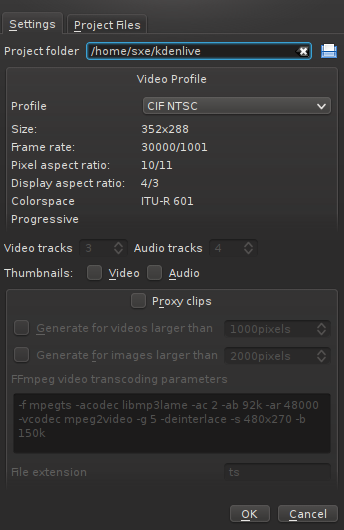
Now that you've saved your project, you can import footage. There are several ways to do this, and Kdenlive can handle them all. Since most cameras record to solid-state media now, "importing" footage often consists of little more than putting your camera into USB storage mode, plugging it into your computer, and dragging and dropping the camera's directory tree to your Kdenlive project folder. Note that carrying over the entire directory tree is essential, since many cameras use complex muxed formats that require metadata about the clips in order to actually play the clips. Do NOT just drag over the "Streams" or "Clips" folder.
Once you've copied the footage to your harddrive, you can add those clips to your Kdenlive project via Project Menu > Add Clip (or by right-clicking in the Project Tree and selecting Add Clip). You may be notified by Kdenlive that the current project setting is not the same as the footage that you've just imported. This is telling you that your project setting has defaulted to, for instance, DV NTSC but that you've just imported CIF sized clips.
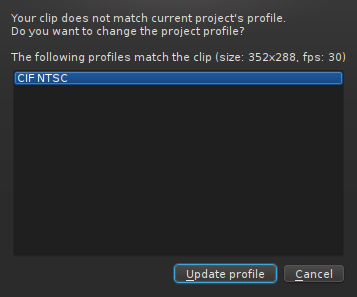
If this is the case, then you should accept Kdenlive's offer to change the project profile to match your clips. It's best to edit in a native environment and perform any transcoding only when exporting, so regardless of what you actually intend to create, you should try to edit in the format that you shot, or else transcode up-front (a topic we'll cover in more detail in Article 5 of this series). Otherwise, you'll be capturing footage from some external source, like a tape-based camera, or even, in theory, a webcam. All of these options are accessible via the View Menu > Record Monitor.
The Record Monitor is a robust video capture frontend. It currently defaults to Firewire and will warn you if dvgrab is not installed on your system, but don't panic--you can change this. Click the wrench icon to configure what backend Record Monitor attempts to use.
The configuration menu for Record Monitor should give you a choice between Firewire (dvgrab), Video4Linux (USB and, accordingly, built-in webcams on laptops), Screen Grab (via RecordMyDesktop), and even third-party capture cards. Choose the appropriate back end.
Once you've set the default capture device, return to the Record Monitor and select from the pop-up menu on the lower right the back end you'd like to use. You may need to click the "Connect" button on the left of Record Monitor in order to bring the capture device online. Finally, press the Play button to preview the external video, and Record to save it to your hard drive.
Three-point editing
The editing process was invented and refined more than 100 years ago and is still just as applicable as ever. The first of these editing principles that we have inherited from men and women dealing with hundreds of feet of celluloid film is the three-point edit.
To perform a basic edit in your footage, click on a clip in your Project Tree. It appears in the Clip Monitor for you to preview. This is akin to a film editor taking a strip of film from the film bin and running it through a Moveola (a small, hand-cranked, personal film projector).
Once you've played the clip past the introductory footage (actors getting ready for their shot, the clapboard or slate, and so on), set an "In" point for that clip by hitting the "i" key on your keyboard. Allow the clip to continue playing until you find the end of the action you want to use in the clip. Mark "Out" with the "o" key on your keyboard. You've just set the first two points in your three-point edit. 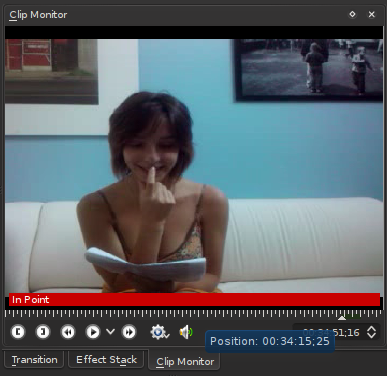
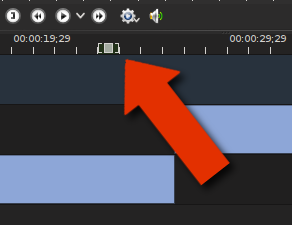
The third point is where in your timeline the clip should appear. If this is the first clip in your movie, then probably the logical place for it would be 00:00:00:00, i.e., the very beginning of your timeline. To do this quickly, press "v," which will drop the video between the In and Out points of your clip into the selected Video track of your Timeline (by default, this will be Video Track 1, but you can select a different one by clicking the track label on the left of the Timeline). On many other video editors, the video playhead in the Timeline determines where the clip is dropped. In Kdenlive, you get a dedicated target tool for this purpose, meaning that you needn't move your playhead from its parked position just to drop in a new clip. The target tool appears as a small white box in the top SMPTE ruler bar of the timeline.
You can also do a drag-and-drop add by grabbing the video thumbnail from the Clip Monitor and dragging it down to the Timeline.
The basic tools
There are three basic tools in Kdenlive: the Select Tool (s), the Razor Tool (x), and the Spacer Tool (m). This is a fairly standard, albeit basic, toolset. There is no ripple edit tool, roll edit, or any of the power-user tools that some editors might have become accustomed to on other editing systems, but I've found that adapting to the simplified toolset is almost natural. For the amount of use most of the specialized tools actually get, it's probably difficult to justify maintaining the associated code. I noticed the lack of some specialized edit tools when I first launched Kdenlive, but in practice haven't even noticed them missing.
The Select Tool is exactly what you'd expect: click to select a clip, drag to move a clip. Use the it for related tasks as well, such as selecting the active track, creating Guides and Markers, extending or shortening video clips in the timeline, control-clicking to select multiple clips at once, and so on.
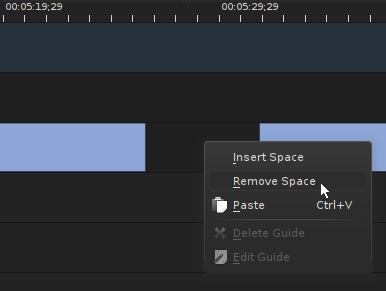
The Razor Tool creates splices in a video region in the timeline. In theory this isn't really a necessary tool, since you could always just use the Select Tool to shorten a video clip manually, but in practice, it's nice to be able to target a point at which you wish to cut out or in, make a splice, and then delete the excess footage. If you do shorten a clip with the Razor Tool and delete the excess footage that you've just sliced off, you will be left with a gap between your new out point and the beginning of the next clip in the timeline. To get rid of this empty space, you can right-click on it and select Remove Space. Note that you need to Remove Space on both the Video Track and the Audio Track if you are using separate audio.
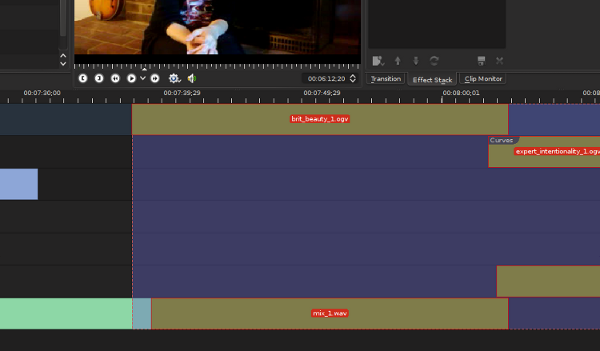
Rather than using the Remove Space function, you could manually move the video and audio regions over using the Space Tool. This tool simply selects everything to the right of where you click, i.e., it selects all video and audio regions in the future and allows you to either move them to the left or right in your timeline. It's a common task, although unforunately the Space Tool is quite rigid in how it selects. It will select and move every media region on every track. Should you ever decide that you want to select all regions on, for instance, only track one, then you'll need to either lock all other tracks, or you'll need to zoom out and just use your Select Tool to manually select the regions you want to grab.
Conclusion
Kdenlive excels at a very difficult task: importing media from a myriad different sources, organizing them into projects, and allowing them to be manipulated in any variety of ways. It's user-friendly, powerful, simple, and yet capable of so much. It is easily a drop-in replacement for industry-standard video editors, as you shall continue to discover in the forthcoming articles in this series.


25 Comments