

Last month, Jason Baker wrote a great article on photo managers. As it happens in open source, the collaboration that followed his article (in this case, in the form of comments by lots and lots of opensource.com readers) generated a whole new list of great open source photo tools. One that kept popping up was Darktable, which I use on a semi-regular basis, so I thought I'd write up a quick intro to this fine open source, cross-platform application.
Darktable is designed to be a photography workflow application, meaning that if you want it to act as the center of your photo studio, it can be exactly that; you can tether your camera to it, bypass the need for an SD card tool, shoot straight into Darktable, and then review your photos, do filter-based non-destructive edits, and publish. It's as complete a solution as you need.
I don't have the access to studio space the way I did at my previous job, so my use for Darktable now is solely as a digital darkroom.
Darktable basics
If you don't have Darktable installed, you can either grab it for Linux or MacOS from github.com/darktable-org/darktable/releases or, if you're on Linux, then you can probably find the latest version in your distribution's software repository.
When you first launch Darktable, the program may seem a little daunting. Its interface is unique, but once you get the hang of it, Darktable is actually pretty simple. There are a few different modes that Darktable can run in. Most are named aptly:
- Lighttable: an array of images, as if you were looking at your film negatives on a, well, lighttable
- Darkroom: the photo editing interface with non-destructive filters you can use to enhance a photo the same way you would in a darkroom (or, to be fair, at some later stage)
- Tethering: for studio use, permitting you to shoot straight to disk
- Map: a world map showing geo-location for the current image or images
- Slideshow: a presentation mode, much like a slideshow
Each of these modes is accessible from the labels in the upper right corner of the Darktable window, but you'll start in the Lighttable mode.
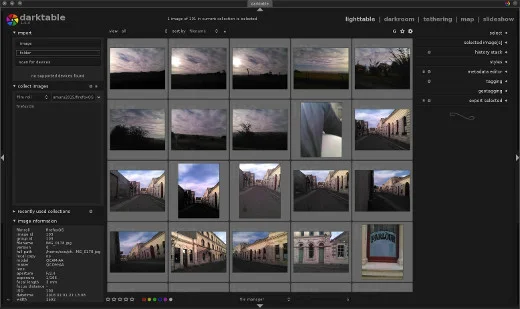
Initially, you'll not have any photographs loaded, so the first step is to import images, either on a per-file basis or by directory. To import, click one of the buttons in the import panel, located in the upper left corner of the Darktable window.
You can import RAW images, or compressed images. When you import images, a virtual "film roll" is created and each photo is tagged as being a member of that roll. This is useful if you want to view only the photos taken during one specific shoot, or over your family holiday, and so on. Two things to keep in mind about this:
- The film roll designation is only a tag. Photos are not moved from where they live on disk when you import them into Darktable, so it's safe to use tags to organize them within Darktable.
- You can tag a photo or group of photos with pretty much whatever you want. The film roll convention is a logical, film-like analogy that Darktable uses, but you can tag photos with any word or phrase that you find useful, and then filter your view of photos by tags.
Once you have imported a few photos, you'll see them on a lighttable-style layout. The lighttable itself can operate in two ways: it can just be an array of photos (file manager mode), or it can be a dynamic photo viewer with mouse-wheel zooming and middle-mouse click navigation (think Blender-style efficiency). To switch between modes, use the file manager pop-up menu at the bottom of the lighttable panel.
The lighttable is truly just a photo viewer; there's not much to it, aside from looking at all of your many choices, and possibly rating them (1 to 5 stars) based on how you (or your client) feels about them.
Most of your work will be done in the darkroom panel, so select a photo and click the darkroom label in the top right corner of the Darktable window.
Digital darkroom
In the darkroom view, there are three main areas of interest:
- The left and right panels hold filter and property palettes. These are what you'll use to apply effects to your photograph.
- The center screen displays your image.
- The bottom thumbnail bar provides quick access to your lighttable.
If you feel you need more room to work, you can hide panels and switch to full-screen, and if you find yourself doing any action repetitively, you can even assign keyboard shortcuts for quick access.
Your workflow will probably start with the panel on the right. Any filter placed on a photograph appears in the right filter stack. Available filters are available in the bottom right panel, labeled more modules.
Try adding a filter, or enable one of the default filters by making a change to some value. I usually start with the levels filter to enhance the shadows and highlights of my image. This filter is tagged as a member of the tone group, so you can find it quickly by clicking the tone group button at the top of the filter panel on the right. The group buttons each show filters that belong to their group; to see what the various classifications of filters are, roll your mouse over the buttons and read the tooltip.
![]()
In the levels palette, adjust the black, gray, and white levels of your photo. You should see the results immediately. Of course, these are all non-destructive edits, so you can change your settings at any time. You can toggle a filter on and off using the on/off icon on the left of the filter title. This is the quickest and easiest way to see a before-and-after version of what you are doing with any individual effect.
All the effects you would reasonably expect to need as a professional photography are available, and each can be added as filters to your stack. If a filter is in the stack, activate or deactivate them with the on/off icon.
Let's step through a few simple modifications on a sample photograph to demonstrate one way of working. I've already applied a level filter, so next I'll use the colour correction filter. This filter is tagged as a member of the colour group, so click on that button in the top right quadrant of the Darktable window to reveal the colour correction filter.
Changing the color balance causes the filter to become active. You can shift the white balance as well as the overall saturation.

There are "special effect"-style filters, too, such as bloom, vignetting, and grain. These are found in the right-most group, the effect group.
Filters can have presets. Darktable ships with some presets already defined, but you can add your own, too. To access presets, use the menu icon to the left of a filter's name. For instance, if I decide that I want my photo to be black-and-white, I can either click the menu icon next to the color zones filter (one of the many filters that can produce a grayscale effect) and choose black & white film, or just right-click the color zones filter title and choose from the presets that appear.

Any setting you create in a filter can be saved as a preset for later use by selecting store new preset... from the preset menu.
Version flipping
Inevitably, you're going to reach a point in your work when you have a version of the photograph that you like, but you want to keep playing with filters to see if you can make it even better. The good news is that you can have your cake and eat it, too. There are two ways to do this: one temporary, and one persistent.
Snapshotting
Taking a snapshot of a work in progress is a great way to preserve one particular set of filters while you continue to work. A snapshot does not make a literal copy of the photo; instead, preserves the set of active filters that you, at the moment of the snapshot, have applied to the base photo.
Snapshots are meant to be temporary.
To take a snapshot of your work, click the take snapshot button in the top left corner of the Darktable window.
Once you've taken a snapshot, it's listed in the snapshots panel. As you continue to work, you can always compare snapshots to your photo's current state by clicking on a snapshot. This displays a split-screen view of the snapshot and your photo.

Duplicating
A more permanent solution to have one photograph serve as the base image for several final versions is to duplicate a photo. Like a snapshot, a "duplicate" photo in Darktable is not a literal copy of the base image; Darktable just saves the filters you've applied to a photo and shows you another representation of the base image with those filters applied to it, as though it had made a copy. This results in you having two versions of the same "physical" computer file in Darktable (but not on your hard drive).
To make a duplicate of a photo, go back to the lighttable view and select the photo you want to duplicate. From the selected images panel on the right, click the duplicate button. ![dt_duplicate.jpg] You can now select one of the two images and continue editing in the darkroom.
Exporting
Eventually, you or your client will decide which photos to publish, and you'll want to export your work from Darktable. Exporting a single image or a selection of images is done from the lighttable view.
First, select the image or images you want to to export.
Reveal the export selected panel on the right and set the destination of where you want to save the files. Select the format and quality, and then click the export button. In my examples, I'm using relatively small JPEG files, so exports are quick, but if you're editing RAW, you might be able to sneak in a quick coffee break.

Customization
Darktable has a very respectable, albeit somewhat hidden, preference panel. To access it, go to thelighttableview and click the gear icon hiding up in the right corner of the lighttable panel.

Most of the Darktable defaults are reasonable, but if you're accustomed to keyboard conventions or averse to something Darktable implements (such as using the backspace key, generally used to delete, as the back button in the lighttable view), you can change almost everything about the keyboard layout.

Darktable
Darktable probably leans heavily toward the "pro photo" end of the spectrum compared to something like, say, Shotwell or Picasa, but if you're looking for a step up from those, or you're looking to improve your photo workflow, then it may be a great move for you. If you are a professional photographer, then Darktable is quite possibly everything you need from a digital darkroom app.
Try it out! Next month, we'll take a look at digiKam, and then LightZone.


5 Comments