

In my two previous articles in this series, we started using Git and learned how to clone, modify, add, and delete Git files. In this third installment, we'll explore Git branching and why and how it is used.

Picture this tree as a Git repository. It has a lot of branches, long and short, stemming from the trunk and stemming from other branches. Let's say the tree's trunk represents a master branch of our repo. I will use master in this article as an alias for "master branch"—i.e., the central or first branch of a repo. To simplify things, let's assume that the master is a tree trunk and the other branches start from it.
Why we need branches in a Git repo
The main reasons for having branches are:
- If you are creating a new feature for your project, there's a reasonable chance that adding it could break your working code. This would be very bad for active users of your project. It's better to start with a prototype, which you would want to design roughly in a different branch and see how it works, before you decide whether to add the feature to the repo's
masterfor others to use. - Another, probably more important, reason is Git was made for collaboration. If everyone starts programming on top of your repo's
masterbranch, it will cause a lot of confusion. Everyone has different knowledge and experience (in the programming language and/or the project); some people may write faulty/buggy code or simply the kind of code/feature you may not want in your project. Using branches allows you to verify contributions and select which to add to the project. (This assumes you are the only owner of the repo and want full control of what code is added to it. In real-life projects, there are multiple owners with the rights to merge code in a repo.)
Adding a branch
Let's go back to the previous article in this series and see what branching in our Demo directory looks like. If you haven't yet done so, follow the instructions in that article to clone the repo from GitHub and navigate to Demo. Run the following commands:
pwd
git branch
ls -la
The pwd command (which stands for present working directory) reports which directory you're in (so you can check that you're in Demo), git branch lists all the branches on your computer in the Demo repository, and ls -la lists all the files in the PWD. Now your terminal will look like this:

There's only one file, README.md, on the branch master. (Kindly ignore the other directories and files listed.)
Next, run the following commands:
git status
git checkout -b myBranch
git status
The first command, git status reports you are currently on branch master, and (as you can see in the terminal screenshot below) it is up to date with origin/master, which means all the files you have on your local copy of the branch master are also present on GitHub. There is no difference between the two copies. All commits are identical on both the copies as well.
The next command, git checkout -b myBranch, -b tells Git to create a new branch and name it myBranch, and checkout switches us to the newly created branch. Enter the third line, git status, to verify you are on the new branch you just created.
As you can see below, git status reports you are on branch myBranch and there is nothing to commit. This is because there is neither a new file nor any modification in existing files.

If you want to see a visual representation of branches, run the command gitk. If the computer complains bash: gitk: command not found…, then install gitk. (See documentation for your operating system for the install instructions.)
The image below reports what we've done in Demo: Your last commit was Delete file.txt and there were three commits before that. The current commit is noted with a yellow dot, previous commits with blue dots, and the three boxes between the yellow dot and Delete file.txt tell you where each branch is (i.e., what is the last commit on each branch). Since you just created myBranch, it is on the same commit as master and the remote counterpart of master, namely remotes/origin/master. (A big thanks to Peter Savage from Red Hat who made me aware of gitk.)

Now let's create a new file on our branch myBranch and let's observe terminal output. Run the following commands:
echo "Creating a newFile on myBranch" > newFile
cat newFile
git status
The first command, echo, creates a file named newFile, and cat newFile shows what is written in it. git status tells you the current status of our branch myBranch. In the terminal screenshot below, Git reports there is a file called newFile on myBranch and newFile is currently untracked. That means Git has not been told to track any changes that happen to newFile.

The next step is to add, commit, and push newFile to myBranch (go back to the last article in this series for more details).
git add newFile
git commit -m "Adding newFile to myBranch"
git push origin myBranch
In these commands, the branch in the push command is myBranch instead of master. Git is taking newFile, pushing it to your Demo repository in GitHub, and telling you it's created a new branch on GitHub that is identical to your local copy of myBranch. The terminal screenshot below details the run of commands and its output.

If you go to GitHub, you can see there are two branches to pick from in the branch drop-down.

Switch to myBranch by clicking on it, and you can see the file you added on that branch.

Now there are two different branches; one, master, has a single file, README.md, and the other, myBranch, has two files.
Now that you know how to create a branch, let's create another branch. Enter the following commands:
git checkout master
git checkout -b myBranch2
touch newFile2
git add newFile2
git commit -m "Adding newFile2 to myBranch2"
git push origin myBranch2
I won't show this terminal output as I want you to try it yourself, but you are more than welcome to check out the repository on GitHub.
Deleting a branch
Since we've added two branches, let's delete one of them (myBranch) using a two-step process.
1. Delete the local copy of your branch: Since you can't delete a branch you're on, switch to the master branch (or another one you plan to keep) by running the commands shown in the terminal image below:
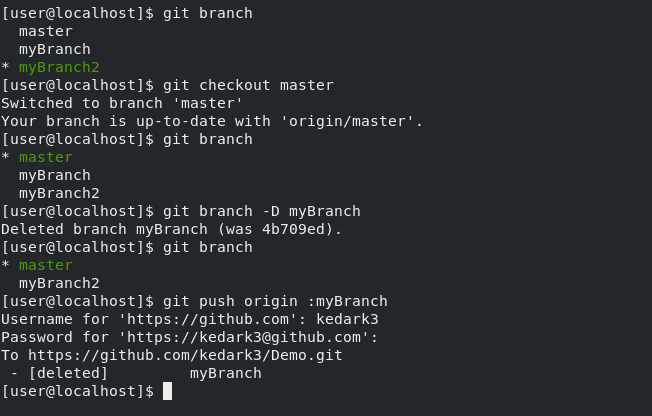
git branch lists the available branches; checkout changes to the master branch and git branch -D myBranch removes that branch. Run git branch again to verify there are now only two branches (instead of three).
2. Delete the branch from GitHub: Delete the remote copy of myBranch by running the following command:
git push origin :myBranch
The colon (:) before the branch name in the push command tells GitHub to delete the branch. Another option is:
git push -d origin myBranchas -d (or --delete) also tells GitHub to remove your branch.
Now that we've learned about using Git branches, in the next article in this series we'll look at how to fetch and rebase branch operations. These are essential things to know when you are working on a project with multiple contributors.


2 Comments