

If you have a talent you want to share with the world, whether it's making your favorite sourdough bread or speedrunning through a level of your favorite video game, live streaming is the modern show-and-tell. It's a powerful way to tell the world about your hobby through a medium once reserved for exclusive and expensive TV studios. Not only is the medium available to anyone with a relatively good internet connection, but the most popular software to make it happen is open source.
OBS (Open Broadcaster Software) is a cross-platform application that serves as a control center for your live stream. A stream, strictly speaking, means progressive and coherent data. The data in a stream can be audio, video, graphics, text, or anything else you can represent as digital data. OBS is programmed to accept data as input, combine streams together (technically referred to as mixing) into one product, and then broadcast it.
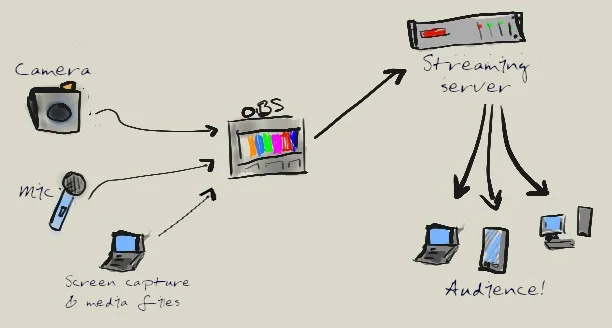
A broadcast is data that can be received by some target. If you're live streaming, your primary target is a streaming service that can host your stream, so other people can find it in a web browser or media player. A live stream is a live event, so people have to "tune in" to your stream when it's happening, or else they miss it. However, you can also target your own hard drive so you can record a presentation and then post it on the internet later for people to watch at their leisure.
Installing OBS
To install OBS on Windows or macOS, download an installer package from OBS's website.
To install OBS on Linux, either install it with your package manager (such as dnf, zypper, or apt) or install it as a Flatpak.
Join a streaming service
In order to live stream, you must have a stream broker. That is, you need a central location on the internet for your stream to be delivered, so your viewers can get to what you're broadcasting. There are a few popular streaming services online, like YouTube and Twitch. You can also set up your own video streaming server using open source software.
Regardless of which option you choose, before you begin streaming, you must have a destination for your stream. If you do use a streaming service, you must obtain a streaming key. A streaming key is a hash value (it usually looks something like 2ae2fad4e33c3a89c21) that is private and unique to you. You use this key to authenticate yourself through your streaming software. Without it, the streaming service can't know you are who you say you are and won't let you broadcast over your user account.

- In Twitch, your Primary Stream Key is available in the Channel panel of your Creator Dashboard.
- On YouTube, you must enable live streaming by verifying your account. Once you've done that, your Stream Key is in the Other Features menu option of your Channel Dashboard.
- If you're using your own server, there's no maze-like GUI to navigate. You just create your own streaming key.
Enter your streaming key
Once you have a streaming key, launch OBS and go to the File > Settings menu.
In the Settings window, click on the Stream category in the left column. Set the Service to your stream service (Custom, Twitch, YouTube, etc.), and enter your stream key. Click the OK button in the bottom right to save your changes.
Create sources
In OBS, sources represent any input signal you want to stream. By default, sources are listed at the bottom of the OBS window.

This might be a webcam, a microphone, an audio stream (such as the sound of a video game you're playing), a screen capture of your computer (a "screencast"), a slideshow you want to present, an image, and so on. Before you start streaming, you should define all the sources you plan on using for your stream. This means you have to do a little pre-production and consider what you anticipate for your show. Any camera you have set up must be defined as a source in OBS. Any extra media you plan on cutting to during your show must be defined as a source. Any sound effects or background music must be defined as a source.
Not all sources "happen" at once. By adding media to your Sources panel in OBS, you're just assembling the raw components for your stream. Once you make devices and data available to OBS, you can create your Scenes.
Setting up audio
Computers have seemingly dozens of ways to route audio. Here's the workflow to follow when setting up sound for your stream:
- Check your cables: verify that your microphone is plugged in.
- Go to your computer's sound control panel and set the input to whatever microphone you want OBS to treat as the main microphone. This might be a gaming headset or a boom mic or a desktop podcasting mic or a Bluetooth device or a fancy audio interface with XLR ports. Whatever it is, make sure your computer "hears" your main sound input.
- In OBS, create a source for your main microphone and name it something obvious (e.g., boom mic, master sound, or mic).
- Do a test. Make sure OBS "hears" your microphone by referring to the audio-level monitors at the bottom of the OBS window. If it's not responding to the input you believe you've set as input, check your cables, check your computer sound control panel, and check OBS.
I've seen more people panic over audio sources than any other issue when streaming, and we've all made the same dumb mistakes (several times each, probably!) when attempting to set a microphone for a live stream or videoconference call. Breathe deep, check your cables, check your inputs and outputs, and get comfortable with audio. It'll pay off in the end.
Create scenes
A Scene in OBS is a screen layout and consists of one or more sources.

For instance, you might create a scene called Master shot that shows you sitting at your desk in front of your computer or at the kitchen counter ready to mix ingredients together. The source could be a webcam mounted on a tripod a meter or two in front of you. Because you want to cut to a detail shot, you might create a second scene called Close-up, which uses the computer screen and audio as one input source and your microphone as another source, so you can narrate as you demonstrate what you're doing. If you're doing a baking show, you might want to mount a second webcam above the counter, so you can cut to an overhead shot of ingredients being mixed. Here, your source is a different webcam but probably the same microphone (to avoid making changes in the audio).
A scene, in other words, is a lot like a shot in traditional production vernacular, but it can be the combination of many shots. The fun thing about OBS is that you can mix and match a lot of different sources together, so when you're adding a Scene, you can resize and position different sources to achieve picture-in-picture, or split-screen, or any other effect you might want. It's common in video game "let's play" streams to have the video game in full-screen, with the player inset in the lower right or left. Or, if you're recording a panel or a multi-player game like D&D you might have several cameras covering several players in a Brady Bunch grid.
The possibilities are endless. During streaming, you can cut from one scene to another as needed. This is intended to be a dynamic system, so you can change scenes depending on what the viewer needs to see at any given moment.
Generally, you want to have some preset scenes before you start to stream. Even if you have a friend willing to do video mixing as you stream, you always want a safe scene to fall back to, so take time beforehand to set up at least a master shot that shows you doing whatever it is you're doing. If all else fails, at least you'll have your main shot you can safely and reliably cut to.
Transitions
When switching from one scene to another, OBS uses a transition. Once you have more than one scene, you can configure what kind of transition it uses in the Transitions panel. Simple transitions are usually best. By default, OBS uses a subtle crossfade, but you can experiment with others as you see fit.
Go live
To start streaming, do your vocal exercises, find your motivation, and press the Start Streaming button.

As long as you've set up your streaming service correctly, you're on the air (or on the wires, anyway).
If you're the talent (the person in front of the camera), it might be easiest to have someone control OBS during streaming. But if that's not possible, you can control it yourself as long as you've practiced a little in advance. If you're screencasting, it helps to have a two-monitor setup so you can control OBS without it being on screen.
Streaming for success
Many of us take streaming for granted now that the internet exists and can broadcast media created by anyone. It's a hugely powerful means of communication, and we're all responsible for making the most of it.
If you have something positive to say, a skill to teach, words of encouragement, or just something fun that you want to share, and you feel like you want to broadcast to the world, then take the time to learn OBS. You might not get a million viewers, but independent media is a vital part of free culture. The world can always use empowering and positive open source voices, and yours may be one of the most important of all.


2 Comments