Raspberry Pi can be used to interface with the real world from its GPIO, for example, by controlling a stepper motor. You can also use Raspberry Pi to dialog with some devices—like Arduino—by using a serial USB port.
In this guide, I'll show you how to connect your Raspberry Pi to a serial USB port and read its values with Python from the terminal (without a desktop environment). For this purpose, we'll use Pyserial and its terminal tool.
What we need
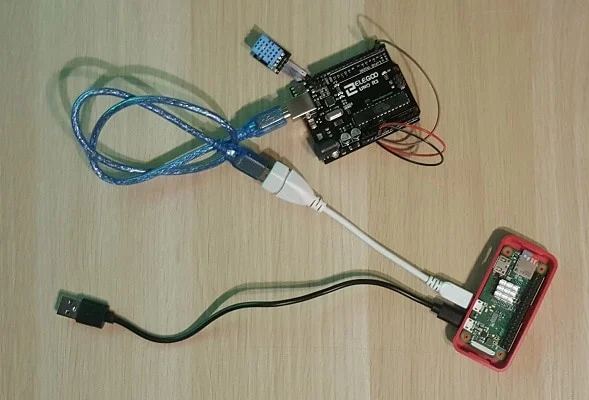
For this project, I'm going to use a Raspberry Pi Zero W and an Arduino Uno R3. Steps should also work with newer Raspberry Pi boards.
- Raspberry Pi Zero W (including proper power supply or a smartphone micro USB charger with at least a 3A) or newer board
- micro SD card (at least 16 GB, at least class 10)
- Arduino Uno R3 board or compatible board (you can also consider the Elegoo starter kit).
Step-by-step guide
We'll start by installing Raspbian Buster Lite in our Raspberry Pi Zero W. Then, we'll use Python to install proper libraries to read data from Arduino Uno R3.
Raspberry Pi environment preparation
Before you start, please refer to Install Raspbian Buster Lite in your Raspberry Pi article to install Raspberry PI OS.
Furthermore, Rasbpian Buster Lite comes with Python pre-installed.
Now we must configure Arduino Uno with its first sketch. To accomplish this, you have two options:
- Connecting Windows PC with Arduino via Arduino IDE
- Connecting Raspberry Pi to Arduino only via terminal (from Raspbian Buster Lite)
Install Pyserial
Before installing Pyserial, we need to get pip:
sudo apt install python-pipNow we can go on to install Pyserial:
python -m pip install pyserialTest installation and read console
To read our console, we need to connect the Raspberry Pi USB port to Arduino one. For testing purposes, I'll show you results from my weather system:

Arduino must be configured to send data via COM port with a Serial.print command inside its running sketch. Remember to append carriage return (text "\n") to each data sample in your Arduino sketch, in order to have different rows for each reading.
In this configuration, you can simply use the Pyserial miniterm tool to list available ports and their output. Use command python -m serial.tools.miniterm, then enter device port and receive port data on screen. Use CTRL+] to close connection:
pi@raspberrypi:~ $ python -m serial.tools.miniterm
--- Available ports:
---  1: /dev/ttyACM0         'ttyACM0'
---  2: /dev/ttyAMA0         'ttyAMA0'
--- Enter port index or full name: /dev/ttyACM0
--- Miniterm on /dev/ttyACM0  9600,8,N,1 ---
--- Quit: Ctrl+] | Menu: Ctrl+T | Help: Ctrl+T followed by Ctrl+H ---
20.0;61.0
20.0;61.0
20.0;61.0
--- exit ---
You can also go directly on the port reading, if you already know its name, just by appending the port name. In my example, the correct port is /dev/ttyACM0 (please refer Connecting Raspberry Pi to Arduino only via terminal from Raspbian Buster Lite to know how to discover your port), so direct command will be:
pi@raspberrypi:~ $ python -m serial.tools.miniterm /dev/ttyACM0
--- Miniterm on /dev/ttyACM0  9600,8,N,1 ---
--- Quit: Ctrl+] | Menu: Ctrl+T | Help: Ctrl+T followed by Ctrl+H ---
20.0;61.0
20.0;61.0
20.0;61.0
--- exit ---
Using Pyserial inside Python programs
Also, this operation is really simple. You need to import a serial library and call port opening. Create a file named "test.py":
nano test.pyand include the following code:
import serial
ser=serial.Serial(’/dev/ttyACM0’,9600)
readedText = ser.readline()
print(readedText)
ser.close()
Execute:
python test.pyEnjoy!
Article originally posted at peppe8o.com. Reposted with the permission.


5 Comments