

Apache ShardingSphere 5.0.0-Beta version with DistSQL made the project even more beloved by developers and ops teams for its advantages, such as dynamic effects, no restart, and elegant syntax close to standard SQL. With upgrades to 5.0.0 and 5.1.0, the ShardingSphere community has once again added abundant syntax to DistSQL, bringing more practical features.
In this article, the community co-authors will share the latest functions of DistSQL from the perspective of cluster governance.
ShardingSphere clusters
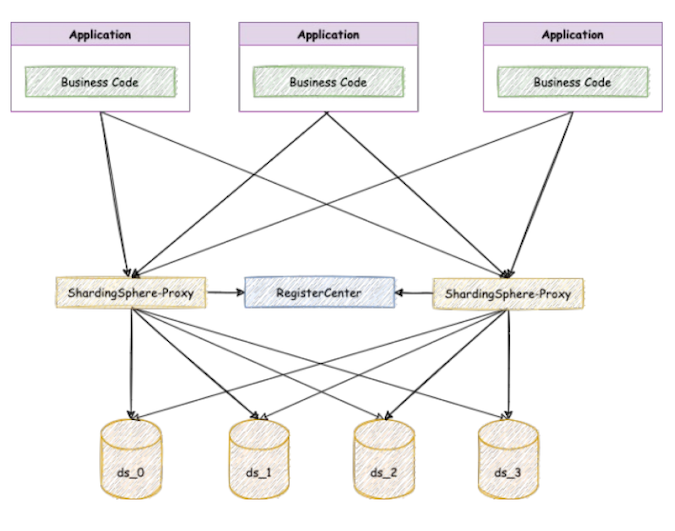
In a typical cluster composed of ShardingSphere-Proxy, there are multiple compute nodes and storage nodes, as shown in the figure below.
(Jiang Longtao and Lan Chengxiang, CC BY-SA 4.0)
To make it easier to understand, in ShardingSphere, we refer to proxy as a compute node and proxy-managed distributed database resources (such as ds_0 or ds_1) as resources or storage nodes.
Multiple proxy or compute nodes are connected to the same register center. They share configuration and rules, and they can sense each other's online status. These compute nodes also share the underlying storage nodes, so they can perform read and write operations to the storage nodes at the same time. The user application is connected to any compute node and can perform equivalent operations.
Through this cluster architecture, you can quickly scale proxy horizontally when compute resources are insufficient, reducing the risk of a single point of failure and improving system availability. The load-balancing mechanism can also be added between the application and compute node.
Compute node governance
Compute node governance is suitable for cluster mode. For more information about the ShardingSphere modes, please see Your detailed guide to Apache ShardingSphere's operating modes.
Cluster preparation
Take a standalone simulation of three proxy compute nodes as an example. To use the mode, follow the configuration below:
mode:
type: Cluster
repository:
type: ZooKeeper
props:
namespace: governance_ds
server-lists: localhost:2181
retryIntervalMilliseconds: 500
timeToLiveSeconds: 60
maxRetries: 3
operationTimeoutMilliseconds: 500
overwrite: false
Execute the bootup command separately:
sh %SHARDINGSPHERE_PROXY_HOME%/bin/start.sh 3307
sh %SHARDINGSPHERE_PROXY_HOME%/bin/start.sh 3308
sh %SHARDINGSPHERE_PROXY_HOME%/bin/start.sh 3309
After the three proxy instances are successfully started, the compute node cluster is ready.
SHOW INSTANCE LIST
Use the client to connect to any compute node, such as 3307:
mysql -h 127.0.0.1 -P 3307 -u root -pView the list of instances using SHOW INSTANCE LIST:
mysql> SHOW INSTANCE LIST;
+----------------+-----------+------+---------+
| instance_id    | host      | port | status  |
+----------------+-----------+------+---------+
| 10.7.5.35@3309 | 10.7.5.35 | 3309 | enabled |
| 10.7.5.35@3308 | 10.7.5.35 | 3308 | enabled |
| 10.7.5.35@3307 | 10.7.5.35 | 3307 | enabled |
+----------------+-----------+------+---------+
The above fields mean:
instance_id: The id of the instance, which is currently composed of host and porthost: Host addressport: Port numberstatus: The status of the instance, either enabled or disabled
DISABLE INSTANCE
Use a DISABLE INSTANCE statement to set the specified compute node to a disabled state. The statement does not terminate the process of the target instance but only virtually deactivates it.
DISABLE INSTANCE supports the following syntax forms:
DISABLE INSTANCE 10.7.5.35@3308;
#or
DISABLE INSTANCE IP=10.7.5.35, PORT=3308;
For example:
mysql> DISABLE INSTANCE 10.7.5.35@3308;
Query OK, 0 rows affected (0.02 sec)
mysql> SHOW INSTANCE LIST;
+----------------+-----------+------+----------+
| instance_id    | host      | port | status   |
+----------------+-----------+------+----------+
| 10.7.5.35@3309 | 10.7.5.35 | 3309 | enabled  |
| 10.7.5.35@3308 | 10.7.5.35 | 3308 | disabled |
| 10.7.5.35@3307 | 10.7.5.35 | 3307 | enabled  |
+----------------+-----------+------+----------+
After executing the DISABLE INSTANCE statement by querying again, you can see that the instance status of Port 3308 has been updated to disabled, indicating that the compute node has been disabled.
If there is a client connected to 10.7.5.35@3308, executing any SQL statement will prompt an exception:
1000 - Circuit break mode is ON.You are not allowed to disable the current compute node. If you send 10.7.5.35@3309 to DISABLE INSTANCE 10.7.5.35@3309, you will receive an exception prompt.
ENABLE INSTANCE
Use an ENABLE INSTANCE statement to set the specified compute node to an enabled state. ENABLE INSTANCE supports the following syntax forms:
ENABLE INSTANCE 10.7.5.35@3308;
#or
ENABLE INSTANCE IP=10.7.5.35, PORT=3308;
For example:
mysql> SHOW INSTANCE LIST;
+----------------+-----------+------+----------+
| instance_id    | host      | port | status   |
+----------------+-----------+------+----------+
| 10.7.5.35@3309 | 10.7.5.35 | 3309 | enabled  |
| 10.7.5.35@3308 | 10.7.5.35 | 3308 | disabled |
| 10.7.5.35@3307 | 10.7.5.35 | 3307 | enabled  |
+----------------+-----------+------+----------+
mysql> ENABLE INSTANCE 10.7.5.35@3308;
Query OK, 0 rows affected (0.01 sec)
mysql> SHOW INSTANCE LIST;
+----------------+-----------+------+----------+
| instance_id    | host      | port | status   |
+----------------+-----------+------+----------+
| 10.7.5.35@3309 | 10.7.5.35 | 3309 | enabled  |
| 10.7.5.35@3308 | 10.7.5.35 | 3308 | enabled  |
| 10.7.5.35@3307 | 10.7.5.35 | 3307 | enabled  |
+----------------+-----------+------+----------+
After executing the ENABLE INSTANCE statement, you can query again and view that the instance state of Port 3308 has been restored to enabled.
How to manage compute node parameters
In our article Integrating SCTL into DISTSQL's RAL: Making Apache ShardingSphere perfect for database management, we explained the evolution of ShardingSphere control language (SCTL) to resource and rule administration language (RAL) and the new SHOW VARIABLE and SET VARIABLE syntax.
However, in 5.0.0-Beta, the VARIABLE category of DistSQL RAL only contained only the following three statements:
SET VARIABLE TRANSACTION_TYPE = xx; (LOCAL, XA, BASE)
SHOW VARIABLE TRANSACTION_TYPE;
SHOW VARIABLE CACHED_CONNECTIONS;
By listening to the community's feedback, we noticed that querying and modifying the props configuration of proxy (located in server.yaml) is also a frequent operation. Therefore, we have added support for props configuration in DistSQL RAL since the 5.0.0 GA version.
SHOW VARIABLE
First, we'll review how to configure props:
props:
max-connections-size-per-query: 1

kernel-executor-size: 16  # Infinite by default.

proxy-frontend-flush-threshold: 128  # The default value is 128.

proxy-opentracing-enabled: false

proxy-hint-enabled: false

sql-show: false

check-table-metadata-enabled: false

show-process-list-enabled: false

# Proxy backend query fetch size. A larger value may increase the memory usage of ShardingSphere Proxy.

# The default value is -1, which means set the minimum value for different JDBC drivers.

proxy-backend-query-fetch-size: -1

check-duplicate-table-enabled: false

proxy-frontend-executor-size: 0 # Proxy frontend executor size. The default value is 0, which means let Netty decide.

# Available options of proxy backend executor suitable: OLAP(default), OLTP. The OLTP option may reduce time cost of writing packets to client, but it may increase the latency of SQL execution

# and block other clients if client connections are more than `proxy-frontend-executor-size`, especially executing slow SQL.

proxy-backend-executor-suitable: OLAP

proxy-frontend-max-connections: 0 # Less than or equal to 0 means no limitation.

sql-federation-enabled: false

# Available proxy backend driver type: JDBC (default), ExperimentalVertx

proxy-backend-driver-type: JDBC
Now, you can perform interactive queries by using the following syntax:
SHOW VARIABLE PROXY_PROPERTY_NAME;For example:
mysql> SHOW VARIABLE MAX_CONNECTIONS_SIZE_PER_QUERY;
+--------------------------------+
| max_connections_size_per_query |
+--------------------------------+
| 1                              |
+--------------------------------+
1 row in set (0.00 sec)
mysql> SHOW VARIABLE SQL_SHOW;
+----------+
| sql_show |
+----------+
| false    |
+----------+
1 row in set (0.00 sec)
……
Note: For DistSQL syntax, parameter keys are separated by underscores.
SHOW ALL VARIABLES
Since there are plenty of parameters in proxy, you can also query all parameter values through SHOW ALL VARIABLES:
mysql> SHOW ALL VARIABLES;
+---------------------------------------+----------------+
| variable_name                         | variable_value |
+---------------------------------------+----------------+
| sql_show                              | false          |
| sql_simple                            | false          |
| kernel_executor_size                  | 0              |
| max_connections_size_per_query        | 1              |
| check_table_metadata_enabled          | false          |
| proxy_frontend_database_protocol_type |                |
| proxy_frontend_flush_threshold        | 128            |
| proxy_opentracing_enabled             | false          |
| proxy_hint_enabled                    | false          |
| show_process_list_enabled             | false          |
| lock_wait_timeout_milliseconds        | 50000          |
| proxy_backend_query_fetch_size        | -1             |
| check_duplicate_table_enabled         | false          |
| proxy_frontend_executor_size          | 0              |
| proxy_backend_executor_suitable       | OLAP           |
| proxy_frontend_max_connections        | 0              |
| sql_federation_enabled                | false          |
| proxy_backend_driver_type             | JDBC           |
| agent_plugins_enabled                 | false          |
| cached_connections                    | 0              |
| transaction_type                      | LOCAL          |
+---------------------------------------+----------------+
21 rows in set (0.01 sec)
SET VARIABLE
Dynamic management of resources and rules is a special advantage of DistSQL. Now you can also dynamically update props parameters by using the SET VARIABLE statement. For example:
#Enable SQL log output
SET VARIABLE SQL_SHOW = true;
#Turn on hint function
SET VARIABLE PROXY_HINT_ENABLED = true;
#Open federal query
SET VARIABLE SQL_FEDERATION_ENABLED = true;
……
The SET VARIABLE statement can modify the following parameters, but the new value takes effect only after the proxy restart:
kernel_executor_sizeproxy_frontend_executor_sizeproxy_backend_driver_type
The following parameters are read-only and cannot be modified:
cached_connections
Other parameters will take effect immediately after modification.
How to manage storage nodes
In ShardingSphere, storage nodes are not directly bound to compute nodes. One storage node may play different roles in different schemas at the same time, in order to implement different business logic. Storage nodes are always associated with a schema.
For DistSQL, storage nodes are managed through RESOURCE-related statements, including:
ADD RESOURCEALTER RESOURCEDROP RESOURCESHOW SCHEMA RESOURCES
Schema preparation
RESOURCE-related statements only work on schemas, so before operating, you need to create and use the USE command to successfully select a schema:
DROP DATABASE IF EXISTS sharding_db;
CREATE DATABASE sharding_db;
USE sharding_db;
ADD RESOURCE
ADD RESOURCE supports the following syntax forms:
- Specify
HOST,PORT,DB
ADD RESOURCE resource_0 (
HOST=127.0.0.1,
PORT=3306,
DB=db0,
USER=root,
PASSWORD=root
);- Specify URL
ADD RESOURCE resource_1 (
URL="jdbc:mysql://127.0.0.1:3306/db1?serverTimezone=UTC&useSSL=false",
USER=root,
PASSWORD=root
);
The above two syntax forms support the extension parameter PROPERTIES, which is used to specify the attribute configuration of the connection pool between the proxy and the storage node.
For example:
ADD RESOURCE resource_2 (
HOST=127.0.0.1,
PORT=3306,
DB=db2,
USER=root,
PASSWORD=root,
PROPERTIES("maximumPoolSize"=10)
),resource_3 (
URL="jdbc:mysql://127.0.0.1:3306/db3?serverTimezone=UTC&useSSL=false",
USER=root,
PASSWORD=root,
PROPERTIES("maximumPoolSize"=10,"idleTimeout"="30000")
);
Specifying Java Database Connectivity (JDBC) connection parameters, such as useSSL, is supported only with URL form.
ALTER RESOURCE
Use ALTER RESOURCE to modify the connection information of storage nodes, such as changing the size of a connection pool or modifying JDBC connection parameters.
Syntactically, ALTER RESOURCE is identical to ADD RESOURCE.
ALTER RESOURCE resource_2 (
HOST=127.0.0.1,
PORT=3306,
DB=db2,
USER=root,
PROPERTIES("maximumPoolSize"=50)
),resource_3 (
URL="jdbc:mysql://127.0.0.1:3306/db3?serverTimezone=GMT&useSSL=false",
USER=root,
PASSWORD=root,
PROPERTIES("maximumPoolSize"=50,"idleTimeout"="30000")
);
Since modifying the storage node may cause metadata changes or application data exceptions, ALTER RESOURCE cannot be used to modify the target database of the connection. Only the following values can be modified:
- User name
- User password
PROPERTIESconnection pool parameters- JDBC parameters
DROP RESOURCE
Use DROP RESOURCE to delete storage nodes from a schema without deleting any data in the storage node. The statement example is as follows:
DROP RESOURCE resource_0, resource_1;To ensure data correctness, the storage node referenced by the rule cannot be deleted.
t_order is a sharding table, and its actual tables are distributed in resource_0and resource_1. When resource_0 and resource_1 are referenced by t_order sharding rules, they cannot be deleted.
SHOW SCHEMA RESOURCES
SHOW SCHEMA RESOURCES is used to query storage nodes in schemas and supports the following syntax forms:
#Query the storage node in the current schema
SHOW SCHEMA RESOURCES;
#Query the storage node in the specified schema
SHOW SCHEMA RESOURCES FROM sharding_db;
For example, add four storage nodes through the ADD RESOURCE command, and then execute a query:
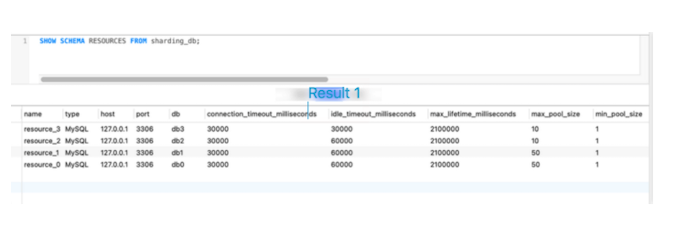
(Jiang Longtao and Lan Chengxiang, CC BY-SA 4.0)
There are many columns in the query result, but here we only show part of them.
Conclusion
In this article, we have introduced you to the ways you can dynamically manage storage nodes through DistSQL.
Unlike modifying YAML files, executing DistSQL statements happens in real time, and there is no need to restart the proxy or compute node, making online operations safer. Changes executed through DistSQL can be synchronized to other compute nodes in the cluster in real time through the register center. The client connected to any compute node can also query changes of storage nodes in real time.
If you have any questions or suggestions about Apache ShardingSphere, please open an issue on the GitHub issue list. If you are interested in contributing to the project, you're very welcome to join the Apache ShardingSphere community.
Apache ShardingSphere Project Links:
This article originally appeared on FAUN and is republished with permission.


Comments are closed.