

Python's Tkinter library isn't exactly known for its good looks. I've developed a library to help create a modern graphical user interface for Python.
I spent a lot of time searching for a simple but modern GUI toolkit before developing a new library called TKVue that creates graphical interfaces for desktop applications. Through my research, I realized that there were several different libraries to create graphical interfaces. However, most involve adding new dependencies to bind with graphical libraries. For example, there's a library for Qt, another for wxWidgets, and a third for GTK. None are native to Python or entirely coded in Python. That's a problem. If you want to code a GUI with Qt, it's necessary to compile the Qt source code on each platform you want to support. I wanted to target the three leading platforms: Linux, Windows, and Mac.
The big advantage of Tkinter is that it's embedded in Python. There's no need for new dependencies or to compile new libraries. Everything's already done for you.
In short, it is best to use Tkinter to create something portable.
Tkinter with a modern theme
Creating a GUI with Tkinter is easy, but there's no denying that by default, it looks like a GUI from the 1980s. In addition to creating graphical interfaces that aren't very pleasing to the eye, the programming methodology is also from the 1980s: Programming the Tkinter graphical interface is not declarative.
Motivated by Tkinter's portability, I was determined to use it to create a professional and modern graphical interface. My research led me to discover a whole system for modifying Tkinter's appearance using themes. Tkinter themes are similar to the CSS file of a web page. They allow you to configure the appearance of the components that make up the graphical interface by declaring new styles. The creation of these styles requires some work, but the system is flexible enough to allow the creation of a modern-looking graphical interface. This work is similar to customizing a CSS theme in web development. If you create a web page without CSS, the appearance is not modern, and a lot of work is needed to improve it. This is why CSS libraries such as bootstrap are used to speed up the creation of the graphic interface.
In the Tkinter universe, there is no CSS library. Some pre-existing themes exist, but it's preferable for any project to customize the color palette to match your product branding and give it a web look-and-feel.
To achieve that, the most important element in creating a modern interface with Tkinter is changing the background color and the buttons' appearance.
Once properly personalized to your liking, the result is a clean and visually attractive graphical interface.
Here is the "default" theme:
(Patrik Dufresne, CC BY-SA 4.0)
The "clam" theme looks like this:
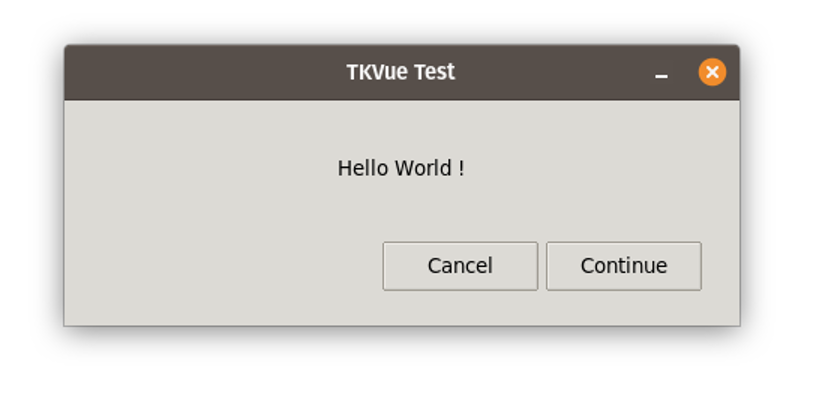
(Patrik Dufresne, CC BY-SA 4.0)
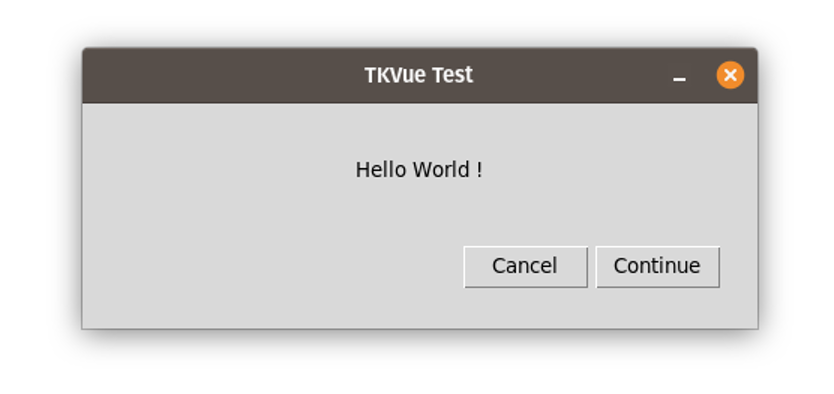
Then with my personalization:

(Patrik Dufresne, CC BY-SA 4.0)
TKVue:
import tkvue
import tkinter.ttk as ttk

tkvue.configure_tk(theme="clam")


class RootDialog(tkvue.Component):
    template = """
<TopLevel title="TKVue Test" geometry="450x200">
    <Frame style="default.TFrame" pack-fill="both" pack-expand="1" padding="10">
        <Label text="Hello World!" style="H1.TLabel" pack-padx="25" pack-pady="25"/>
        <Frame style="default.TFrame" pack-fill="both" pack-expand="1" pack-padx="10" pack-pady="10">
            <Button style="default.TButton" text="Continue" pack-side="right" pack-padx="5"/>
            <Button style="default.TButton" text="Cancel" pack-side="right"/>
        </Frame>
    </Frame>
</TopLevel>
    """

    def __init__(self, master=None):
        super().__init__(master)
        s = ttk.Style(master=self.root)
        s.configure('H1.TLabel', font=['Lato', '-60'], background='#ffffff')
        s.configure('default.TFrame', background='#ffffff')
        s.configure(
            default.TButton',
            foreground='#0E2933',
            background='#B6DDE2',
            bordercolor='#ACD1D6',
            darkcolor='#B6DDE2',
            lightcolor='#B6DDE2',
            focuscolor='#0E2933',
        )
        s.map(
            default.TButton',
            background=[('disabled', '#E9F4F6'), ('hover !disabled', '#9ABBC0'), ('pressed !disabled', '#88A5A9')],
        )


if __name__ == "__main__":
    dlg = RootDialog()
    dlg.mainloop()
Use a declarative language
After discovering the Tkinter style system, another problem to solve is using a declarative language. For a person who develops web interfaces every day, creating a GUI using Python code doesn't make sense. It requires too much code and too many variables, and poorly structured code. Creating a simple button requires many lines of code intertwined through the creation of many other components.
Modifying the GUI is tedious because it requires many variables that are all tangled up.
In comparison, creating a graphical interface using HTML tags is much more declarative and allows the creation of complex graphical interfaces while remaining structured. That's why I decided to use the Markup Language to create a graphical interface easily from the components available in Tkinter.
The initial idea was quite simple; a tag corresponds to a component. If I want to create a button component with the text Hello, I just have to make a tag named button with an attribute with the value Hello.
TKVue:
<Button text="Hello" />Python:
b = Button(parent, text ="Hello")

b.pack()
I extrapolated the concept to all the components and functionalities in the Tkinter library from this starting idea. So, to create a more complex graphical interface with different elements, just nest them inside each other by creating a parent-child structure and defining the attributes for each component.
TKVue:
<TopLevel title="TKVue Test">
   <Frame pack-fill="both" pack-expand="1" pack-padx="10" pack-pady="10">
       <Label text="Available values: " width="20" pack-side="left"/>
       <ComboBox id="label" pack-side="left" pack-expand="1" values="['zero', 'one', 'two', 'three']" />
   </Frame>
</TopLevel>
Python:
import tkinter
from tkinter.ttk import Frame, Label, Combobox

top = tkinter.Tk()
top.title = "TKVue Test

frame = tkinter.Frame(top)
frame.pack(fill='both', expand=1, padx=10, pady=10)

l = Label(frame, text="Available values: ", width=20)
l.pack(side='left')

c = Combobox(frame, values=['zero', 'one', 'two', 'three'])
c.pack(side='left', expand=1)

top.mainloop()
Result:
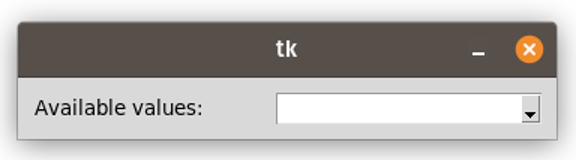
(Patrik Dufresne, CC BY-SA 4.0)
Using a hierarchical design similar to HTML simplifies the creation of the graphical interface and significantly simplifies the presentation of the parent-child structure created between each component.
Create a dynamic interface
The other problem I encountered using Tkinter was the non-dynamic side of the interface. Having coded Web GUIs with Jinja2 templates, which allow you to reuse variables and create loops easily, I wanted similar functionality when creating desktop GUIs.
I must admit that the dynamic side of TKVue gave me some problems. My initial plan was to update the GUI dynamically when a variable was changed by the code. So it should be possible to use variables in the markup language. Suppose I select a value from a drop-down list. I want to be able to associate the specified value with a variable and allow that variable to be reused in another component for display. See the code sample below:
TKVue:
import tkvue

class RootDialog(tkvue.Component):
   template = """
<TopLevel title="TKVue Test">
   <Frame pack-fill="both" pack-expand="1" pack-padx="10" pack-pady="10">
       <Label text="Available values: " width="20" pack-side="left"/>
       <ComboBox pack-side="left" pack-expand="1" values="{{myvalues}}" textvariable="{{var1}}" />
   </Frame>
   <Frame pack-fill="both" pack-expand="1" pack-padx="10" pack-pady="10">
       <Label text="{{'Available values:' + var1 }}" />
   </Frame>
</TopLevel>
   """
   data = tkvue.Context({"myvalues": ["zero", "one", "two", "three"], "var1": ""})

dlg = RootDialog()
dlg.mainloop()
Python:
import tkinter
from tkinter.ttk import Frame, Label, Combobox

top = tkinter.Tk()
top.title = "TKVue Test

frame = tkinter.Frame(top)
frame.pack(fill='both', expand=1, padx=10, pady=10)

l = Label(frame, text="Available values: ", width=20)
l.pack(side='left')

var1 = tkinter.StringVar()

c = Combobox(frame, values=['zero', 'one', 'two', 'three'], textvariable=var1)
c.pack(side='left', expand=1)

frame2 = tkinter.Frame(top)
frame2.pack(fill='both', expand=1, padx=10, pady=10)
s = Label(frame2, text='Value selected:')
s.pack(side='bottom')

var1.trace_add("write", lambda *args: s.configure(text='Value selected: ' + var1.get()))

top.mainloop()
Result:
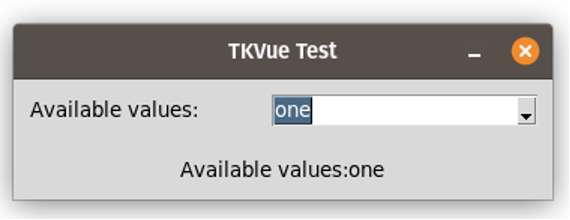
(Patrik Dufresne, CC BY-SA 4.0)
With this in place, it is possible to create a graphical interface that reacts to the user's actions in a simple and declarative way.
Use loops and conditions
To make the model as dynamic as possible, it was necessary to support the use of loops and conditions to show or hide components depending on variables. TKVue introduces two special attributes to fill this need, the for attribute for loop creation and the visible attribute.
The following example allows the user to select the number of items to be displayed in the loop from a drop-down list. The following example demonstrates the dynamic side of a loop reacting to the user's actions:
TKVue:
import tkvue


class RootDialog(tkvue.Component):
   template = """
<TopLevel geometry="970x500" title="TKVue Test">
   <Frame pack-fill="both" pack-expand="true" padding="10">
       <Label text="Selection number of row to display:" />
       <Combobox values="{{ list(range(1, 100)) }}" textvariable="{{ count }}"/>
       <Frame pack-fill="both" pack-expand="1" pack-side="left">
           <Label pack-fill="x" pack-expand="1" for="i in range(1, count)" text="{{ 'row %s' % i }}" />
       </Frame>
   </Frame>
</TopLevel>
   """
   data = tkvue.Context({'count': 5})


if __name__ == "__main__":
   dlg = RootDialog()
   dlg.mainloop()
Result:
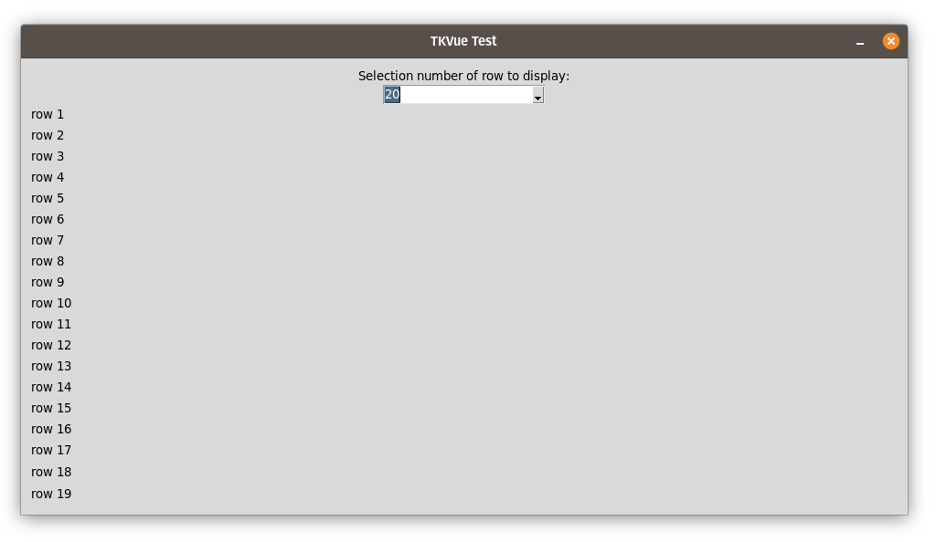
(Patrik Dufresne, CC BY-SA 4.0)
The condition declaration is even simpler. You must define an expression in the visible attribute as follows:
TkVue:
import tkvue


class RootDialog(tkvue.Component):
   template = """
<TopLevel geometry="970x500" title="TKVue Test">
   <Frame pack-fill="both" pack-expand="true" padding="10">
       <Checkbutton text="Show Text" variable="{{show}}" />
       <Label text="Text is Visible" visible="{{show}}" />
   </Frame>
</TopLevel>
   """
   data = tkvue.Context({'show': True})


if __name__ == "__main__":
   dlg = RootDialog()
   dlg.mainloop()
Result:
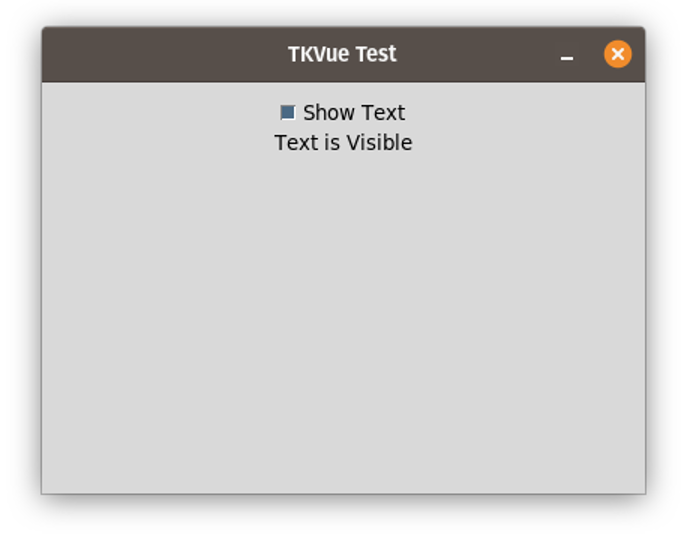
(Patrik Dufresne, CC BY-SA 4.0)
Use localization
Another important aspect of the development of my application is to allow the translation of the graphical interface quickly by using technologies that are already known and widely used in Python: gettext.
To do this, the library provides an adapter for Babel, which allows extracting the strings to be translated. You can then find these strings in a translation catalog (.po file).
Here is an example of a configuration file for Babel that allows you to extract strings for translation purposes:
Place the following in Babel.cfg:
[python: **.py]

[tkvue: **/templates/**.html]
I'm using Tkinter and my theming library for my data backup software, Minarca.
The final result is elegant and simple at the same time. The style matches the color palette of the Minarca project.
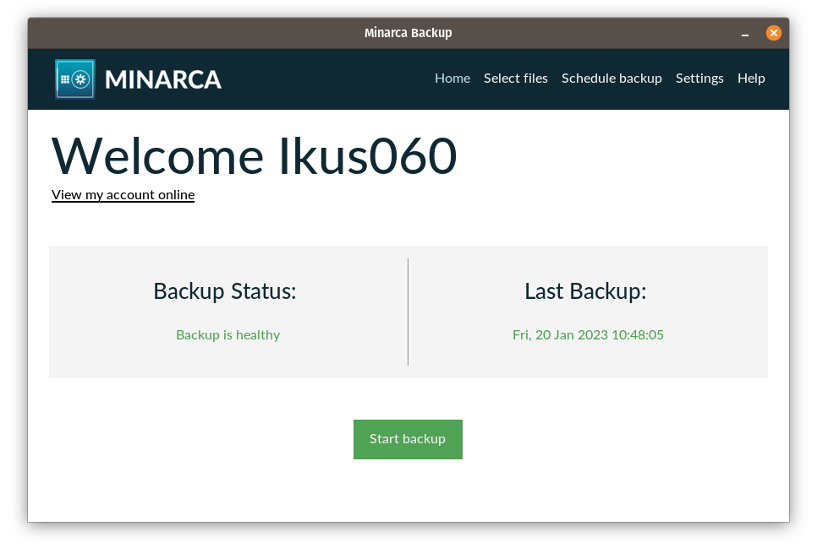
(Patrik Dufresne, CC BY-SA 4.0)
Try TKVue today
The objective of all this work is to bring familiar advantages in web development to traditional development. TKVue saves time while developing the graphical interface and makes it easier to maintain and modify the code afterward.
The work I have done so far in the library is quite rudimentary and needs further modification before being used more widely in projects. I hope that the publication of this article allows someone else to take over the development of a similar library or to continue to develop directly in TKVue to improve its functionality. TKVue's code is available on GitLab.


2 Comments