
The world of electronic music has traditionally been a fairly expensive venture, whether you're paying for expensive hardware or software. Luckily, there are plenty of free apps and open source software to enable people to get creative on the devices that they mostly have anyway. But I wanted to see how far the famously inexpensive Raspberry Pi could be pushed as a music-making machine.
Turns out, it can be quite an amazing little sequencer, as long as you know what tools to use and aren't afraid to learn a little something new.
The setup
I wanted to aim as low as possible, so I did all my work on a Raspberry Pi v1 model B. That's an ARM6 processor with 512MB RAM. I do have access to a model A+ (256MB RAM), but it only has one USB port. When I set out to make my Pi into a digital audio studio, I thought I would need one USB port for a mouse and one for a keyboard. As it turns out, I didn't end up needing a mouse, so in the end I did do a little testing on the A+. I'll mention significant differences in performance when applicable.
Regardless of which Pi model you use, you'll want to keep the overhead for the rest of the system as low as possible. If you're familiar with Fluxbox or Ratpoison, those may be the non-desktops to go with when making music. If you're not familiar with that style of interface, then go with LXDE (which is usually the default desktop on Pi distributions).
So what do we need to make music on the Pi? Electronic music traditionally consists of two components:
- Sequencer: a program that keeps track of what sound will play and when.
- Synths: a program that makes sound.
Linux offers a lot of both, so the first order of business is to look at the options out there, and try them out on the Pi.
Lightweight ALSA apps
At first, I looked at a few of the usual suspects for low-spec sound work; I loaded up a few modular components and tested them out. I found straight away that JACK on a Pi was not practical. Because many Linux sound applications expect JACK, my options were more limited than what I am used to on my Slackware workstation.
I eventually settled on the modular Seq24 MIDI sequencer to provide a "piano roll" editing interface for composition, along with AMsynth as the synth to provide sounds. I sent signals from Seq24 to ALSA's inbuilt MIDI-In to trigger AMSynth. No JACK required, and a fairly lightweight solution.
Theoretically.
After an afternoon of trying out my simple Pi audio workstation, I found that it only worked as a proof-of-concept. Once I got serious about making music on it, rather than just making loops for fun, I found that it ran very slow even with just a simple sequence, and a lot worse when I added more synths into the mix. It was fun to noodle around with, but it definitely wasn't something I'd take on the road (and by "road", I mean "studio") to perform or to an event to teach people about computer music.
A brief history of trackers
Music wasn't always made on fast multi-core computers with gigabytes of RAM. In fact, music used to be (and still is, in some circles) made on rack units that used floppy disk drives and MIDI cables. In other words, instead of trying to use lightweight versions of modern music software, the ultimate answer turns out to be a grand old tradition of electronic music: the tracker.
A proper history of trackers is out of scope for this article, so if you're interested, look up information on the original trackers like FastTracker and ProTracker. For now, suffice it to say that the concept of trackers has been around since at least the early '90s. (Arguably earlier, depending on how you view some of the earlier hardware interfaces on some drum machines and sample sequencers.)
The one I chose to use, of the three that are familiar to me (Milky, Schism, and Sound), is MilkyTracker. MilkyTracker was GPLed in 2008, and it seeks to emulate one of popular original trackers, FastTracker. It is cross-platform and extremely lightweight because it doesn't rely on synthesizers to produce sound; instead, it triggers samples. Trackers are known for making the data entry part of composing very efficient (notes are laid out in a vertical column rather than horizontally, making it very fast to enter notes as naturally as you would enter, say, data into a spreadsheet) and for producing musical quality ranging from 8-bit "chip tunes" to professional-grade electronic masterpieces (because what it plays depends on the samples you use, not on the tracker's own capabilities).
Trackers are also known for having possibly the most intimidating learning curve of any music application. But don't worry, it's not nearly as intimidating as its reputation.
MilkyTracker
To use MilkyTracker, you'll need two things:
- MilkyTracker: your repository, or go-to extras repository (like SlackBuilds, has it available.
- Samples: you can create your own samples in MilkyTracker by drawing your own waveforms, but if you want to make music that doesn't sound like Nintendo themes, then you should grab a sample library. They're all over the internet, but one of the best is freesound.org, host to hundreds of thousands Creative Commons sounds. Your samples should be in WAV format; upconvert if they are not already.
When you first launch MilkyTracker, it is sized 640x480 with eight-point text. Unless you're using your Pi on a miniature LCD screen, you should give it some wiggle room. To make your workspace larger, click the Config button in the top left cluster of controls.
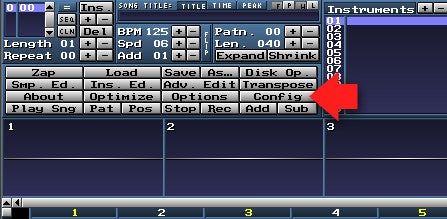
The control panel switches to the config panel; click the Layouts tab to choose the size of the MilkyTracker window and the Fonts tab to increase the font size.
Click the OK button to accept your changes and you'll be prompted to restart MilkyTracker. Close the MilkyTracker window and re-launch; your new settings have been applied. You can switch in and out of full screen mode in MilkyTracker with Alt-Enter.
Now that you can see what you are doing, let's dive straight into the tracking workflow.
Name an instrument, load a sample
Like in any music software, the first thing you need to do to compose a song is figure out what instruments you want to use. In MilkyTracker, this takes place in two panels at the top: the Instruments panel and the Samples panel. Instruments contain samples, so assuming you're starting from scratch, we will build simple instruments per track (or "channel", in Tracker terminology).
To give your new instrument a name, double-click on the empty 01 slot in the Instrument panel.
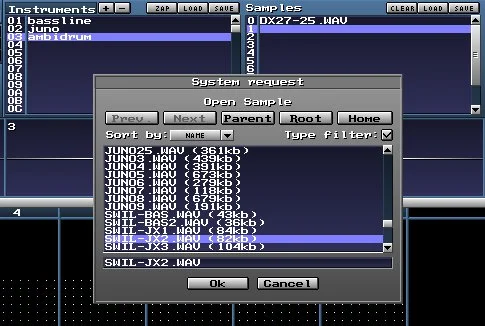
You can name your instrument anything you want; in fact, you might think of it, at least until you start designing more complex instrument banks, as nothing more than a track label.
The actual sound that gets played is determined by the Sample panel. To load a sample into the currently active Instrument, click on an empty slot in the Samples panel and click the Load button at the top. Choose a sample from the menu that appears, and click OK to load the sample into place.
A word of warning about the Pi A+ and the Pi 2 B: I made the mistake of loading a very long sample (4 minutes) into MilkyTracker on my Pi A+, thinking I would use the first couple of seconds from the sample. What happened instead was that the sample got loaded, triggered, and then looped around and triggered again and again until MilkyTracker crashed. Long samples on the Pi are not a good idea anyway, but certainly not on a Pi with only 256MB RAM. Avoid making the same mistake by editing any unusually long samples before attempting to use them in a song.
Time to play some music!
Playing notes
The most immediate way to play some music in a tracker is on your keyboard (the one you type on). As long as Instrument 01 and a valid Sample are highlighted in the Instruments and Samples panels, you should hear sound when you press any of these keys on your keyboard:
Keys Z through < cover C(4) through C(5), with the black keys mapped to the row immediately above. (So, S and D as C# and D#, and so on.)
Keys Q through I cover C(5) through C(6) with the number keys acting as appropriate black keys. These octaves are adjustable with the F1 to F8 keys.
I mention the "typing" method first because in my experience, most trackers enter notes from the keyboard. It's part of the efficiency of using a tracker. However, there's a nice virtual chromatic keyboard included in MilkyTracker that isn't just useful for playing in notes, but editing envelopes and adding effects, too. Bring up the Instrument Editor with the Ins. Ed. button in the top left control panel. (It's located just above Channel 1 column, under the Load button and above the Optimize button.)
The instrument editor provides a small virtual keyboard as well as buttons to shift the default octave of the notes you are playing.
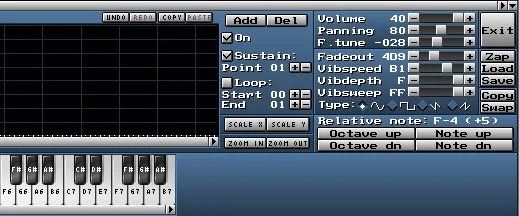
The Instrument Editor also gives you the ability to modify the sustain of your sample, add vibrato, adjust panning, and shape a note's volume and panning behavior (per keypress rather than for the instrument as a whole).
Recording
As is often the case with sequencers, there are two recording modes in MilkyTracker: live recording and step entry. Both modes are entered with the same keyboard shortcut: the Spacebar.

Live recording
For live, on-the-fly recording, press the Spacebar to arm recording, and then press the Play Sng button (located just above Channel 1 column). There's no count-in, so you may or may not want to build one in for yourself. Either way, the song will just keep looping forever until you stop, so if you miss a measure you can punch it in on the next pass.
Step entry
You don't have to try to keep up with the computer when entering notes. Once you're in record mode, you can press the Up or Down arrows to move from tick to tick and then press whatever note you want to have played there. It's very common to see a tracker at work using nothing but the Q-U and A-M keys with the left hand and the arrow keys and a few extras with the right.
MIDI data entry
If you've entered notes into your fledgling song, you've noticed that in each channel there are several internal columns, each represented by a dot (.) when empty. These columns are the MIDI data being sent along with each tick.
- The first triplet is probably obvious: it's the note and octave. For example: C-5 or E#4, and so.
- The second column represents the instrument number. In my demo song for this article, I have only three instruments defined, so 01 through 03 are valid entries (note that the 0 character gets replaced by a dot in single-digit numbers). I usually select the instrument and sample myself from the panels at the top, and that value gets inherited during note entry. However, this column gives you an option to manually override.
- The third position is the volume of the note. 00 through 40 are valid (they correspond to the hex values, in case you were wondering about the 40 maximum value).
- The final triplet holds effect values (pitch bend, vibrato, portamento, and so on). A full list of effect codes is available in the MilkyTracker Manual.
I generally enter notes first and then go back through and make adjustments to subtle things like volume and effects, but it's up to you how and when you enter the data.
Editing by hand
One of the nice things about MilkyTracker is that everything can be entirely keyboard-driven if you want it to be.
Navigating along the tracks ("channels", in tracker terminology) can be done with the up and down arrow keys (for moving from tick to tick), and left and right to move along the columns within each channel.
Tab moves from channel to channel.
As you'd expect, the Backspace key removes the note above your current line.
The Return key plays your song from the top, and Alt-Space stops playback.
There are many, many more commands but those are the essentials. A full list is available in the MilkyTracker Manual.
Saving your work
To save your work, in case you want to stop tracking and come back to it later, just click the Save or As... buttons in the top control panel.

Exporting
Last but not least, at some point you'll want to export your song so that not everyone has to know how to use a music tracker to listen to your work. MilkyTracker exports to WAV files.
To export, click the Disk Op. button in the control panel. This opens the Disk Op. panel.
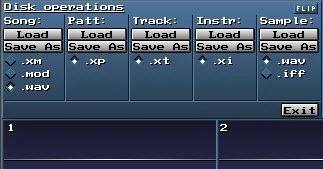
Exporting your masterpiece.
In the Song section, put a tick in the box by .wav and then click Save As.
In the dialogue box that appears, save your file to your home directory (or ~/Music, or whatever you prefer). Wait for it to export and you're done!
Tracker Pi
Raspberry Pis as low as models A+ and B support MilkyTracker without any problem. I have found music trackers to be a great tool for fast loop-building, but as long as you set up the environment with some samples and provide a quick demonstration, it can be a wonderfully creative tool for entry-level users as well. Since the Raspberry Pi isn't required to do heavy calculations (as it would for live synthesis or realtime effects), the quality of sound is subject only to the quality of the samples you use.
In short: yes, you can make amazing music on a $35 computer.


4 Comments