

For the first article of this series, I explained how to use Python to create a simple, text-based dice game. In the second part, I showed you how to build a game from scratch, starting with creating the game's environment. But every game needs a player, and every player needs a playable character, so that's what you'll do next in this third part of the series.
In Pygame, the icon or avatar that a player controls is called a sprite. If you don't have any graphics to use for a player sprite yet, download the walk-0.png, walk-2.png, walk-4.png, and walk-5.png files from the classic open source game Supertux and rename them hero1.png to hero4.png Alternately, you can create something for yourself using Krita or Inkscape, or search OpenGameArt.org for other options. Then, if you didn't already do so in the previous article, create a directory called images within your Python project directory. Put the images you want to use in your game into the images folder.
To make your game truly exciting, you ought to use an animated sprite for your hero. If you're drawing your characters yourself, this means you have to draw more assets, but it makes a big difference. The most common animation is a walk cycle, a series of drawings that make it look like your sprite is walking. The quick and dirty version of a walk cycle requires four drawings.

CC BY-SA Seth Kenlon
Note: The code samples in this article allow for both a static player sprite and an animated one.
Name your player sprite hero.png. If you're creating an animated sprite for a walk cycle, append a digit after the name, starting with hero1.png. Save you hero image into a directory called images in your Python project directory.
Create a Python class
In Python, when you create an object that you want to appear on screen, you create a class.
Near the top of your Python script, in the Objects section, add the code to create a player. If you're using a static image with no walk cycle, use this code (note that this code goes in the Objects section of your file):
'''
Objects
'''

class Player(pygame.sprite.Sprite):
    """
    Spawn a player
    """

    def __init__(self):
        pygame.sprite.Sprite.__init__(self)
        self.images = []

        img = pygame.image.load(os.path.join('images', 'hero.png')).convert()
        self.images.append(img)
        self.image = self.images[0]
        self.rect = self.image.get_rect()
This code block creates a virtual "object" for Python to use when referencing your hero sprite. In object-oriented programming, an "object" is referred to as a class. The object template (specifically, pygame.sprite.Sprite) is provided by Pygame. That's what makes it possible for you to define an image to represent the player character. If you had to program that from scratch, you'd have to learn a lot more about Python before you could start creating a game, and that's the advantage of using a framework like Pygame.
If you have a walk cycle for your playable character, save each drawing as an individual file called hero1.png to hero4.png in your project's images folder. Then use a loop to tell Python to cycle through each file. This is one of the features of object-oriented programming: each class can have tasks assigned exclusively to it, which occurs without affecting the "world" around it. In this case, your player character sprite is programmed to cycle through four different images to create the illusion of walking, and this can happen regardless of what else is happening around it.
'''
Objects
'''


class Player(pygame.sprite.Sprite):
    """
    Spawn a player
    """

    def __init__(self):
        pygame.sprite.Sprite.__init__(self)
        self.images = []
        for i in range(1, 5):
            img = pygame.image.load(os.path.join('images', 'hero' + str(i) + '.png')).convert()
            self.images.append(img)
            self.image = self.images[0]
            self.rect = self.image.get_rect()
Bring the player into the game world
Now that a Player class exists, you must use it to spawn a player sprite in your game world. If you never call on the Player class, it never runs, and there will be no player. You can test this out by running your game now. The game runs just as well as it did at the end of the previous article, with the exact same results: an empty game world.
To bring a player sprite into your world, you must "call" the Player class to generate a sprite and then add it to a Pygame sprite group. Add these lines to your Setup section:
player = Player()   # spawn player
player.rect.x = 0   # go to x
player.rect.y = 0   # go to y
player_list = pygame.sprite.Group()
player_list.add(player)
Try launching your game to see what happens. Warning: it won't do what you expect. When you launch your project, the player sprite doesn't spawn. Actually, it spawns, but only for a millisecond. How do you fix something that only happens for a millisecond? You might recall from the previous article that you need to add something to the main loop. To make the player spawn for longer than a millisecond, tell Python to draw it once per loop.
Change the drawing clause of your main loop to look like this:
    world.blit(backdrop, backdropbox)
    player_list.draw(world) # draw player
    pygame.display.flip()
    clock.tick(fps)
Launch your game now. Your player spawns!
Setting the alpha channel
Depending on how you created your player sprite, it may have a colored block around it. What you are seeing is the space that ought to be occupied by an alpha channel. It's meant to be the "color" of invisibility, but Python doesn't know to make it invisible yet. What you are seeing, then, is the space within the bounding box (or "hit box," in modern gaming terms) around the sprite.

You can tell Python what color to make invisible by setting an alpha channel and using RGB values. If you don't know the RGB values your drawing uses as alpha, open your drawing in Pinta or Inkscape and fill the empty space around your drawing with a unique color, like #00ff00 (more or less a "greenscreen green"). Take note of the color's hex value (#00ff00, for greenscreen green) and use that in your Python script as the alpha channel.
Using alpha requires the addition of two lines in your Sprite creation code. Some version of the first line is already in your code. Add the other two lines:
            img = pygame.image.load(os.path.join('images','hero' + str(i) + '.png')).convert()
            img.convert_alpha()     # optimise alpha
            img.set_colorkey(ALPHA) # set alpha
Python doesn't know what to use as alpha unless you tell it.
If you believe your image already has an alpha channel, you can try setting a variable ALPHA to 0 or 255, both of which are common places for alpha to be stored. One of those may work, but maybe due to my background in film production, I prefer to explicitly create and set my own alpha channel.
Setting your own alpha
In the Variable section of your code, add this variable definition:
ALPHA = (0, 255, 0)
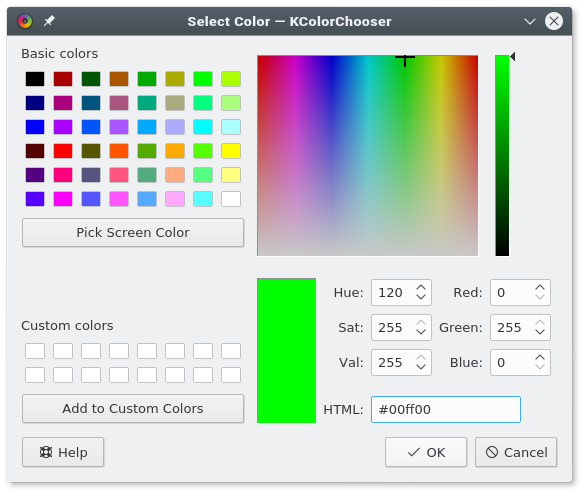
In this example code, 0,255,0 is used, which is the same value in RGB as #00ff00 is in hex. You can get all of these color values from a good graphics application like GIMP, Krita, or Inkscape. Alternately, you can also detect color values with a good system-wide color chooser, like KColorChooser or ColourPicker.
opensource.com
If your graphics application is rendering your sprite's background as some other value, adjust the values of your alpha variable as needed. No matter what you set your alpha value, it will be made "invisible." RGB values are very strict, so if you need to use 000 for alpha, but you need 000 for the black lines of your drawing, just change the lines of your drawing to 111, which is close enough to black that nobody but a computer can tell the difference.
Launch your game to see the results.

Here's the code in its entirety so far:
#!/usr/bin/env python3
# by Seth Kenlon

# GPLv3
# This program is free software: you can redistribute it and/or
# modify it under the terms of the GNU General Public License as
# published by the Free Software Foundation, either version 3 of the
# License, or (at your option) any later version.
#
# This program is distributed in the hope that it will be useful, but
# WITHOUT ANY WARRANTY; without even the implied warranty of
# MERCHANTABILITY or FITNESS FOR A PARTICULAR PURPOSE.  See the GNU
# General Public License for more details.
#
# You should have received a copy of the GNU General Public License
# along with this program.  If not, see <https://www.gnu.org/licenses/>.
from typing import Tuple

import pygame
import sys
import os

'''
Variables
'''

worldx = 960
worldy = 720
fps = 40  # frame rate
ani = 4  # animation cycles
world = pygame.display.set_mode([worldx, worldy])

BLUE = (25, 25, 200)
BLACK = (23, 23, 23)
WHITE = (254, 254, 254)
ALPHA = (0, 255, 0)

'''
Objects
'''


class Player(pygame.sprite.Sprite):
    """
    Spawn a player
    """

    def __init__(self):
        pygame.sprite.Sprite.__init__(self)
        self.images = []
        for i in range(1, 5):
            img = pygame.image.load(os.path.join('images', 'hero' + str(i) + '.png')).convert()
            img.convert_alpha()  # optimise alpha
            img.set_colorkey(ALPHA)  # set alpha
            self.images.append(img)
            self.image = self.images[0]
            self.rect = self.image.get_rect()


'''
Setup
'''

backdrop = pygame.image.load(os.path.join('images', 'stage.png'))
clock = pygame.time.Clock()
pygame.init()
backdropbox = world.get_rect()
main = True

player = Player()  # spawn player
player.rect.x = 0  # go to x
player.rect.y = 0  # go to y
player_list = pygame.sprite.Group()
player_list.add(player)


'''
Main Loop
'''

while main:
    for event in pygame.event.get():
        if event.type == pygame.QUIT:
            pygame.quit()
            try:
                sys.exit()
            finally:
                main = False

        if event.type == pygame.KEYDOWN:
            if event.key == ord('q'):
                pygame.quit()
            try:
                sys.exit()
            finally:
                main = False
    world.blit(backdrop, backdropbox)
    player_list.draw(world)
    pygame.display.flip()
    clock.tick(fps)
In the fourth part of this series, I'll show you how to make your sprite move. How exciting!


1 Comment