

I teach university courses part-time, including a class about general computing topics, open to all majors. This is an introductory course that teaches students about how technology works, to remove the mystery around computing.
While not a computer science course, one section of this course covers computer programming. I usually talk about programming in very abstract terms, so I don't lose my audience. But this year, I wanted my students to do some "hands-on" programming in an "old school" way. At the same time, I wanted to keep it simple, so everyone could follow along.
I like to structure my lessons to show how you got from "there" to "here." Ideally, I would let my students learn how to write a simple program. Then I would pick it up from there to show how modern programming allows developers to create more complex programs. I decided to try an unconventional approach — teach the students about the ultimate in low-level programming: machine language.
Machine language programming
Early personal computers like the Apple II (1977), TRS-80 (1977), and IBM PC (1981) let users enter programs with a keyboard, and displayed results on a screen. But computers didn't always come with a screen and keyboard.
The Altair 8800 and IMSAI 8080 (both made in 1975) required users to enter a program using "switches and lights" on a panel. You would enter an instruction in machine language, using a bank of switches, and the machine would light up the ones and zeros of each binary instruction using LEDs.
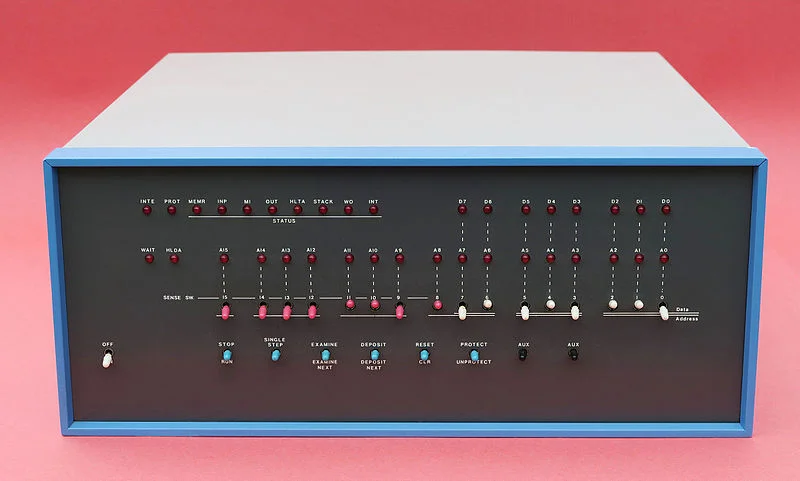
(Cromemco, CC BY-NC-SA 3.0)
Programming these early machines required knowing the machine language instructions, called opcodes, short for operation codes, to perform basic operations like adding two numbers or storing a value into the computer's memory. I wanted to show my students how programmers would enter a series of instructions and memory addresses by hand, using the switches and lights.
However, using an actual Altair 8800 would be too much overhead in this class. I needed something simple that any beginner-level student could grasp. Ideally, I hoped to find a simple "hobby" retro computer that worked similarly to the Altair 8800, but I couldn't find a suitable "Altair-like" device for less than $100. I found several "Altair" software emulators, but they faithfully reproduce the Altair 8800 opcodes, and that was too much for my needs.
I decided to write my own "educational" retro computer. I call it the Toy CPU. You can find it on my GitHub repository, including several releases to play with. Version 1 was an experimental prototype that ran on FreeDOS. Version 2 was an updated prototype that ran on Linux with ncurses. Version 3 is a FreeDOS program that runs in graphics mode.
Programming the Toy CPU
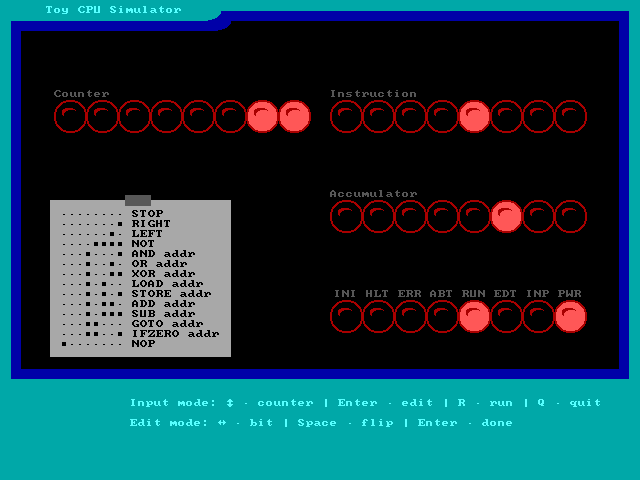
The Toy CPU is a very simple retro computer. Sporting only 256 bytes of memory and a minimal instruction set, the Toy CPU aims for simplicity while replicating the "switches and lights" programming model. The interface mimics the Altair 8800, with a series of eight LEDs for the counter (the "line number" for the program), instruction, accumulator (internal memory used for temporary data), and status.
When you start the Toy CPU, it simulates "booting" by clearing the memory. While the Toy CPU is starting up, it also displays INI ("initialize") in the status lights at the bottom-right of the screen. The PWR ("power") light indicates the Toy CPU has been turned on.
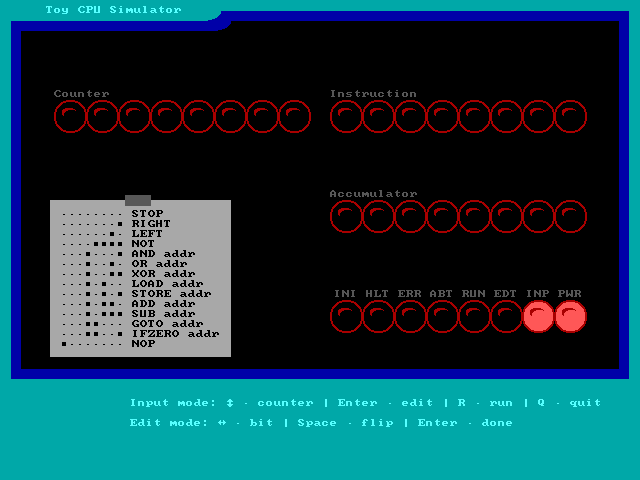
(Jim Hall, CC BY-SA 4.0)
When the Toy CPU is ready for you to enter a program, it indicates INP ("input" mode) via the status lights, and starts you at counter 0 in the program. Programs for the Toy CPU always start at counter 0.
In "input" mode, use the up and down arrow keys to show the different program counters, and press Enter to edit the instruction at the current counter. When you enter "edit" mode, the Toy CPU shows EDT ("edit" mode) on the status lights.
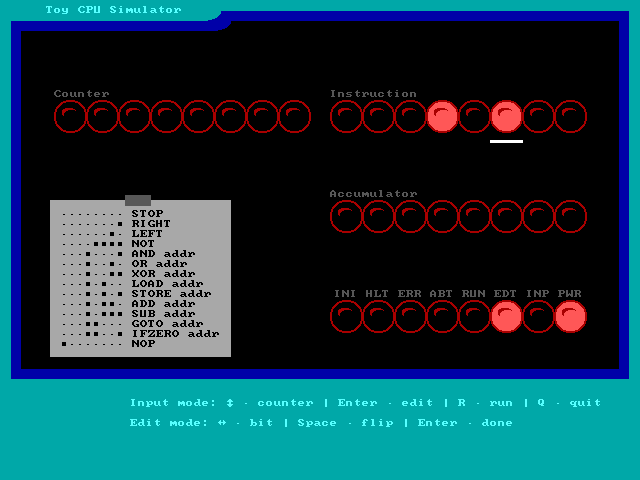
(Jim Hall, CC BY-SA 4.0)
The Toy CPU has a cheat sheet that's "taped" to the front of the display. This lists the different opcodes the Toy CPU can process:
-
00000000(STOP): Stop program execution. -
00000001(RIGHT): Shift the bits in the accumulator to the right by one position. The value 00000010 becomes 00000001, and 00000001 becomes 00000000. -
00000010(LEFT): Shift the bits in the accumulator to the left by one position. The value 01000000 becomes 10000000, and 10000000 becomes 00000000. -
00001111(NOT): Binary NOT the accumulator. For example, the value 10001000 becomes 01110111. -
00010001(AND): Binary AND the accumulator with the value stored at an address. The address is stored in the next counter. -
00010010(OR): Binary OR the accumulator with the value stored at an address. -
00010011(XOR): Binary XOR (“exclusive or”) the accumulator with the value stored at an address. -
00010100(LOAD): Load (copy) the value from an address into the accumulator. -
00010101(STORE): Store (copy) the value in the accumulator into an address. -
00010110(ADD): Add the value stored at an address to the accumulator. -
00010111(SUB): Subtract the value stored at an address from the accumulator. -
00011000(GOTO): Go to (jump to) a counter address. -
00011001(IFZERO): If the accumulator is zero, go to (jump to) a counter address. -
10000000(NOP): No operation; safely ignored.
When in "edit" mode, use the left and right arrow keys to select a bit in the opcode, and press Space to flip the value between off (0) and on (1). When you are done editing, press Enterto go back to "input" mode.
(Jim Hall, CC BY-SA 4.0)
A sample program
I want to explore the Toy CPU by entering a short program that adds two values, and stores the result in the Toy's memory. Effectively, this performs the arithmetic operation A+B=C. To create this program, you only need a few opcodes:
-
00010100(LOAD): Load (copy) the value from an address into the accumulator. -
00010110(ADD): Add the value stored at an address to the accumulator. -
00010101(STORE): Store (copy) the value in the accumulator into an address. -
00000000(STOP): Stop program execution.
The LOAD, ADD, and STORE instructions require a memory address, which will always be in the next counter location. For example, the first two instructions of the program are:
counter 0: 00010100
counter 1: some memory address where the first value A is stored
The instruction in counter 0 is the LOAD operation, and the value in counter 1 is the memory address where you have stored some value. The two instructions together copy a value from memory into the Toy's accumulator, where you can work on the value.
Having loaded a number A into the accumulator, you need to add the value B to it. You can do that with these two instructions:
counter 2: 00010110
counter 3: a memory address where the second value B is stored
Say that you loaded the value 1 (A) into the accumulator, then added the value 3 (B) to it. The accumulator will now have the value 4. Now you need to copy the value 4 into another memory address (C) with these two instructions:
counter 4: 00010101
counter 5: a memory address (C) where we can save the new value
Having added the two values together, you can now end the program with this instruction:
counter 6: 00000000Any instructions after counter 6 are available for the program to use as stored memory. That means you can use the memory at counter 7 for the value A, the memory in counter 8 for the value B, and the memory at counter 9 for the stored value C. You need to enter these separately into the Toy:
counter 7: 00000001 (1)
counter 8: 00000011 (3)
counter 9: 00000000 (0, will be overwritten later)
Having figured out all the instructions and the memory locations for A, B, and C, you can now enter the full program into the Toy. This program adds the values 1 and 3 to get 4:
counter 0: 00010100
counter 1: 00000111 (7)
counter 2: 00010110
counter 3: 00001000 (8)
counter 4: 00010101
counter 5: 00001001 (9)
counter 6: 00000000
counter 7: 00000001 (1)
counter 8: 00000011 (3)
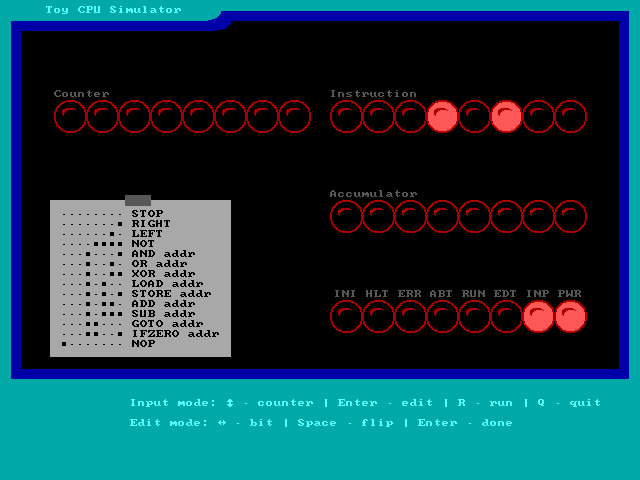
counter 9: 00000000 (0, will be overwritten later)To run the program, press the R key when in "input" mode. The Toy CPU will show RUN ("run" mode) in the status lights, and execute your program starting at counter 0.
The Toy has a significant delay built into it, so you can watch the Toy execute each step in the program. You should see the counter move from 00000000 (0) to 00000110 (6) as the program progresses. After counter 1, the program loads the value 1 from memory location 7, and the accumulator updates to 00000001 (1). After counter 3, the program will add the value 3 and update the accumulator to show 00000100 (4). The accumulator will remain that way until the program stores the value into memory location 9 after counter 5 then ends at counter 6.
(Jim Hall, CC BY-SA 4.0)
Exploring machine language programming
You can use the Toy to create other programs and further explore machine language programming. Test your creativity by writing these programs in machine language.
A program to flash the lights on the accumulator
Can you light up the right four bits on the accumulator, then the left four bits, then all of the bits? You can write this program in one of two ways:
A straightforward approach would be to load three values from different memory addresses, like this:
counter 0: LOAD
counter 1: "right"
counter 2: LOAD
counter 3: "left"
counter 4: LOAD
counter 5: "all"
counter 6: STOP
counter 7: 00001111 ("right")
counter 8: 11110000 ("left")
counter 9: 11111111 ("all")
Another way to write this program is to experiment with the NOT and OR binary operations. This results in a smaller program:
counter 0: LOAD
counter 1: "right"
counter 2: NOT
counter 3: OR
counter 4: "right"
counter 5: STOP
counter 6: 00001111 ("right")
Count down from a number
You can use the Toy as a countdown timer. This program exercises the IFZERO test, which will jump the program to a new counter only if the accumulator is zero:
counter 0: LOAD
counter 1: "initial value"
counter 2: IFZERO (this is also the "start" of the countdown)
counter 3: "end"
counter 4: SUB
counter 5: "one"
counter 6: GOTO
counter 7: "start"
counter 8: STOP
counter 9: 00000111 ("initial value")
counter 10: 00000001 ("one")
The Toy CPU is a great way to learn about machine language. I used the Toy CPU in my introductory course, and the students said they found it difficult to write the first program, but writing the next one was much easier. The students also commented that writing programs in this way was actually fun, and they learned a lot about how computers actually work. The Toy CPU is educational and fun!


1 Comment