

While a good portion of my focus on Opensource.com is on OpenStack and related cloud technologies, my most recent background prior to joining the team here was in doing web design and development work for small businesses, nonprofits, and others who needed sites created for them quickly and easily. So while I'm a Drupal fan for a lot of things I do, the ease and simplicity of WordPress led me to use it for a number of projects.
Like a lot of WordPress users, I was excited to hear that WordPress 4.0 was released yesterday. Inspired by my colleague Jen, who has been writing about her experience learning Linux, I thought I'd share my experience with you for getting WordPress 4.0 up and running on an OpenStack instance, specifically using the freely available TryStack site to test it out. So what follows is less of a tutorial than a documentation of what it took to set up an environment in which to play with two pieces of software I'm interested in together. It's not a substitute for some of the excellent documentation out there. And if you want a full review of WordPress 4.0, there are plenty of good sources out there.
We've written about TryStack before, but if you haven't checked it out, now's a good time to start. You'll need a Facebook account, and to join the TryStack Facebook group to get access. If you've not used TryStack or OpenStack before, there is a great short, little video that will walk you through the basic steps. The Havana-based video is a little bit dated now, since TryStack is now running the Icehouse version of OpenStack. So the interface and the options you're presented with might look slightly different, but there haven't been any significant changes to be the basic steps.
Check the video out for an overview. Then, you can then follow the steps I took below.
We're going to use Horizon, the web-based OpenStack dashboard, to complete most of these steps. You can accomplish the same thing using the command line version of the OpenStack clients if you want, but for a beginner the GUI is probably an easier way to start. We will need to delve into the command line to get WordPress up and running on our instances but really not much deeper than we'd have to on any shared hosting environment.
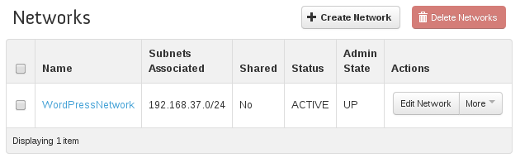
Let's start out by creating a private network to attach our instances to. Using the lefthand navigation bar, click "Networks" under the network section, and then the button up at the top right for "Create Network." We'll call our network "WordPressNetwork" but it doesn't really matter what you name it in this test configuration. Click Next, and under Subnet, you'll need to define a subnet for the network to use. I'm not a networking guru, so I just went with the default settings presented in Dan's video of 192.168.37.0/24 for the Network Address. All of the other fields can be left in their default settings. Click "Next" again. Here you'll want to be sure to add a DNS server so that your instances can resolve domain names. The first time I ever tried setting up a network I accidentally skipped this step and stumbled around for a while trying to figure out why I could ping an IP address but (seemingly) not do anything else requiring an outside Internet connection. You can use Google's 8.8.8.8 server in the DNS Name Servers box, and then "Create" to create your internal network. Your Networks should then look something like the following.
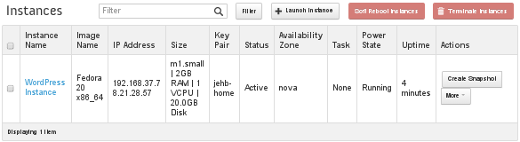
Next, let's launch a virtual machine instance on which to run our initial WordPress install. Under the Compute tab in the left hand navigation, click "Instances." I'll be using Fedora 20 because it's what I'm most familiar with, but if you're more comfortable with a different distribution, feel free to try something else here. In addition to Fedora 20, TryStack has images for CentOS 6.5 and 7, as well as Ubuntu 13.10. I'm going to call our instance name, uncreatively, "WordPress Instance." From the "Boot Source" drop down, select "boot from image" and then pick your distribution of choice.
The other default settings on the first screen are fine. We're going to run an m1.small flavor, which should be fine for testing out WordPress. Flavors define the computing resources available to the virtual machine. In this case, an m1.small means we're giving our machine 1 virtual CPU, 20 GB of root disk space, and two gigabytes of memory.
On the next tab, "Access & Security," you'll want to select a keypair, so that when your instance launches, you'll be able to connect to it in some way. I already had a keypair saved on TryStack, but if you're experimenting for the first time, click the plus button to add a keypair. You'll want to run something like this from a terminal on your local machine (assuming you're using Linux or something similar).
$ ssh-keygen -t rsa -f cloud.key
$ tail cloud.key.pub
Paste the key in and continue; the default security group is fine. We'll talk more about security groups in a minute. Under the Networking tab, your WordPressNetwork should already be selected, but if not, drag it up from "Available Networks," and then you're all set to punch "Launch." Congratulations, you've launched a virtual machine! It will take a moment to boot before it is ready, and the Instances screen should update to reflect this.
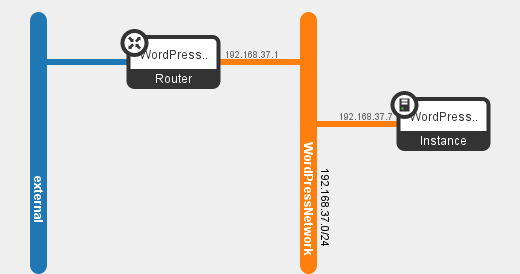
Unfortunately, this instance can't talk to the outside world yet. It could talk to the computers on the WordPress Network if we launched other instances, but in order for it to talk to the rest of the Internet, we need to create a router. Under the Network navigation, click Routers, and then click Create Router. Let's name our Router "WordPress Router" (I am clearly feeling very creative today). Once the router is created, let's give it a gateway to talk through by clicking "Set Gateway" and then selecting the external network.
Now that we've connected the external network to the router, let's connect the internal network we created, too. Click on the router we have just created, and then click "Add Interface" and then select the WordPressNetwork which we created earlier. Thanks to your newly created router, your instance should now be able to talk to the outside world. Well, almost. You can take a look at your network by using the "Network Topology" option under "Networks" in the navigation menu.
All we've got left to do is to enable some permissions under the "Access & Security" tab. Under security groups, we'll just use the default security group for now. Click "Manage Rules" and we're going to then "Add Rule." Let's make a custom TCP rule, allowing ingress on port 80. This will allow external computers to request documents from our web server.
Our final step in the OpenStack Horizon interface is to give the virtual machine instance an external IP address so we can connect to it remotely. Click back to your instances tab, and under the "More" drop down menu, add an external IP address. Good work, now let's connect to that instance and install Wordpress to test it out. Still have that terminal window open from creating your SSH key above? If note, open a terminal, and then enter the following to connect, but be sure to replace x.x.x.x with your server's actual external IP address.
$ ssh -i cloud.key x.x.x.x
All right, now let's set up a basic web server environment with PHP, Apache HTTP Server, and MySQL. Well, MariaDB actually, but since I used MySQL for years, and the commands still work with that name, we'll still call it MySQL here.
$ sudo yum install httpd mysql-server php php-mysql
Once you've got the necessary software installed, launch the Apache web server
$ sudo systemctl start httpd.service
Now might be a good time to make sure everything's still working. Let's navigate to the IP address of our server in a web browser. If you see something like the screen below, everything's on the right path.

It's also time to start up MySQL and create a database.
$ sudo systemctl start mysqld.service
$ mysql -u root
Within MySQL, run the following. You might also refer to the WordPress documentation on MySQL, which is quite straightforward.
> CREATE DATABASE wordpress;
> GRANT ALL PRIVILEGES ON wordpress.* TO "wordpressuser" IDENTIFIED BY "password";
> FLUSH PRIVILEGES;
> EXIT
Now all we've got to do is download the WordPress 4.0 final package, but you might want to change over into your www directory first.
$ cd /var/www/html
$ sudo curl -O https://wordpress.org/latest.tar.gz
Then, uncompress it, and then let's make a copy of the configuration file and edit it with your favorite text editor. I'll use vi.
$ sudo tar -xzvf latest.tar.gz
$ cd wordpress
$ sudo cp wp-config-sample.php wp-config.php
$ sudo vi wp-config.php
You'll just need to edit your database name, username, and password to reflect what you chose above; these should be the first three variables in the config file. That's it on the command line side. In retrospect, if you'd like to avoid using sudo quite so much, feel free to use sudo -i at the beginning instead.
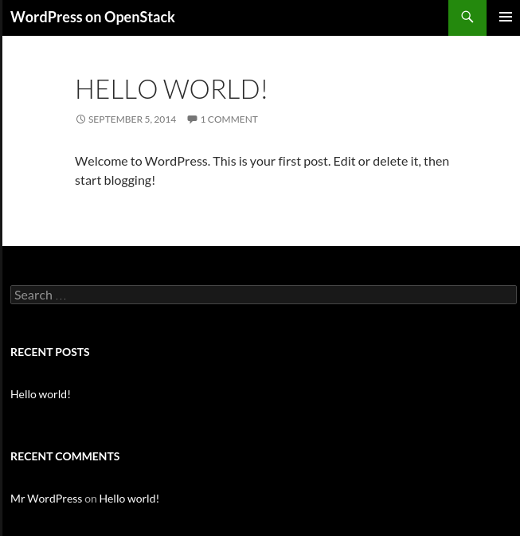
Now you should be all set to go! Fire up a new browser tab, navigate to the your server's ip/wordpress, and check it out. Working WordPress 4.0! You'll need to fill in a few simple form fields to get it going, but nothing difficult from here on out. Now feel free to play around to your heart's content.
So what's next for me, OpenStack, and WordPress? I posted in our monthly OpenStack tutorial roundup on Wednesday about a tutorial I found describing how to use Heat to deploy an auto-scaling WordPress installation, and I'm looking forward to trying that out. Or possibly, I'll try a manually configured version from the official documentation with WordPress's database, HTTP server, and Memcache split across three instances. At the very least, mounting a persistent volume so that our data stays preserved if the instance running WordPress is terminated.


1 Comment