It can be hard to find meaningful gifts for relatives that already have almost everything. My wife and I have given our parents "experiences" to try something novel, such as going to a themed restaurant or seeing a concert, but as our parents get older, it becomes more difficult. This year was no exception—until I thought about a way open source could give them something really special.
What if when they request help from an artificial intelligence (AI) voice assistant such as Mycroft, my in-laws could get a special greeting? I looked at the existing voice assistant APIs to see if something like this was already available. There was something close, but not exactly what I was looking for. My idea was to record their great-grandchildren speaking a short greeting that would play whenever they push the button and before the conversation with the voice assistant begins. The greeting would be something like:
"Good morning, Nana and Poppy. Today is December 25th. The time is 3:10 pm. The current temperature for Waynesboro is 47 degrees. The current temperature for Ocean City is 50 degrees."
When they press the button, my in-laws would hear their great-grandchildren reporting the date, time, and temperature for their home and their favorite vacation spot. To make this a reality, I had to solve a few problems.
So many audio files…
The first problem was figuring out what phrases the voice assistant would need to say. Thinking about all the dates, times, and temperatures that I would need to cover, I arrived at a list of 79 phrases. I sent these instructions to my nieces:
Please record the kids saying each line below. Sorry there are so many. It's okay to do this in one setting with prompting them if it makes it easier. I can edit the audio files and deal with most formats, so none of that should be a problem. Just record using your phone in whatever way is easiest.
Make sure that the kids say each line clearly and loudly. There should be a slight pause between each line to make editing easier (prompting helps like "Repeat after me …"). That will make it easier for me to chop these up into individual sound files.
Whenever the button on the device is pushed, it will respond with a random grandchild saying the correct date/time/temperature, like:
"Good afternoon, Nana and Poppy. Today is January third. The time is one oh four pm. The current temperature for Waynesboro is thirty degrees. The current temperature for Ocean City is thirty four degrees."
PLEASE RECORD EACH CHILD SAYING THE FOLLOWING PHRASES WITH A SHORT PAUSE BETWEEN EACH ONE:
Then I provided the following list of words for the children to record:
| Good morning afternoon evening night Nana and Poppy The time am January |
June July August September October November December first second third fourth fifth sixth seventh eighth ninth tenth eleventh twelfth thirteenth fourteenth fifteenth sixteenth seventeenth eighteenth nineteenth twentieth thirtieth oh |
one two three four five six seven eight nine ten eleven twelve thirteen fourteen fifteen sixteen seventeen eighteen nineteen twenty thirty forty fifty sixty seventy eighty ninety hundred |
My nieces are doubly blessed with children under 10 years old and near-infinite patience. So, after a couple of months of prodding, I received a three-minute audio file for each child.
Now my problem was how to edit them. I needed to normalize the recordings, reduce noise, and chop them into audio clips for individual words and phrases. I also wanted to take advantage of lossless audio, and I decided to convert the tracks to Waveform Audio File Format (WAV). Audacity was just the open source tool to do all of that.
Audacity to the rescue!
Audacity is a feature-rich open source sound-editing tool. The software's features and capabilities can be overwhelming, so I'll describe the workflow I followed to accomplish my goals. I make no claims to being an Audacity expert, but the steps I followed seemed to work pretty well. (Comments are always welcome on how to improve what I've done.)
Audacity has downloads for Linux, Windows, and macOS. I grabbed the most recent macOS binary and quickly installed it on my laptop. Launching Audacity opens an empty new project. I imported all of the children's audio files using the Import feature.

(Rich Lucente, CC BY-SA 4.0)
Normalizing audio files
Some of the children spoke louder than others, so the various audio files had different volume levels. I needed to normalize the audio tracks so that the greeting's volume would be the same regardless of which child was speaking. To normalize the volumes, I began by selecting all of the audio tracks after they were imported.
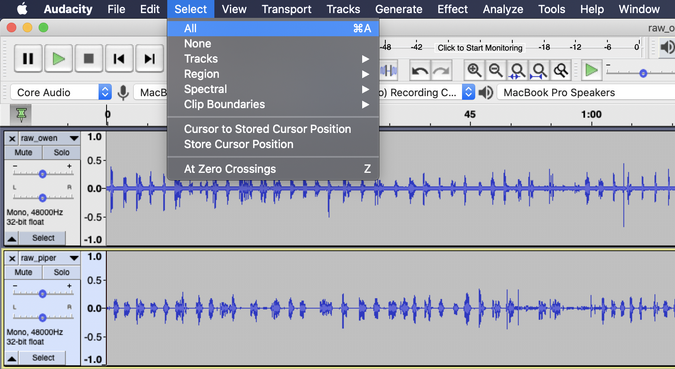
(Rich Lucente, CC BY-SA 4.0)
To normalize the children's peaks and valleys, so one child wasn't louder than the other, I used Audacity's Normalize effect.
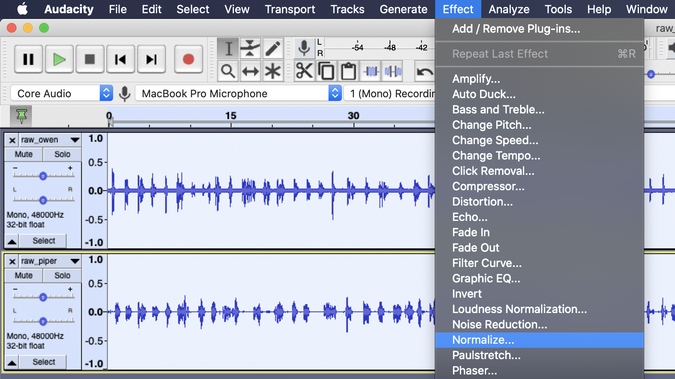
(Rich Lucente, CC BY-SA 4.0)
It's important to understand that the Normalize and Amplify effects do very different things. Normalize adjusts the highest peaks and lowest valleys for multiple tracks, so they are all similar, whereas Amplify exaggerates the existing peaks and valleys. If I had used Amplify instead of Normalize, the louder child would have become even louder. I used the default settings to normalize the two audio tracks.
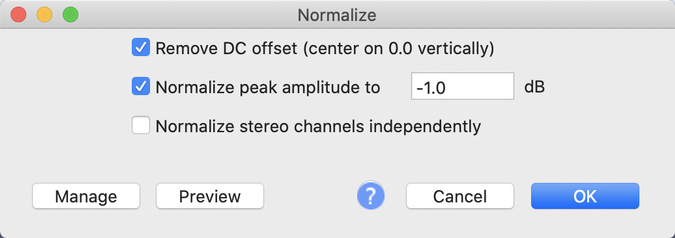
(Rich Lucente, CC BY-SA 4.0)
Remove background noise
Another thing I noticed is that there was noise between the spoken phrases on the tracks. Audacity has tooling to help reduce background noise and result in much cleaner audio. To reduce noise, select a sample of an audio track with background noise. I used the View->Zoom menu option to see the track's noise more easily.
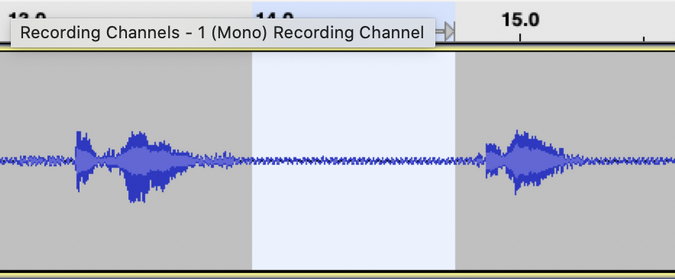
(Rich Lucente, CC BY-SA 4.0)
To make sure I selected only the background noise, I listened to the selected audio clip using the Play button in the toolbar. Next, I selected Effect->Noise Reduction.
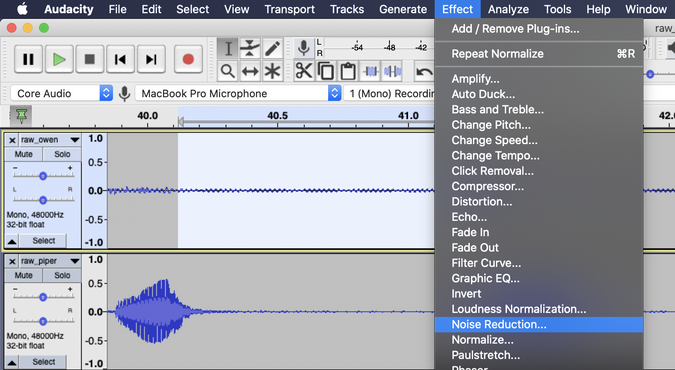
<p class="rtecenter"><sup>(Rich Lucente, <a href="https://opensource.com/%3Ca%20href%3D"https://creativecommons.org/licenses/by-sa/4.0/" rel="ugc">https://creativecommons.org/licenses/by-sa/4.0/" target="_blank">CC BY-SA 4.0</a>)</sup></p>
Then I created a Noise Profile using step 1 in the Noise Reduction dialog.
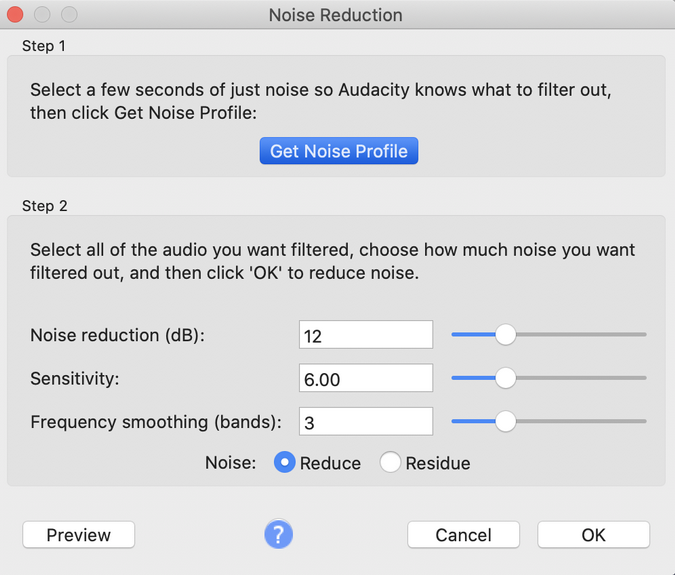
(Rich Lucente, CC BY-SA 4.0)
Audacity characterizes the background noise in the audio sample so that it can be removed. To remove the background noise, I selected the entire audio track by pressing the small Select button to the left of the track.
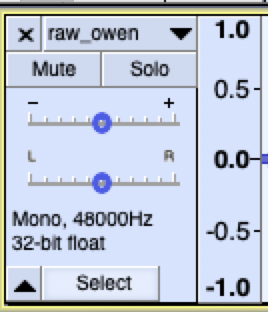
(Rich Lucente, CC BY-SA 4.0)
I applied the Noise Reduction effect again, but this time I pressed OK in step 2 of the dialog. I accepted the default settings.
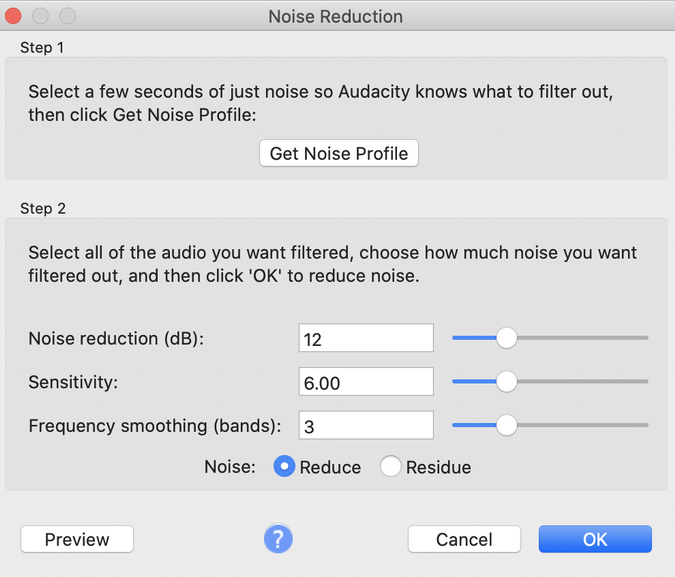
(Rich Lucente, CC BY-SA 4.0)
I repeated these steps for each child's audio track, so I had normalized audio tracks, and the background noise was characterized and removed.
Export the clips as WAV files
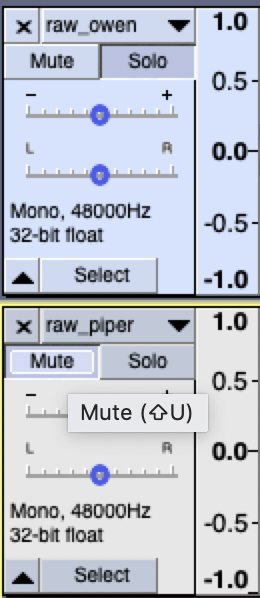
The remaining task was to zoom and scroll through each track and export the specific clips as separate audio files in WAV format. When working with one child's track, I needed to mute the other tracks using either the small Mute button to the left of each audio track or, since there were so many tracks, selecting the Solo button for the track I wanted to work with.
(Rich Lucente, CC BY-SA 4.0)
Selecting each word and phrase can be tricky, but the ability to zoom into an audio track was my friend. I tried to set each audio clip's start and end to just before and just after the word or phrase being spoken. Before exporting any audio clips, I played the selected clip using the Play icon on the toolbar to make sure I got it all.
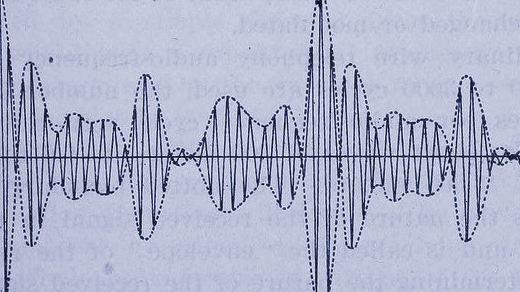
One interesting thing is how waveforms map to spoken words. The waveforms for "six" and "sixth" are incredibly similar, with the latter having a smaller audio waveform to the right for the "th" sound. I carefully tested each clip before exporting it to make sure I had captured the full word or phrase.
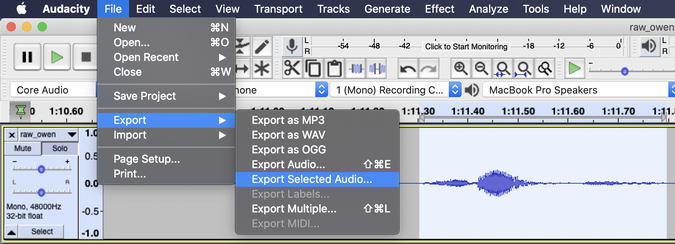
After selecting an audio clip for a word or phrase, I exported the selected audio using the File->Export menu.
(Rich Lucente, CC BY-SA 4.0)
I had to make sure to save each clip using the correct file name from the list of words and phrases. This is because the application I used to customize the voice assistant expects the file name to match an entry in the phrase list.
The expected file names for the audio clips (without the .wav extension) are listed below. Note the underscores within the phrases. If you're doing this project, adjust the bold file names to match your loved ones' nicknames and location preferences. You'll also have to make the same changes in the application source code.
| good morning afternoon evening night nana_and_poppy the_time today the_current_temperature_for waynesboro ocean_city is and degrees minus am pm january february march april may june july august september october |
november december first second third fourth fifth sixth seventh eighth ninth tenth eleventh twelfth thirteenth fourteenth fifteenth sixteenth seventeenth eighteenth nineteenth twentieth thirtieth oh one two |
three four five six seven eight nine ten eleven twelve thirteen fourteen fifteen sixteen seventeen eighteen nineteen twenty thirty forty fifty sixty seventy eighty ninety hundred |
This project's GitHub repository also includes a Bash script to run as a sanity check for any missing or misnamed files.
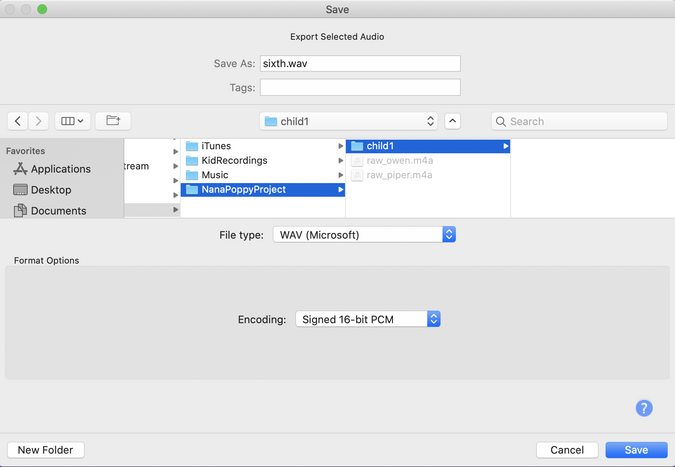
After choosing each clip's appropriate name, I saved the clip in the child's specific folder (child1, child2, etc.) as a WAV format file. I accepted the default export settings.
(Rich Lucente, CC BY-SA 4.0)
After exporting all the audio clips, I had a folder for each child that was fully populated with WAV files for the phrases above. This seems like a lot of work, but it took only about 90 minutes for each child, and I got way more efficient with each successive audio clip.
Package the application
Now that I had the audio clips for the greeting, I needed to think about the application and how to package it. I also wanted an open source-friendly solution that was open to modification.
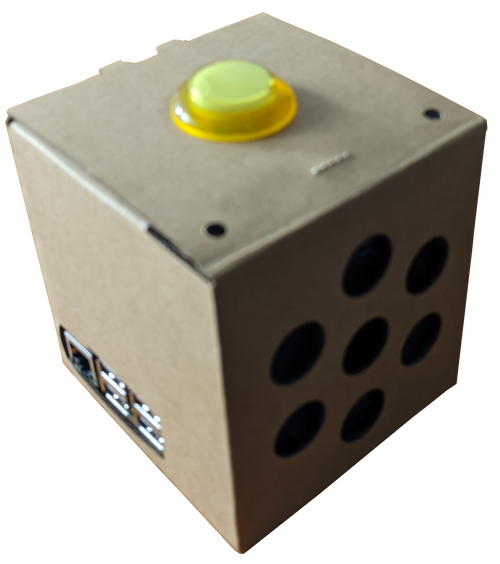
About two years ago, a colleague gave me a Google AIY Voice Kit that he grabbed from the clearance bin for just $10. It's a cleverly folded box containing a speaker, microphone, and custom circuit board. You supply a Raspberry Pi and quickly have a do-it-yourself Google voice assistant. These kits are available for purchase online and in electronics stores. This small box offered an easy way to package the project.
(Rich Lucente, CC BY-SA 4.0)
Customize the voice assistant
The Google kit includes a Python API and several Python modules. I followed the kit's instructions to get the initial configuration working. The Google Assistant gRPC software is open source under an Apache 2.0 license.
I adapted the Google Assistant gRPC demo to implement my application. The application's operation is fairly simple: First, it waits for the device's button to be pressed. The code then constructs four separate word lists for: 1. the greeting and date, 2. the current time, 3. the current temperature of the first location, and 4. the current temperature of the second location. The children's voices are randomly shuffled, and then each word list is used to play the audio clips corresponding to the child assigned to that list. (This is why it was important to strictly follow the naming convention for the audio clips.) The application then initiates a conversation with the Google Assistant API.
At first, I thought the code to gather weather data for the current temperature and convert numbers to words would be challenging. This proved not to be the case at all. In fact, existing open source Python modules made it all simple and intuitive.
There were two cases to be addressed for converting numbers to word lists: I needed to convert ordinal numbers to words (e.g., 1 and 2 to first and second), and I also needed to convert cardinal numbers to words (e.g., 28 to twenty-eight). The open source inflect.py module has functions that handle both cases quite easily.
import inflect

p = inflect.engine()
number = 23

# get a cardinal word list (e.g. ['twenty', 'three'])
print(p.number_to_words(number).replace('-', ' ').split(' '))

# get an ordinal word list (e.g. ['twenty', 'third'])
print(p.number_to_words(p.ordinal(number)).replace('-', ' ').split(' '))
The inflect engine returns string representations of the numbers with embedded hyphens (e.g., twenty-three) so that the code splits the strings into variable-length word lists by converting the hyphens to spaces and splitting the string into a list using a space as the delimiter.
The next problem to solve was getting the current temperature for the two locations. Open Weather Map offers a free-tier weather service that allows up to 60 calls a minute or 1 million calls a month, which is way more than this project needs. I signed up for the free-tier service and received an API key. It was very easy to access the service by using the open source Python wrapper module PyOWM. Here is a simplified code snippet:
import pyowm

# use the OpenWeatherMap API key to get a weather manager
owm = pyowm.OWM('YOUR-OPEN-WEATHER-MANAGER-API-KEY')
mgr = owm.weather_manager()

# convert location phrase to city for OWM API
# e.g. ocean_city becomes 'Ocean City, US'
location = 'ocean_city'
city = location.replace('_', ' ').title() + ', US'

# get current temperature in fahrenheit for location
observation = owm_mgr.weather_at_place(city)
temp = round(observation.weather.temperature('fahrenheit')['temp'])
Wrapping it up with a bow
The full source code for the project is available in my GitHub repository. The project includes a systemd service unit file adapted from Google's demo to automatically start the application on device boot. The GitHub repository includes instructions to install the Python modules and configure the systemd service.
I created a short video of the result. Five custom voice assistants were distributed during the holidays: one each for the great grandparents and grandparents of each child. For some, these gifts brought tears of joy. The children's voices are absolutely adorable and these boxes capture a fleeting moment of childhood that can be enjoyed for a very long time.




Comments are closed.