

Last month I decided to kick off a new Raspberry Pi project, since it's been a bit too long since my last few (See: Christmas lights and Musicbox).
For a few months now, I've been wanting to play around with a Raspberry Pi Touchscreen, and I've been meaning to buy the Pi Camera as well. I went ahead and ordered them both from Adafruit. (I went with the 3.5" PiTFT touchscreen.)
Once they arrived, I started to do some reading online on how to get them installed. The PiTFT requires you to customize your Raspbian install a bit, but the directions were pretty straightforward and I only had a couple of issues. First, I didn't have the screen seated well enough on the GPIO pins and it didn't turn on. The other one was a bit more complicated. If I used lightdm to auto-login into LXDE, the screen would go black right after the boot screen. If I logged into just a console (i.e., disabled lightdm) everything would work fine.
The fix ended having to tell Xorg to use /dev/fb1 as the display device, and to do that you should do the following:
Install framebuffer driver:
sudo apt-get install xserver-xorg-video-fbdev
Create file: /usr/share/X11/xorg.conf.d/99-fbdev.conf
Section "Device"
 Identifier "myfb"
 Driver "fbdev"
 Option "fbdev" "/dev/fb1" EndSection
(Source)
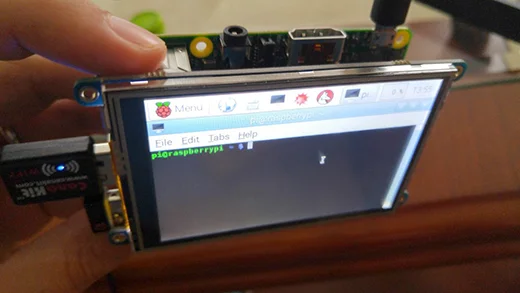
This should allow lightdm to start up and auto-login to Xorg on your Raspberry Pi, as shown in the picture below.
Overall the PiTFT is nice enough for the price, but I found the sensitivity of the touchscreen to be sub-optimal. I haven't tried to see if there is a way to tune it yet, but I will eventually.
To install the PiCam, I just searched on YouTube for a tutorial and made sure I enabled it on the raspi-config cli program. Like the touchscreen, I feel like I didn't plug in the camera quite right the first time around, so I had to adjust the ribbon a bit. One other thing that I did (I can't recall if it was on any of the instructions) was to enable SPI via raspi-config.
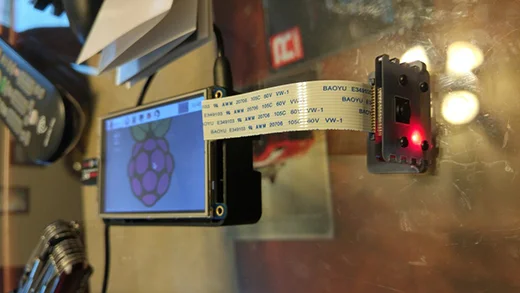
The picture below shows the PiCam up and running.
The Raspberry Pi comes with a few tools that allows you to interact with the camera. See them on RaspberryPi.org.
The CLI tools are nice, but I wanted to take it one step further. I wanted to be able to move around with the Pi, and possibly stream live video from the PiCam. (Note: This is not my original idea, other people have done this before, I just wanted to do it too.)
The next step was to try to find something a bit more user friendly than CLI commands for me to do the streaming with. For now, I've settled on the Pi Cam Web Interface project.
Again, instructions were pretty straightforward, although it worked better using Apache as a web server than Ngnix. Given memory is limited, and Ngnix is known for its small memory foot print, I definitely want to try re-installing this using Ngnix again in the near future. It is also worth reminding everyone that after installing Pi Cam Web Interface, you have set it to auto-boot. You still have to start up the camera via the RPi_Cam_Web_Interface_Installer.sh. I am sure there is a way to make the camera auto-start as well, I just haven't taken the time to do it.
With Pi Cam Web Interface working, you can easily view live streams from your Pi Cam by hitting the IP/URL of your Raspberry Pi on a browser within your network (or local host if on the Pi itself).
The last piece of the puzzle was setting up the Pi in a way that I could kick off the local browser via touch screen so I can start seeing the video. I decided to install Chromium on the Pi and run it in kiosk mode against localhost. It works really well.
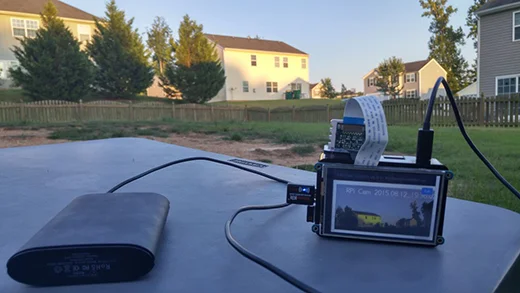
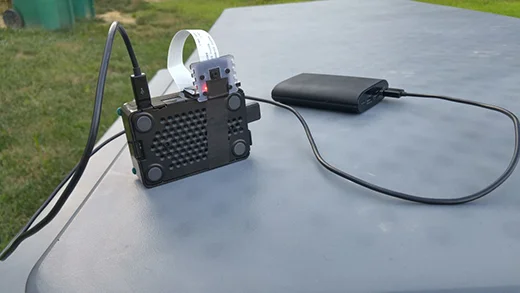
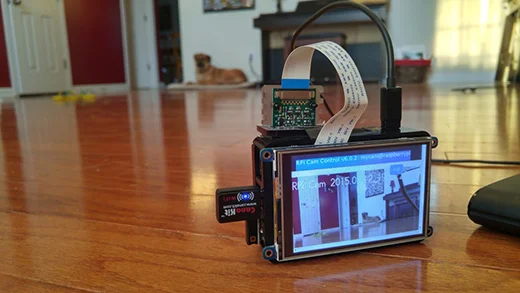
The final product. Mounted PiCam on a Raspberry Pi 2 and PiTFT screen running on battery power.
Oh, and of course the battery. I am using an Anker 12000mah external battery which is pretty massive and heavy. I think for demonstration purposes it may be worth picking up a smaller one some time in the future just to show how compact this project can really be. The case you see in my pictures is just the standard case that comes with the Raspberry Pi 2 when you back one with the Canakit.
And that's the project so far! It has been a lot of fun, and I've learned a few more things about the capabilities of the Raspberry Pi. I still have quite a few things I want to improve on this particular project, including:
- Hide "Reboot/Shutdown" server from the Pi Cam Web Interface so I can share live streams with friends without having to worry they are going to troll the server.
- Make the camera start up under Pi Cam Web Interface automatically after reboot, instead of manually as I am doing now.
- Auto start Chromium in Kiosk mode. (Right now you have to tap on an icon).
- Possibly shorter cable and smaller battery.
- Some memory tuning: use Ngnix, tune RAM usage with raspi-config, possibly kill off other processes that may not be in use, etc.
One final and somewhat unrelated thought: I became interested on the PiTFT because I wanted to be able to start and stop my Christmas light show without needing network connectivity or a "normal" monitor around. Given the connectors for this PiTFT plugs over the entire GPIO port, I am going to have to figure out how to map the pins needed for the PiTFT to work, while using the other pins for the light show, but that's the subject of a future project.


7 Comments