I've learned that video tutorials are a great way to teach my students, and open source tools have helped me take my video-production skills to the next level. This article will explain how to get started and add artfulness and creativity to your video tutorial projects.
I'll describe an end-to-end workflow for making video tutorials using open source tools for each subtask. For the purposes of this tutorial, making a video is the "task," and the various steps to make the video are the "subtasks." Those subtasks are video screen capture, video recording, video editing, audio recording, and effort estimation. Other tools include hardware such as cameras and microphones. My workflow also includes effort estimation as a subtask, but it's more of a general skill that parallels the idea of effort estimation when developing software.
My workflow involves recording the bulk of the video content as screen capture. I record supporting video material (known as B-roll) using a smartphone, as it is a cheap, ubiquitous video camera. Then I edit the materials together into shot sequences using a video editor.
Advantages of video tutorials
There are many reasons to record video tutorials. Some people prefer learning with video than with text like web pages and manuals. This preference may be partly generational—my students tend to prefer (or at least appreciate) the video option.
Some modalities, like graphical user interfaces (GUIs), are easier to demonstrate with video. Video tutorials also work well for documenting open source software. Showing a convenient, standard workflow for producing software demonstration videos makes it easier for users to learn new software.
Teaching people how to make videos can help increase the number of people participating in open source software. Enabling users to record themselves using software helps them share their knowledge. Teaching people how to do basic screen capture is a good way to make it easier for users to file bug reports on open source software.
Educators are increasingly turning to tutorial videos as a way to deliver course content asynchronously. The most direct way to transition to an online classroom is to lecture over a videoconference system. Another option is the flipped classroom, which "flips" the traditional teaching method (i.e., in-class teaching followed by independent homework) by having students watch a recorded lecture on their own at home and using classroom time as a live, synchronous, interactive session for doing independent and project work. While video technologies have been evolving in the classroom for some time, the Covid-19 pandemic strongly motivated many educators, like my colleagues at the University of St. Thomas and me, to adopt video techniques when Covid-19 forced schools to close.
Previously, I worked at the University of Southern California Annenberg School of Communications and Journalism, which offered a project and an app to help citizen journalists produce higher-quality video. (A citizen journalist is not a professional journalist but uses their proximity to current events to document and share their experiences). Similarly, this article aims to help you produce artful, quality video tutorials even if you are not a professional videographer.
Screen capture
Screen capture is the first subtask in making a video tutorial. I use the Open Broadcaster Software (OBS) suite. OBS started as a way to stream video games and has evolved into a general-purpose tool for video recording and live streaming. It is programmed using Qt, which allows it to run on different operating systems. OBS can capture content as a video file or as a live stream, but I use it to capture to a video file for creating video tutorials.
Screen capture is the natural starting place for creating things like a video tutorial for a piece of software. Still, OBS is also useful for tutorials that use physical objects, like electronics or woodworking. A simple use is to record a presentation, but it also supports webcams and switching views to combine multiple webcams and screen captures. In fact, you can combine a simple presentation with a tutorial; in this case, the presentation slides provide structure to the other tutorial content.
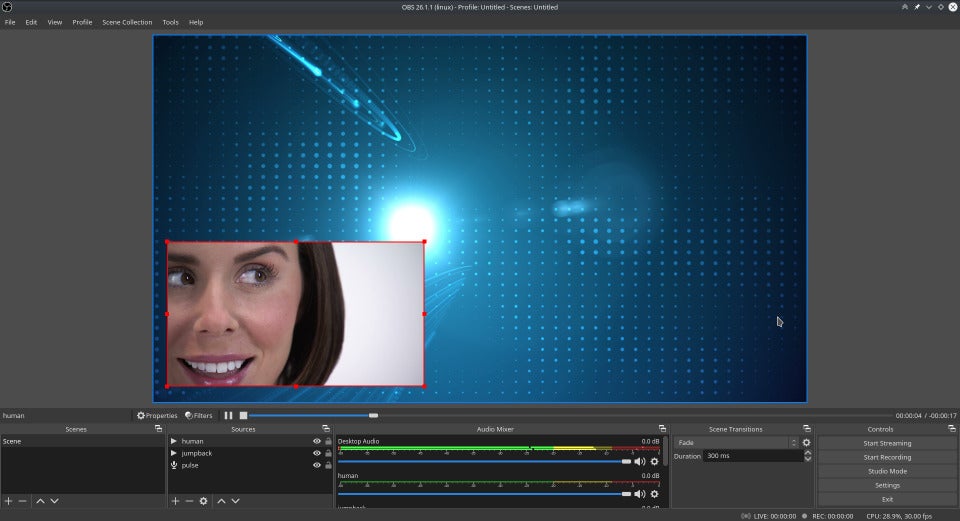
The main abstractions in OBS are scenes, and these scenes are made up of sources. Sources are any basic video inputs, including webcams, entire desktop displays, individual applications, and static images. Scenes are composed of one or more sources. Any individual source can be a scene, but the power and creativity of scenes come from combining sources. An example of a composite scene with two sources would be a video-captured presentation with a "talking head"—i.e., a small window inset inside the larger display with the presenter's face recorded from a webcam. In some cases, the "talking head" can help the presenter engage with the audience better, and it serves as an extra channel of information to go along with the speech's audio.
This example implements a three-scene setup: one scene is the webcam, another scene is a full desktop display capture, and the third is the display capture with a webcam video inset.
If you are using a new OBS installation, you'll see a single blank scene called "Scene" without any sources in the lower-left corner. If you have an existing OBS installation, you can start fresh by creating a new scene collection from the Scene Collection menu.
Start by renaming the first scene Face by right-clicking the scene and selecting Rename. Then add the webcam as a source by selecting the + under Sources, choosing Video Capture Device, and clicking Create New. Set the name to Webcam, and click OK. This opens a screen where you can select and preview the webcam to make sure it's working (which is very useful if you have more than one webcam). After you select the webcam and click OK, you need to resize it. This can be done manually, but it is easier to right-click, select Transform, and select Fit to Screen.
An aside on naming scenes and sources: I like to make logical distinctions between scenes (which I give abstract names like Face) and sources (which I give concrete names like Webcam #1). A naming convention like this is useful when you have multiple scenes and sources. You can always rename scenes and sources by right-clicking and selecting Rename, so don't worry much about naming at this stage.
Add the second scene by clicking on the + button below the scenes area. Name it Desktop (or another name that describes this screen if you have a multiple-monitor setup). Then, under Sources, click + and select Display Capture. Select the display you want to capture (you only have one option if you have one monitor). Resize the video to fit the screen by right-clicking the Transform option. If you have one monitor, you should see a trippy, recursive view of the screen capture within a screen capture within a screen capture into infinity.
For the third scene, you can use a shortcut by duplicating the last scene and adding an inset webcam. To do this, right-click on the last scene, select Duplicate, and name it Desktop with Talking Head (or something similar). Then add another source for this scene by clicking + under Sources when this source is selected, selecting Video Capture Device, and choosing your webcam under Add Existing (instead of Create New, like before). Instead of fitting the webcam to the whole screen, this time, move and stretch the webcam so that it is in the lower-right corner. Now you'll have the desktop and the webcam in the same scene.
Now that the screen capture setup is finished, you can start making a basic software tutorial. Click Start Recording in the lower-right corner under Controls, record whatever you want to show in your tutorial, and use the scene selector to control what source you are recording. Changing scenes is like making a cut when editing a video, except it happens in real time while you are doing the tutorial. Because scene transitions in OBS happen in real time, this is more time-efficient than editing your video after the fact, so I recommend you try to do most of the scene transitions in OBS.
I mentioned above that OBS recursively captures itself in a way that can best be described as "trippy." Seeing OBS in the screen capture is fine if you are demonstrating how OBS works, but if you are making a tutorial about anything else, you will not want to capture the OBS application window. There are two ways to avoid this. First, if you have a second monitor, you can capture the desktop environment on one monitor and have OBS running on the other. Second, OBS allows you to capture from individual applications (rather than the entire desktop environment), so you can specify which application you want to show in your video.
When you are finished recording, click Stop Recording. To find the video you recorded, use the File menu and select Show Recordings.
OBS is a powerful tool with many more features than I have described. You can learn more about adding text labels, streaming, and other features in Linux video editing in real time with OBS Studio and How to livestream games like the pros with OBS. For specific questions and technical issues, OBS has a great online user forum.
Editing video and using B-roll footage
If you make mistakes when recording the screen capture or want to shorten the video, you'll need to edit it. You also might want to edit your video to make it more creative and artful. Adding creativity is also fun, and I believe having fun is necessary for sustaining your effort over time.
For this how-to, assume the screen capture video recorded in OBS is your main video content, and you have other video recorded to enhance the tutorial's creative quality. In cinema and television jargon, the main content is called "A-roll" footage ("roll" refers to when video was captured on rolls of film), and supporting video material is called "B-roll." B-roll footage includes the surrounding environment, hands and pointing gestures, heads nodding, and static images with logos or branding. Editing B-roll footage into the main A-roll footage can make your video look more professional and give it more creative depth.
A practical use of B-roll footage is to prevent jump cuts, which can happen when editing two similar video clips together. For example, imagine you make a mistake while doing your screen capture, and you want to cut out that part. However, this cut will leave an awkward gap—the jump cut—between the two clips after you remove the mistake. To remove that gap, put a short clip of B-roll material between the two parts. That B-roll shot placed to fill the cut is called a cutaway shot ( here, "shot" is used as a synonym of "clip," from the verb "shooting" a movie).
B-roll footage is also used to build shot sequences. Just like software engineers build design patterns from individual statements, functions, and classes, videographers build shot sequences from individual shots or clips. These shot sequences enhance the video's quality and creativity.
One of these, called the five-shot sequence, makes a good opening sequence to introduce your video tutorial. As the name suggests, it consists of five shots:
- A close up of your hands
- A close up of your face
- A wide shot of the environment with you in it
- An over-the-shoulder shot showing the action as if your audience is watching over your shoulder
- A creative shot to capture an unusual perspective or something else the audience should know
This example shows what this looks like.
Showing pictures of yourself doing the activity can also help people better imagine doing it. There is a body of research about so-called "mirror neurons" that fire when observing another person's actions, especially hand movements. The five-shot sequence is also a pattern used by professional video journalists, so using it can give your video an appearance of professionalism.
In addition to these five B-roll shots, you may want to record yourself introducing the video. This could be done in OBS using the webcam, but recording it with a smartphone camera gives you options for different views and backgrounds.
Record your B-roll footage
You can use a smartphone camera to capture B-roll footage for the five-shot sequence. Not only are they ubiquitous, but smartphones' connectedness makes it easy to use filesharing applications to sync your video to your editing application on your computer.
You will need a tripod with a smartphone holder if you are working alone. This allows you to set up the recording without having to hold the phone in your hand. Some tripods come with remote controls that allow you to start and stop recording (search for "selfie tripod"), but this is just a convenience. Using the smartphone's forward-facing "selfie" camera can help you monitor that the camera is aimed properly.
There will be material at the beginning and end of the recorded clip that you need to edit out. I prefer to record the five clips as separate files, and sometimes I need multiple takes to get a shot correct. A movie-making "clapper" with a dry-erase board is a piece of optional equipment that can help you keep track of B-roll footage by allowing you to write information about the shot (e.g., "hand close up, take 2"). The clapper functionality—the bar on top that makes the clap noise—is useful for synchronizing audio. This helps if you have multiple cameras and microphones, but in this simple setup, the clapper's main utility is to make you look like a serious auteur.
Once you have recorded the five shots and any other material you want (e.g., a spoken introduction), copy or sync the video files to your desktop computer to begin editing.
Edit your video
I use OpenShot, an open source video editor. Like OBS, it is programmed in Qt, so it runs on a variety of operating systems.
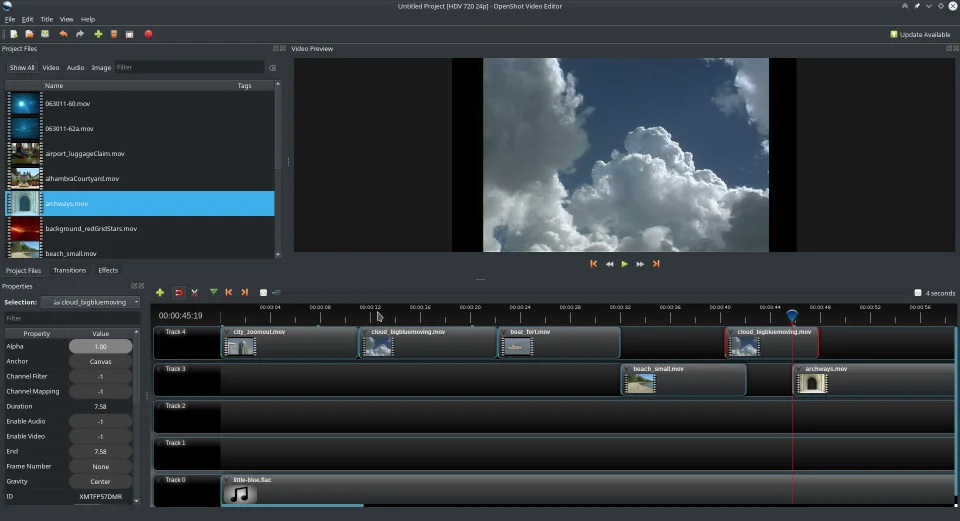
Tracks are OpenShot's main abstraction, and tracks can be made up of clips of individual project files, including video, audio, and images.
Start with the five clips from the five-shot sequence and the video captured from OBS. To import the clips into OpenShot, drag-and-drop them into the project files area. These project files are the raw material that go into the tracks—you can think of this collection as a staging area similar to a chef collecting ingredients before cooking a dish. The clips don't need to be edited: you can edit them using OpenShot when you add them into the final video.
After adding the five clips to the project files area, drag and drop the first clip to the top track. The tracks are like layers, and the higher-numbered tracks are in front of the lower-numbered tracks, so the top track should be track four or five. Ideally, each shot of the five-shot sequence will be about two or three seconds long; if they are longer, cut out the parts you don't want.
To cut the clip, move the cursor (the blue marker on the timeline) to the place you want to cut. Right-click on the blue cursor, select Slice All, and then select which side you want to keep. Once you trim the clip, add the next clip to the same track, and give a bit of space after the first clip. Trim the second clip like you did the first one. After you trim both clips, slide the first clip all the way to the left to time zero on the timeline. Then, drag the second clip over the first clip so that the beginning of the second clip overlaps the end of the first clip. When you release the mouse, you'll see a blue area where the clips overlap. This blue area is a transition that OpenShot adds automatically when the clips overlap. If the overlap is not quite right, the easiest way to fix it is to separate the clips, delete the transition (select the blue area and hit the Delete key), and then try again. OpenShot automatically adds a transition where the shots overlap, but it won't automatically delete it when they are separated. Continue by trimming and overlapping the remaining shots of the five-shot sequence.
You can do a lot more with OpenShot transitions, and OpenShot's user guide can help you learn about the options.
Finally, add the screen capture video clip from OBS. If necessary, you can edit it in the same way, by moving the blue cursor in the timeline to where you want to trim, right-clicking the blue cursor, and selecting Slice All. If you need to keep both sides of the slice—for example, if you want to cut out a mistake in the middle of the video—make a slice on either side of the mistake, keep the sides, and delete the middle. This may result in a jump shot; if so, insert a clip of B-roll footage between them. I've found that a closeup shot of hands on the keyboard or an over-the-shoulder shot are good cutaways for this purpose.
This example didn't use them, but the other tracks in OpenShot can be used to add parallel video tracks (e.g., a webcam, screen capture in OBS, or material recorded with a separate camera) or to add extra audio, like background music. I've found that using a single track is most convenient for combining clips for the five-shot sequence, and using multiple tracks is best for adding a separate audio track (e.g., music that will be played throughout the whole video) or when multiple views of the same action are captured separately.
This example used OBS to capture two sources, the webcam and the screen capture, but it was all done with a single device, the computer. If you have video from another device, like a standalone camera, you might want to use two parallel tracks to combine the camera video and the screen capture. However, because OBS can capture multiple sources on one screen in real time, another option would be to use a second webcam instead of a standalone video camera. Doing all the recording in OBS and switching scenes while doing the screen capture would enable you to avoid after-the-fact editing.
Recording and editing audio
For the audio component of the recording, your computer's built-in microphone might be fine. It is also simpler and saves money. If your computer's built-in microphone is not good enough, you may want to invest in a dedicated microphone.
Even a high-quality microphone can produce poor audio quality if you don't take some care when recording it. One issue is recording in different acoustic environments: If you record one part of the video in a completely silent environment and another part in an environment with background noise (like fans, air conditioners, or other appliances), the difference in acoustic backgrounds will be very apparent.
You might think it is better to have no background noise. While this might be true for recording music, having some ambient room noise can even out the differences between clips recorded in different acoustic environments. To do this, record about a minute of the ambient sound in the target environment. You might not end up needing it, but it is easier to make a brief audio recording at the outset if you anticipate recording in different environments.
Audio compression is another technique that can help you fix volume issues if they arise. Compression helps reduce the differences between quiet and loud audio, and it has settings to not amplify background noise. Audacity is a useful open source audio tool that includes compression.
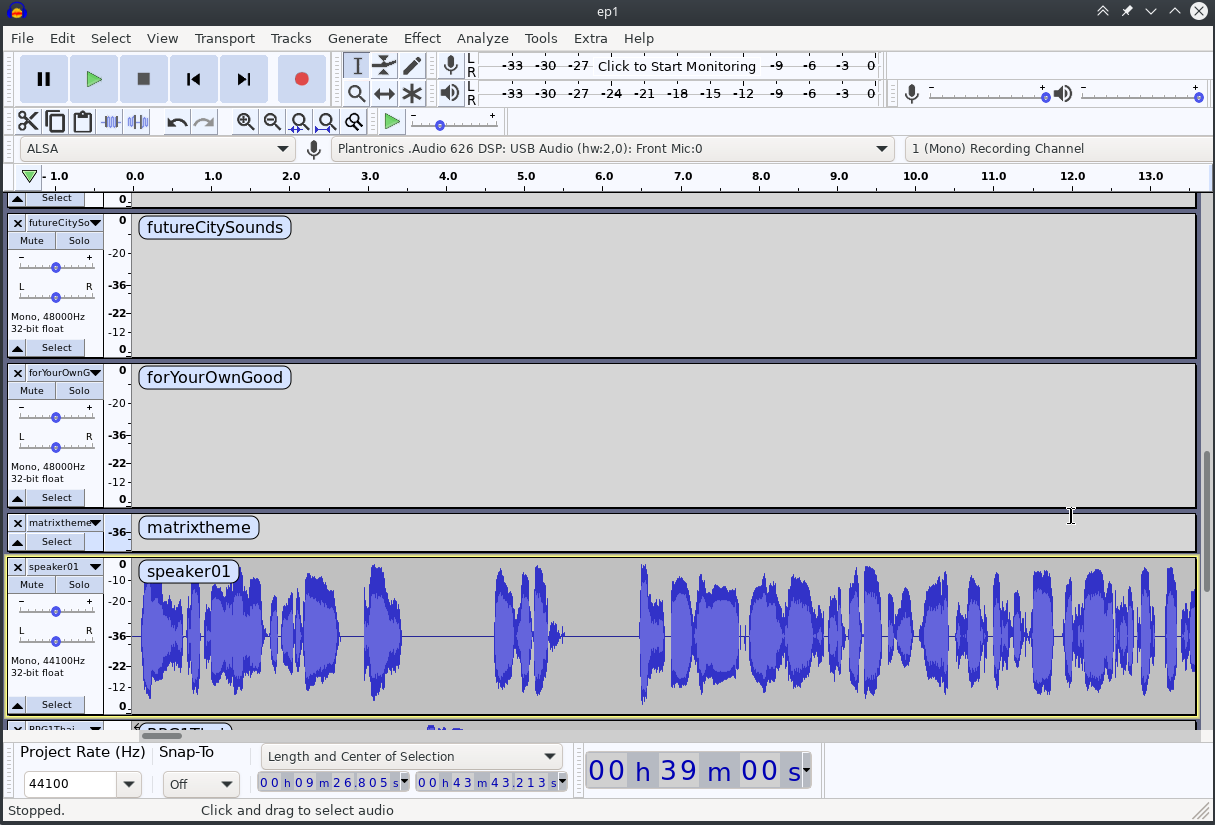
Using a clapper is helpful if you plan to edit multiple simultaneous audio recordings together. You can use the sharp peak in audio volume from the clapper to synchronize different tracks because the clapping noise makes it easier to line up the different recordings.
Estimation and planning
A related issue is estimating the time and effort required to finish tasks and projects. This can be hard for many reasons, but there are some general rules of thumb that can help you estimate the time it will take to complete a video production project.
First, as I noted, it is easier to use OBS scene transitions to switch views while recording than to edit scene transitions after the fact. If you can capture transitions while recording, you have one less task to do while editing.
Another rule of thumb is that as the amount of recorded material increases, it takes more time and effort in general. For one, recording more material takes more time. Also, more material increases the overhead of organizing and editing it. Conversely and somewhat counterintuitively, given the same amount of raw material, a shorter final project will generally take more time and effort than a longer final project. When the amount of input is constant, it is harder to edit the content down to a shorter product than if you have less of a constraint on the final video's length.
Having a plan for your video tutorial will help you stay on track and not forget any topics. A plan can range from a set of bullet points to a mindmap to a full script. Not only will the plan help guide you when you start recording, it can also help after the video is done. One way to improve your video tutorial's usefulness is to have a video table of contents, where each topic includes the timestamp when it begins. If you have a plan for your video—whether it is bullet points or a script—you will already have the video's structure, and you can just add the timestamps. Many video-sharing sites have ways to start playing a video at a specific point. For example, YouTube allows you to add an anchor hashtag to the end of a video's URL (e.g., youtube.com/videourl#t=1m30s would start playback 90 seconds into the video). Providing a script with the video is also useful for deaf and hard-of-hearing viewers.
Give it a try
One great thing about open source is that there are low barriers to trying new software. Since the software is free, the main costs of making a video tutorial are the hardware—a computer for screen capture and video editing and a smartphone to record the B-roll footage.
Acknowledgments: When I started learning about video, I benefited greatly from help from colleagues,*friends, and acquaintances. The University of St. Thomas Center for Faculty Development sponsored this work financially and my colleague Eric Level at the University of St. Thomas gave me many ideas for using video in the classrooms where we teach. My former colleagues Melissa Loudon and Andrew Lih at USC Annenberg School of Communications and Journalism taught me about citizen journalism and the five-shot sequence. My friend Matthew Lynn is a visual effects expert who helped me with time estimation and room-tone issues. Finally, the audience in the 2020 Southern California Linux Expo (SCaLE 18x) Graphics track gave me many helpful suggestions, including the video table of contents.






2 Comments